


The Legend of Zelda wouldn’t be much without a vast array of interesting enemies to slaughter, would it? Spirit Tracks has a total of 57 enemies to take down, including enemies encountered when travelling on the Spirit Train. Below is a complete list of the enemies you’ll cross paths with along your journey.
Table of Contents
Bees
Hits to Defeat: N/A
Damage Dealt: 1/2 Heart
These bees will mind their business – until you harm their hive. Once they start swarming you, the only way to escape their wrath is to flee into a house or fling yourself into water. There is no way to combat these tiny terrors.

Spinut
Hits to Defeat: 2
Damage Dealt: 1/2 Heart
Once these enemies spot you, they’ll charge relentlessly. Each contact will cost you, so watch yourself. If Link has a shield equipped, they’ll bounce off without a scratch. Two swings of the sword, and the little monsters are down.

Keese
Hits to Defeat: 1
Damage Dealt: 1/4 Heart
No stranger to the Zelda world, these flying pests are back again to make your travels through caves that much more annoying. One hit will slay them, but watch out for their random flying patterns.

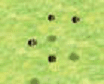
Red ChuChu
Hits to Defeat: 1
Damage Dealt: 1/2 Heart
The weakest and most simple of all the ChuChu family. They move slowly and can be easily defended against using the shield. Poor fellows deserve a much needed break, so put them out of their misery with a quick swing of the sword or hit with the boomerang.

Rat
Hits to Defeat: 1
Damage Dealt: 1/2 Heart
These vermin often hang out in walls and in caves, and love to send Princess Zelda into panic attacks. Good thing they’re easy to defeat! Beware their speed and power in numbers, however.

Phantom
Hits to Defeat: 1 (with powered up sword)
Damage Dealt: 1 Heart
Phantoms are found only in the Tower of Spirits, which is a good thing given their incredible defense. These knights can only be defeated after you collect three Tears of Light and power up your sword. Until then, use your incredible stealth (or guts) to evade them. You are safe from Phantoms in purple, glowing safe stations which are indicated on the map. Zelda can possess any Phantoms you encounter and defeat.

Crow
Hits to Defeat: 1
Damage Dealt: 1/2 Heart
These sneaky enemies hang out on top of trees and wait for you to turn your back before swooping down. Beware, as they love to steal your Rupees! Catch them off guard by turning around just as they leave their treetop safety area.

Vengas
Hits to Defeat: 1
Damage Dealt: 1/2 Heart
These little spider creatures show up only in the Forest Temple. They take only one hit to kill, but they leave a nasty aftertaste. As soon as they’re defeated, they give off a poison that will damage you if you get too close. Use the Whirlwind to blow the poison away.

Bubble
Hits to Defeat: 1 (with bow), 2 (with Whirlwind)
Damage Dealt: 1/2 Heart
These skull creatures don’t actively attack you, but they can still leave a nasty mark. You can’t attack with the sword, so use one of your long-distance weapons (such as the Whirlwind or Bow) to bring the suckers down. But you’re not in the clear just yet! Using the whirlwind requires you to hit their flailing skulls once more.

Mothula
Hits to Defeat: Varied
Damage Dealt: 1/2 Heart
Mothula is reminiscent of a Wizzrobe in that it can conjure up fellow enemies to pursue Link. Mothula can spawn Bubbles. Your strategy will be as follows: Wait for Mothula to conjure up a Bubble, then use your Whirlwind to send it back! While your enemy is stunned, attack with your sword.

Geozard
Hits to Defeat: Many
Damage Dealt: 1/2 Heart
These monsters are some of the toughest to take down. Posessing both a sword and a shield, you can’t just slash willy-nilly at these creatures. Wait for the Geozard to attack, then run around to its back to get a hit in. After the Ocean Temple, you can use the Whip to steal Geozard’s shields. This turns the battle into a quick hack-and-slash!

Mounted Miniblin
Hits to Defeat: 1
Damage Dealt: 1/2 Heart
Exactly what the name entails – a Miniblin mounted upon an Armos Statue. You first encounter these strange creatures in the Tower of Spirits, where you and Zelda must work together to take the Blins down. Jump on Phantom Zelda’s back from a high ledge, then use the Whirlwind to knock the blin off its pedestal. From there, jump off and slash the thing. Alternatively, you can use your whip, boomerang, or bow.

Ice ChuChu
Hits to Defeat: 1
Damage Dealt: 1/2 Heart (contact); 1/4 (frozen)
Ice Chuchus can seem to appear from thin air in snowy areas, so keep your eye out. Contact from these white Chus will freeze you, so keep your distance. Instead, use the boomerang or any other long-distance weapon. If you’re hit, slide the stylus rapidly across the screen to melt.

Blastworm
Hits to Defeat: 1
Damage Dealt: 1/2 Heart
Blastworms only live in the Forest Temple. They look like simple enemies, right? Wrong! These monsters turn into live bombs once striken, so by all means, hit-and-run! The good news is that these enemies can be used to purposefully bomb walls, swtches, blocks, and other enemies. Use your Whirlwind to guide them to their destination.

Key Master
Hits to Defeat: 3
Damage Dealt: 1/2 Heart
Like their name suggests, these giant hands have one mission and one mission only: protect the Boss Key. These enemies will show up in groups as soon as you pick up the Boss Key, so watch out. Seek them out and defeat them with three quick hits of the sword. They reappear after a time, however, so move quickly.

Octorok
Hits to Defeat: 2
Damage Dealt: 1/2 Heart
Octoroks are as classic as you can get! These enemies are the same as ever – they spit rocks out at Link whenever they spot him. Block their rocks with your shield, and then reach your sword out to defeat them.

White Wolfos
Hits to Defeat: 2
Damage Dealt: 1/4 Heart
These canines appear from the snow in groups of three. The fastest of all the enemies, Wolfos will leap at you without mercy. Utilise a quick spin-attack to take them down.

Octive
Hits to Defeat: 1
Damage Dealt: 1/2 Heart
These creatures only appear in the Snow Temple. Similar to Octoroks, Octives will spit out rocks to attack Link. Use your Whirlwind to spit their attacks right back at them. The most satisfying form of revenge!

Freezard
Hits to Defeat: 2
Damage Dealt: 1/2
Freezards slowly slide across icy surfaces, so they aren’t much of a threat. However, hit them with your sword, and they skate around at high speed! The best course of action is to avoid them completely. However, you can use nearby torches and your boomerang to melt them down to regular ol’ Octoroks.

Ice Keese
Hits to Defeat: 1
Damage Dealt: 1/4 Heart
Similar to a garden-variety Keese, but these ones freeze you if you get too close! Skip the sword and use long-distance weapons to take them down.

Fire Keese
Hits to Defeat: 1
Damage Dealt: 1/4
These Keese are invulnerable to sword attacks, so keep your distance. Use your boomerang, bow, or whip to slay these fiery pests.

Nocturn
Hits to Defeat: 1
Damage Dealt: 1/2 Heart
Dark areas may be home to these elusive ghost entities, so watch yourself. If one sees you, take refuge in the light of torches. You can’t attack these ghosties as Link, but Torch Phantom Zelda can slay them with one slash.

Torch Phantom
Hits to Defeat: 1
Damage Dealt: 1 Heart
Similar to regular Phantoms, except that they carry blades on fire. Not that this makes them any more or less of an adversary, but their fiery blades give off light once Zelda posesses one.

Geozard Chief
Hits to Defeat:
Damage Dealt: 1/2 Heart
The King of all Geozards! These enemies have all the elements of a regular Geozard, as well as the ability to breathe streams of fire. Use Phantom Zelda to distract these enemies from the front, while using Link to attack from behind. Alternatively, use your shield and slash like a madman.

Like-Like
Hits to Defeat: Many
Damage Dealt: 1/4 Heart
These gluttonous creatures will suck you up and digest you if you get too close! Instead, lay bombs in their vacuum path and use your boomerang to attack from afar. Keep an eye out for jiggling pots and chests, as they may contain a hiding Like Like ready to suck you into its gullet.

Lobarrier
Hits to Defeat: 1
Damage Dealt: 1/2 Heart
Lobarriers have one huge claw they use to keep Link from passing them. Use your whip to leave them defenseless, then slash with your sword. Alternatively, draw a path behind the crabs and hit them in their vulnerable backside. Once stunned, a quick sword slash’ll get the job done.

Miniblin
Hits to Defeat: 1
Damage Dealt: 1/2 Heart
These tiny enemies present no threat – unless they, as they often do, swarm in numbers. Unleash countless spin attacks to keep the swarms at bay. ‘Course, don’t let Link get dizzy!

Big Blin
Hits to Defeat: Many
Damage Dealt: 1/2 Heart
Defeating a Big Blin takes patience and restraint. Land a few hits in their enormous abdomen, then back off before he swings his club. Don’t lose hope if you’ve been going at it for a long time! They are relentless, with fantastic defense. Keep going until he slumps to his knees. Just don’t let the brute corner you.

Yellow ChuChu
Hits to Defeat: 1
Damage Dealt: 1/2 Heart
These Chuchus have one advantage over Red Chuchus – they periodically become electrically charged! Keep your distance while they’re sparking, and go in for the kill when they’re not. Alternatively, stun them with the boomerang.

Blue ChuChu
Hits to Defeat: 1
Damage Dealt: 1/2 Heart
Unlike the Yellow Chuchu, these enemies are always electrically charged. They cannot be defeated by your boomerang, so make use of objects around you to chuck at the little monsters. Alternatively, use bombs to quickly dispatch them.

Snapper
Hits to Defeat: Many
Damage Dealt: 1/2 Heart
These humanoid creatures have one weapon – their whip. Get too close and they’ll snap you up in their whip. Once you’re captured, slash at the Snapper wildly. Don’t let it snap you up again – just keep going at the enemy until it falls!

Helmet ChuChu
Hits to Defeat: 1
Damage Dealt: 1/2 Heart
You can’t hope to defeat these monsters with their helmets on, so go on and take their only defense with a quick snap of the whip. After they’re demasked, it takes a quick slash of the sword to take them down.

Phantom Eye
Hits to Defeat: 1
Damage Dealt: N/A
These annoying little snitches play the role of security camera for the Phantoms. Don’t let them see you and alert the Phantoms of your presence. Sneak a boomerang trail to hit these enemies long-range. Run over to the stunned eye and slash it with your sword.

Warp Phantom
Hits to Defeat: 1
Damage Dealt: 1 Heart
Warp Phantoms can teleport anywhere in the Tower of Spirits, especially if they hear wind of an intruder. Keep out of Phantom Eye sight, and these phantoms are as threatening as a regular Phantom. They’re defeated in the same way as a garden-variety Phantom, so collect those Tears of Light! If Zelda possesses one of these Phantoms, she can warp to any Phantom Eye.

Fire Baba
Hits to Defeat: 2
Damage Dealt: 1/2 Heart
Living only in the Fire Realm, Fire Babas can spit fire seeds at Link. Use bombs on these deadly plants to quickly dispatch them. In this case, it is highly recommended that you FEED THE PLANT.

Stalfos
Hits to Defeat: Many
Damage Dealt: 1/2 Heart
Stalfos are your nightmare come true – living skeletons! You can’t attack Stalfos directly unless you catch them against a wall or in a corner. Either whip them mercilessly or use bombs to deal with these classic enemies.

Moldola
Hits to Defeat: N/A
Damage Dealt: 1/2 Heart
These electric snake-creatures cannot be defeated by anything, so keep your distance and watch its predictable path.

Heatoise
Hits to Defeat: Many
Damage Dealt: 1/2 Heart
When you first encounter the Heatoise, you’re forced to use a nearby Moldola to stun the charging tortoise before you can attack its head. However, once the bow is obtained, you can simply fire an arrow into the creature’s sensitive head-gem.

Wrecker Phantom
Hits to Defeat: 1
Damage Dealt: 1 Heart
These Phantoms are unsusual in that they turn into wrecking balls whenever Link shows his little intruding face. Keep away from their wrath until you’re ready to let Zelda possess them. As Wrecker Phantom Zelda, she can smash through bomb blocks and Armos statues, among others. She can also stun other Phantoms!

Gerune
Hits to Defeat: Many
Damage Dealt: 1/2 Heart
These sand monsters can only be defeated with the help of your Sand Wand. Aim the beam at the creatures as they flail around the room, until they stiffen up. Immediately run over and pick up the solid sand statue and throw it down several times. Repeat until the monster is slain!
Stalfos Warrior
Hits to Defeat: Many
Damage Dealt: 1/2 Heart
Similar to regular Stalfos, but they have incredible agility and attack with vicious sword attacks. Blast with bombs to bring these swift skeletons down.

Ergtorok
Hits to Defeat: Many
Damage Dealt: 1/2 Heart
Erktoroks resemble Octives, but they live in the dunes of the Sand Realm instead of the icy waters of the Snow Realm. Ergtoroks can move around underground, and their paths are easily traceable. Use your Sand Wand to trap the Ergtorok in a compact sand wall, then slash at the bulging head. Repeat until it poofs.

Moink
Hits to Defeat: N/A
Damage Dealt: 1 Train Heart
You can’t defeat these good-hearted little swine, but you can’t have them hanging out on the tracks, either! Blow your horn to get them to leave the tracks.

Snurgle
Hits to Defeat: 1
Damage Dealt: 1 Train Heart
When you first encounter the Snurgle, you’re forced to scare them away with the train whistle. However, once you get the cannon, you can easily bomb these little monsters with one hit.

Skulltula
Hits to Defeat: 1
Damage Dealt: 1 Train Heart
The classic spider enemy from the past has returned again to make your train rides a little creepier and crawlier. Skulltulas descend from the treetops and hang in your way. One quick hit with the cannon or a quick blow of the whistle will dispatch any Skulltula.

Dark Train
Hits to Defeat: N/A
Damage Dealt: Immediate Death
Dark Trains cannot, under any circumstances, be defeated. It’s best to avoid them completely! Watch their paths on the map when planning your route and plan accordingly. When in danger, slam into reverse and steer away if possible!

Bulbo
Hits to Defeat: 3
Damage Dealt: 1 Train Heart
Bulbos take three hits to defeat, so fire relentlessly at these swine whenever you see them in the distance. They usually appear in pairs or more, so keep firing until every one is slain.

Bulblin
Hits to Defeat: 3
Damage Dealt: 1 Train Heart
Bulbins ride on Bulbos to chase Link while you travel through the fields of New Hyrule. They will fire bomb arrows at you and slam into the sides of your train, so make them pay with quick shots of the cannon. If you see a bomb arrow coming at you, fire back at it with your own cannonball.

Ocean Octorok
Hits to Defeat: 3
Damage Dealt: None
These giant squids can do no damage to your train, but they can temporarily blind you with murky ink. They only appear on the underwater tracks near the Ocean Temple. Defeat them with three hits of the cannon.

Armored Train
Hits to Defeat: N/A
Damage Dealt: Immediate Death
Armored trains, like Dark Trains, cannot be defeated and can only be avoided. However, they are faster, more aggressive, and can kick it into reverse. Armored Trains can outrun the Spirit Train, so be sure to attempt to trick them at junctions by appearing indecisive.

Rocktite
Hits to Defeat: Many
Damage Dealt: 1 Train Heart
Rocktites appear in the caves of New Hyrule and are relatively worthy adversaries. Their weakness lies in their big yellow eye, so aim when its mouth reveals its eye. After a couple of direct hits, the Rocktite will lose its armor and begin to wander the cave as the defenseless eye. Keep firing until it gives up.

Sir Frosty
Hits to Defeat: 2
Damage Dealt:1 Train Heart
These Snowmen are not here to have a good time. Sir Frosties will toss their heads at the train, so fire your cannonballs right back at their heads. Then aim for their torsoes left over.

Cannon Boats
Hits to Defeat: 2
Damage Dealt: 1 Train Heart
The Ocean Realm is the home to relentless pirate boats, which will ambush the Spirit Train in groups of three. They’re not afraid to fire countless cannonballs in your direction, so match their might with your own rainstorm of weaponry.

Tanks
Hits to Defeat: 2
Damage Dealt: 1 Train Heart
Similar to the Cannon Boats of the Ocean Realm, these mobile machines roam the Fire Realm. Blast them to the dirt with your cannonball army until they break down in a fiery pile.

Snurglar
Hits to Defeat: 1
Damage Dealt: 1 Train Heart
Snurglars can be immobilized by your train whistle, so make generous use of it. As soon as it is scared out of its wits, blast it with a cannonball to bring it down to the ground.

Pirates
Hits to Defeat: 2
Damage Dealt: 1 Train Heart
Pirates appear only in the Ocean Realm, but they are tough to beat. They will fire cannonballs at you, and they require two hits to defeat. Simply blast each one twice and meet their cannonballs with your own.

Malgyorg
Hits to Defeat: 1
Damage Dealt: 1 Train Heart
Deep in the Sand Realm, these sand sharks roam under the dunes and charge their unsuspecting prey without mercy. Watch for dorsal fins under the sand, and keep your cannon at the ready. Blast the Malgyorg when it’s in the air, and you’re scot free. Alternatively, blow your whistle to force all of the sharks out of the sand, then blast away!

Tektite
Hits to Defeat: 1
Damage Dealt: 1 Train Heart
Tektites live only in caves, and often in the company of Rocktites. Their only attack is to leap at the Spirit Train. Luckily, they’re easily defeated! So blast away as soon as you see these little monsters, or else they’ll overwhelm you with their numbers.