Obtaining The Rod of Seasons and Winter
Maku Tree’s Guidance: Return to the Maku Tree in Horon Village. He’s regained some strength. He tells you to go north to find the Temple of Seasons.
Northern Horon: Head north from Horon Village. Go west at the fork. You’ll see stairs leading north blocked by a small tree. Use an Ember Seed to burn it down. Go north.
Enter Subrosia: Continue north. You’ll see strange vortexes. These lead to the hidden land of Subrosia. Jump into the vortex.
Subrosia: Explore this lava-filled land. The currency here is Ore Chunks (dig them up with a shovel later or find them lying around). Find the Subrosian Smithy and the Market if you want, but the goal is the Temple of Seasons.
Temple of Seasons: Head to the large temple structure in the central north area of Subrosia. Inside, talk to the spirits of the seasons. Go into the bottom-left room (Winter). Talk to the spirit to get the Rod of Seasons with the Power of Winter.
**(Optional) Shovel: While in Subrosia, find the house with a sign showing a shovel (usually requires navigating west/southwest from the temple area). Inside, a Subrosian wants to trade something for his Shovel. Often you can trade some Ore Chunks or a specific item if you have one from Maple encounters (like a Bomb). Get the Shovel. You can now dig for Ore Chunks, Rupees, Hearts, and find hidden soft soil spots.
Return to Holodrum: Go back to the vortex you used to enter Subrosia and return to Holodrum.
Using Winter: Go east from the vortex area to where a large tree stump sits on a raised platform. Climb the stairs and stand on the stump. Use the Rod of Seasons. The season changes to Winter.
Path to Dungeon 2: The lake to the east is now frozen. Walk across the ice. Enter the cave, which is Snake’s Remains.
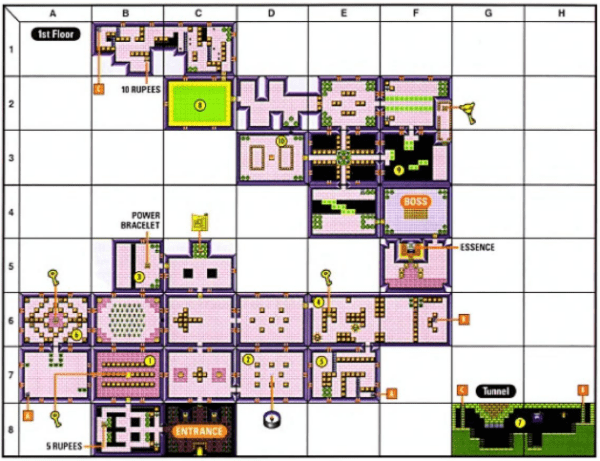
Snake’s Remains Dungeon

Entrance & Bombs: Go north. Defeat the Ropes (snakes). A chest appears with 5 Bombs. Go north.
Bomb Wall 1: Bomb the cracked wall on the west side. Go west.
Power Bracelet: Defeat the Moblins. Go up the stairs. Open the chest to get the Power Bracelet (L-1)! You can now lift heavy objects (like pots and stones).
Map Room: Go back east. Lift the pots and go north. Lift the pot on the button to reveal a chest with the Dungeon Map. Go east.
Compass Room: Defeat the Keese and Ropes. Lift the pots. A chest appears with the Compass. Go south.
Bomb Wall 2 & Key: Bomb the cracked wall on the south side. Go south. Defeat the enemies. Push the block to reach the chest with a Small Key. Go back north twice.
Locked Door: Use the Small Key on the locked door. Go north.
Push Puzzle & Key: Push the outer rollers. Then quickly push the center block up. A Small Key falls. Grab it. Go west.
Miniboss: Dodongos: You face two Dodongos. Throw a Bomb into their mouths when they open wide. After they eat it, pick them up with the Power Bracelet and throw them onto the spikes. Repeat for both. A warp point and fairy appear. Go north.
Bomb Block: Bomb the cracked block. Go north.
Key & Block Puzzle: Defeat the Moblins. Push the blocks to reach the chest with a Small Key. Use it on the locked block. Go east.
Hidden Key: Defeat the Keese. Use your sword to tap the wall sections. Bomb the cracked wall on the north side. Go north. Defeat the Pols Voices (use Bombs or make noise if playing on GBA/emulator with microphone support – Bombs are reliable). Get the Small Key from the chest. Go back south.
Boss Key Room: Go east. Use a Small Key on the locked door. Defeat the Spiked Beetles (use your shield to flip them, then sword). Get the Boss Key from the chest.
Path to Boss: Go back west, then south, then east twice. Lift the pots and use the Boss Key on the door. Go north.
Boss: Facade: This boss is just a face on the floor. He spits fireballs and makes pits appear. Avoid the hazards and drop Bombs onto his face. Repeat until he’s defeated.
Reward: Grab the Heart Container. Go north and take the Essence of Nature – Gift of Time.

