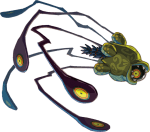
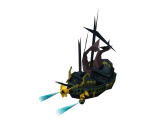
In The Legend of Zelda: Phantom Hourglass, each dungeon culminates in a boss battle that tests your mastery of newly acquired items. From shape-shifting illusions to colossal stone warriors, these encounters blend puzzle-solving with fast-paced action. Here’s a complete guide to every boss you’ll face, including strategies, item usage, and the lore behind each adversary.
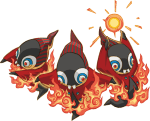
Blaaz, Master of Fire – Temple of Fire Final Boss
The first true challenge comes in the Temple of Fire, where you’ll face Blaaz, a tricky sorcerer who thrives on confusion. As soon as the battle begins, Blaaz splits into three identical copies, making your sword attacks completely useless—at first.
Look at the top screen: each clone has a different number of horns (one, two, or three). Use your boomerang to target them in ascending horn order. Once all three are struck in the correct sequence, they merge into Blaaz’s true form. That’s your window—rush in and land sword strikes. After a few rounds of splitting and re-merging, Blaaz will fall. This victory frees Leaf, the Spirit of Power, and sets your adventure into full motion.
Cyclok, Stirrer of Winds – Temple of Wind Final Boss
Cyclok is a giant, airborne Octorok who uses tornadoes to hover out of reach. To bring him down, watch for the cyclones he generates around the arena. Toss a bomb into one just below him—timing is key—and the gust will launch it upward, hitting Cyclok and causing him to crash to the floor. That’s your cue to strike with your sword.
If you run out of bombs, the arena has bomb flowers you can use instead. Defeating Cyclok earns you a Heart Container and releases Neri, the Spirit of Wisdom.
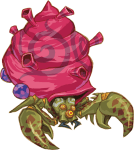
Crayk, Bane of Courage – Temple of Courage Final Boss
Crayk is a massive hermit crab that can turn invisible by releasing a gas that distorts your vision. The twist here is that your view of Crayk’s movements will only appear on the top screen—so pay close attention.
When he charges toward Link, shoot him with an arrow to knock him back and expose his weak spot. Once he hides in his shell, target the air sacs on either side to force him out. Crayk will begin guarding his front with his claws, but this is your chance to circle around and strike his vulnerable tail. Repeat the process and you’ll recover the second half of Ciela, the Spirit of Courage.
Diabolical Cubus Sisters – Ghost Ship Final Boss
These four sinister spirits put your reflexes to the test. You’ll engage in a high-stakes magic duel where they hurl energy orbs that must be deflected back using your sword—think of it as spectral volleyball.
Each sister requires two successful hits to be banished, and the surviving ones continue to attack with lasers and deceptive orbs. Some orbs are fakes, composed of smaller fragments, and should be avoided. The final sister ups the ante with multiple fakes, so watch carefully. Victory grants you a Heart Container and a Ghost Key, paving the way to Tetra.
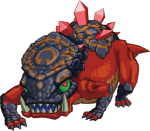
Dongorongo, Armored Lizard – Goron Temple Final Boss
Dongorongo is one of the more complex battles, requiring you to switch control between Link and Gongoron, the Goron hero. While Gongoron pummels the boss from up close, Link must use Bombchus to sneak explosives into Dongorongo’s open mouth.
You’ll also have to fend off waves of Eye Slugs. When Dongorongo falls temporarily, it’s your signal to send in a Bombchu. Midway through the battle, Gongoron retrieves the Pure Metal—Crimsonine—but Dongorongo rises again.
This time, his weak spot is a gem on his back. Wait for him to inhale, then toss in a bomb to stagger him. Strike the jewel with your sword when he collapses, and repeat until the beast is finally defeated.
Gleeok, Two-Headed Dragon – Temple of Ice Final Boss
This two-headed dragon dwells in a frigid chamber and requires clever use of your Grappling Hook. When one head fires a flaming projectile, set up the grappling hook diagonally between two poles to reflect the fireball into the other head.
After several successful hits, the armor on their heads shatters. They begin creating tidal waves and launching glaciers, which can be dodged by tightrope-walking across grappling lines. When one head dives, hook its tongue and tether it to a pole to expose it, then slash it with your sword. Repeat until both heads fall and you obtain Azurine, the final Pure Metal.
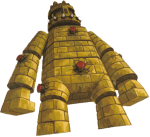
Eox, Ancient Stone Soldier – Mutoh’s Temple Final Boss
Towering across both screens of the DS, Eox is a mechanical titan built from stone and wood. Use the Hammer to launch Link onto Eox’s body, then strike the red bolts on his arms, legs, chest, and back. Once they’re destroyed, his stone armor falls apart, revealing wooden supports.
Your next goal is to hit all the exposed switches simultaneously. When Eox is reduced to just his head, use the Hammer once more to catapult onto it, then slash the red crystal on top until he crumbles. Your reward is the Aquanine, the final Pure Metal needed to forge the Phantom Sword.
Bellum, Evil Phantom – Temple of the Ocean King (Final Trial)
Bellum, the dark force behind the rising threat, is cloaked in mist and malice. Use the Grappling Hook to tear away the fog shrouding his body and expose his central eye. Drag him close, then strike with the Phantom Sword.
He retreats to the upper level. Chase him and use your bow to shoot the eyes on his tentacles. When he’s grounded again, hit him with the sword. After several cycles, you’ll receive the Phantom Sphere, which lets you stop time by drawing the hourglass symbol.
When time is frozen, hit Bellum’s eye with full force. Oshus will then warp Link away in preparation for the final confrontation.
Possessed Ghost Ship – Nautical Battle Boss
As Bellum’s corruption overtakes the Ghost Ship, you must fight from aboard Linebeck’s vessel. Aim your cannon at the floating eye blobs and incoming energy orbs to destroy them before they damage your ship.
Speed and precision are crucial. Once you’ve disabled the ship’s defenses, it’s safe to board and rescue Tetra—though you’ll want to save beforehand. The real final battle awaits.
Bellumbeck (Bellum Possessed Linebeck) – Final Battle
Bellum’s last act of desperation is to possess Linebeck himself, turning your friend into the vessel of evil. Use the Phantom Sphere right away and wait for Ciela to signal that Bellum’s eye is open—visible on the top screen. Time your hourglass drawing to freeze the moment, then strike from behind with the Phantom Sword.
Eventually, Ciela is captured. You’ll need to land a quick hit to release her and gain another Phantom Sphere. Each time she regains freedom, you get another chance to stop time and deal damage. Use spin attacks and fully powered Spirits to finish Bellum off once and for all.
With his defeat, peace returns to the seas, Tetra is rescued, and Link’s Phantom Hourglass adventure comes to a thrilling close.


