


The Wind Waker 100% Completion Walkthrough
- Prologue: Outset Island: Introduction to Link’s home, initial quests, and obtaining the Hero’s Sword and Shield.
- Forsaken Fortress (First Visit): Stealth mechanics and rescuing Aryll.
- Windfall Island: Acquiring the Sail, meeting key characters, and side quests.
- Dragon Roost Island & Cavern: Assisting the Rito tribe, dungeon exploration, and obtaining Din’s Pearl.
- Forest Haven & Forbidden Woods: Meeting the Great Deku Tree, aiding the Koroks, and securing Farore’s Pearl.
- Post-Forbidden Woods Exploration: Collect charts, heart pieces, and upgrades across the southern sea.
- Greatfish Isle & Nayru’s Pearl: Story progression and obtaining the final pearl.
- Great Sea Side Quest Adventure: Explore islands and complete Windfall quests for key upgrades and collectibles.
- Tower of the Gods: Dungeon challenges and gaining access to Hyrule.
- Hyrule Castle: Discovering the Master Sword and storyline developments.
- Post-Hyrule Castle Exploration: Complete trading quests for heart pieces, treasure charts, and the Magic Armor.
- The Forest Water Challenge: Locating and saving each withered tree for a heart piece.
- Forsaken Fortress (Second Visit): Confronting the Helmaroc King and rescuing Aryll.
- Reef Special Charts & Windfall Side Quests: Six-Eye Reefs, Treasure Charts, and Windfall Island side quests.
- Fire Mountain & Ice Ring Isle: Obtain the Power Bracelets and Iron Boots from these elemental islands to access the next temples.
- Earth Temple: Venture with Medli into the Earth Temple to cleanse evil and claim the Mirror Shield.
- Wind Temple: Enter Gale Isle, team up with Makar, and conquer the Wind Temple.
- Triforce Shard Quest: Locating Triforce Charts, deciphering them, and retrieving Triforce shards.
- Ganon’s Tower: Final challenges, boss rematches, and the ultimate confrontation with Ganondorf.
Table of Contents
Welcome, hero! Now that you’ve braved Dragon Roost and Forest Haven and gathered all three Goddess Pearls, it’s time for the gods to test your courage. In this fun and casual walkthrough, we’ll tackle the Tower of the Gods dungeon step by step – from raising the tower out of the sea, to solving its water-logged puzzles, to slaying the boss Gohdan. Spoilers ahead, but we’ll keep it light-hearted and fan-friendly. Let’s set sail!
Raising the Tower of the Gods (Placing the Pearls)
Before we even enter the dungeon, we need to summon the Tower of the Gods itself. Link now holds Din’s Pearl, Farore’s Pearl, and Nayru’s Pearl – the sacred gifts from the Great Sea’s trials. Your task is to sail to each of the three Triangle Islands scattered across the map and place each pearl into the hands of its matching statue:

Northern Triangle Island – Place Din’s Pearl (from Dragon Roost Cavern) into the red statue’s hands.


Eastern Triangle Island – Place Farore’s Pearl (from the Forest Haven) into the green statue’s hands.


Southern Triangle Island – Place Nayru’s Pearl (from your meeting with Jabun) into the blue statue’s hands.


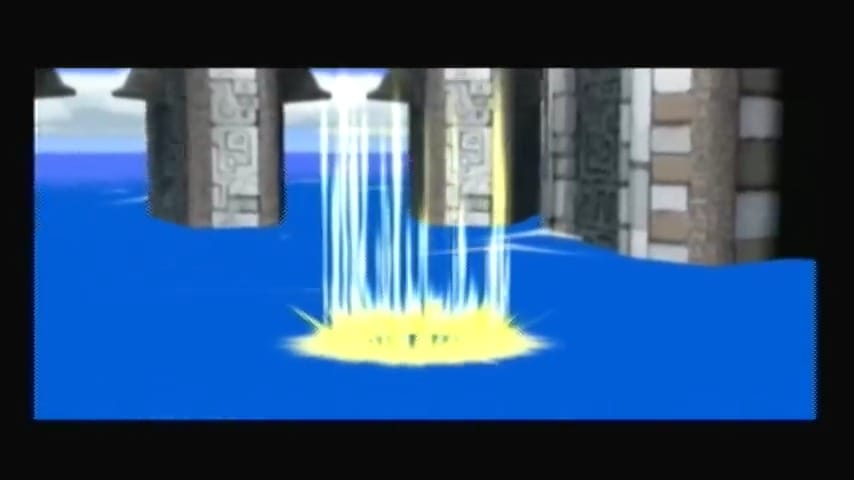
Once all three pearls are set, sit back for an epic cutscene. The statues come alive, raising the pearls skyward and firing beams of light to each other. The beams draw out the outline of a glowing golden triangle – yes, the Triforce! – on the ocean’s surface. In the center of this holy triangle, the Tower of the Gods erupts from beneath the sea, water cascading off its ancient stone walls. The scene is breathtaking… and a little humorous, too. When Link places the final pearl, the statue explodes and launches Link into the air, slamming him into the newly appeared tower’s side (ouch! Talk about a rough welcome). Luckily, our trusty boat King of Red Lions is there to fish Link out of the sea and bring him to the tower’s entrance.


Sea Chart Info #43: Tower of the Gods
Feed the Fishman here as well to record Tower of the Gods (Sea Chart Info #43).


Entering the Tower and First Floor: Flooded Halls
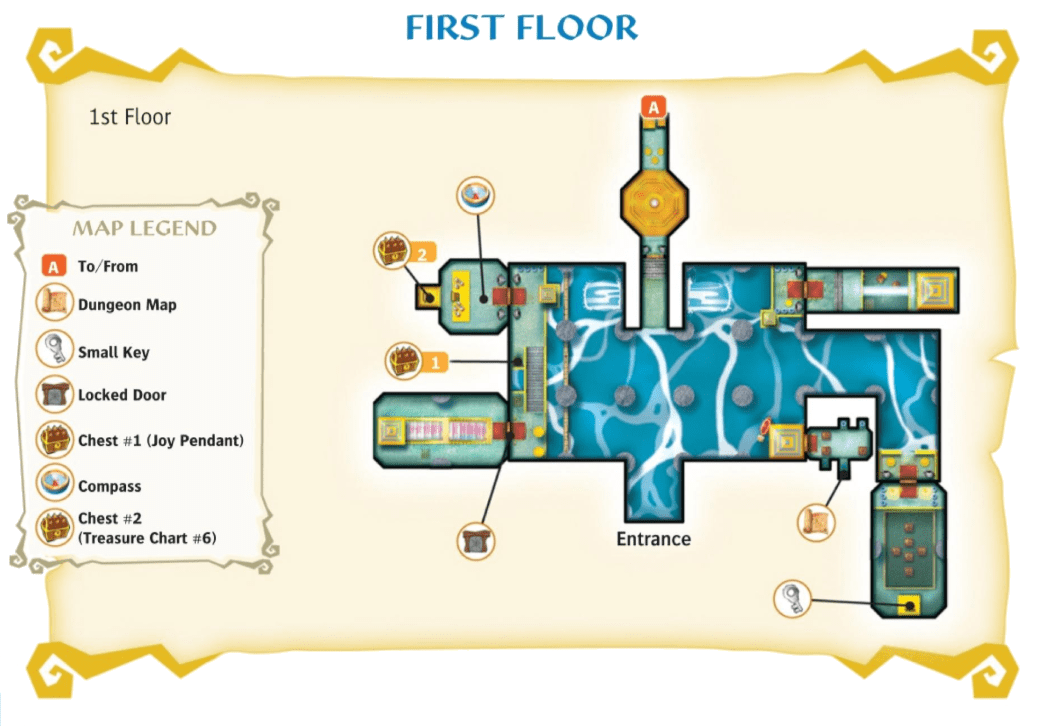
Upon entering the Tower of the Gods, you’ll find yourself in a large flooded chamber. Water Level Mechanic: The water here rises and falls periodically every few seconds, alternately revealing and submerging platforms and paths. You’ll need to time your movements according to the water level – certain doors or ledges are only reachable when the water is low (revealing walkable ground) or when the water is high (letting you float up to higher ledges). Start in your boat. Use the Cruise function to sail around while the water shifts. Steer to the southeastern side first (to your right from the entrance).
Dungeon Map (Southeast Room)
While the water is low, hop out of the boat at the southeastern door (it’s only accessible when the water recedes). In the small room beyond, you’ll face a few Yellow ChuChus. Stun or defeat the ChuChus: these yellow variants can electrify themselves, so stun them with the Boomerang or wait until their electricity subsides before slashing. Once they’re dealt with, blow up the cracked wall on the south wall: climb onto the narrow ledge and drop a bomb to reveal a hidden alcove. Open the chest inside to obtain the Dungeon Map. Four additional Yellow ChuChus will drop down after you grab the map – take them out with the Boomerang or sword before exiting.


Return to the main flooded hall. Your next goal is to access a door on the northeast side. At the northeast corner, there’s a doorway blocked by bars. To open it, pick up a small statue from near the door and place it onto the round floor switch nearby. This will keep the switch pressed and unbar the door.


Head through the now-open northeast door. Inside, take out the Yellow ChuChu that drops into the room, then hop down into the pit below. Grab one of the nearby boxes and place it on the glowing floor switch. This activates a bridge of light above—but it only stays active while the box remains on the switch, so make sure the water is lowered before placing it. Climb back up the ladder and cross the light bridge when it appears.
On the other side, pick up the glowing statue and carefully walk it back across the bridge. Return to the previous room. Turn left and you’ll see a gap in the floor near the ledge. Set the statue into the missing section to complete the floor. Doing so triggers a gate nearby to lower, opening up a new path.


Climb into the King of Red Lions and cruise down the newly accessible hallway. When you reach the end, jump onto the platform and set the two small statues on the glowing switches to unlock the next door. Proceed through the door.


You’ll enter a room with a pit full of water and several floating crates. Defeat the lone Yellow ChuChu that drops in. Climb down into the pit and notice some crates are already aligned, forming part of a bridge. Push the misaligned crate into place so that four crates form a straight line across the water. Wait for the water to lower (the bridge only exists when the water is out of the way). Now climb back up and find a Boko Stick in one of the pots by the lit torch. Light the stick and quickly run across the line of crates while the water is low (if the water starts rising, you can pause on a crate and continue when it falls again). On the other side, light the two unlit torches. A treasure chest will appear containing a Small Key.


With the small key in hand, backtrack to the flooded central chamber. Now sail over to the west side of the main hall. There are two cracked stone walls here. Use the King of Red Lions’ Bomb Cannon to blast open the cracked walls on the west side. (If you don’t have bombs, note that obtaining the Bombs from Jabun is required before this dungeon.) Once the walls are demolished, wait for the water to rise and sail over the low wall into the now-accessible western area. In the back southwest corner, you’ll see a locked door. When the water falls, jump out of the boat and use your Small Key to unlock the southwest door.
Inside this west room, you’ll face another group of Yellow ChuChus. Defeat all four ChuChus here (a bomb in the middle as they drop can stun/clear many at once, or use the Boomerang and sword). When all four are defeated, a magical staircase of light will appear, leading up to a high ledge. Climb the light stairs and pick up the glowing pillar statue on the altar. Now wait for the water to lower again, because you’ll need to carry this statue out at low tide.


While holding the pillar statue, walk through the door straight ahead (which leads back to the main chamber) once the water is low. You’ll emerge on a higher ledge in the central room. From here, go left and up the stone staircase. You’ll see an indented tile (a receptacle) on the right side at the top of the stairs – place the pillar statue into the groove in the floor. Once this statue is set in place, something significant happens: the waterfall flowing from the giant stone head in the center of the hall will cease. With the water no longer pouring out, the central mouth entrance of the tower is now accessible.


Optional: Joy Pendant #1 (West Hall Torches)
Before leaving this west hall, you can grab an extra collectible. At the bottom of the staircase (west side of the main room’s west hall), there is an unlit torch and a pot of wooden Boko sticks. Light a stick using the lit torch near the top of the stairs. When the water is low, run down and light the two torches at the bottom of the staircase (on either side of the locked door you opened). Lighting both torches makes a chest appear nearby – open it to collect a Joy Pendant. (Joy Pendants are useful for a Windfall Island side quest; this dungeon holds a few optional ones.)


Compass (Northwest Room)
Head through the door on the northwest side to where you placed the statue to find a small room with a single enemy Red Bubble (a flaming skull). Defeat the Red Bubble: use the Deku Leaf’s gust to extinguish its flames and knock it down, then strike it with your sword. When it’s defeated, open the chest to obtain the Compass, which will reveal chest and boss locations on your map. (There’s another chest visible behind bars here; don’t worry, we’ll get it later once we have the necessary item.)


Return to the main hall once more. Everything you need on the first floor is done, so board the King of Red Lions and sail into the giant stone mouth that just stopped spewing water. Cruise directly into the mouth and dock inside the passage. Hop out and go through the door to enter the second section of the dungeon.
Second Floor: Gaining the Command Melody
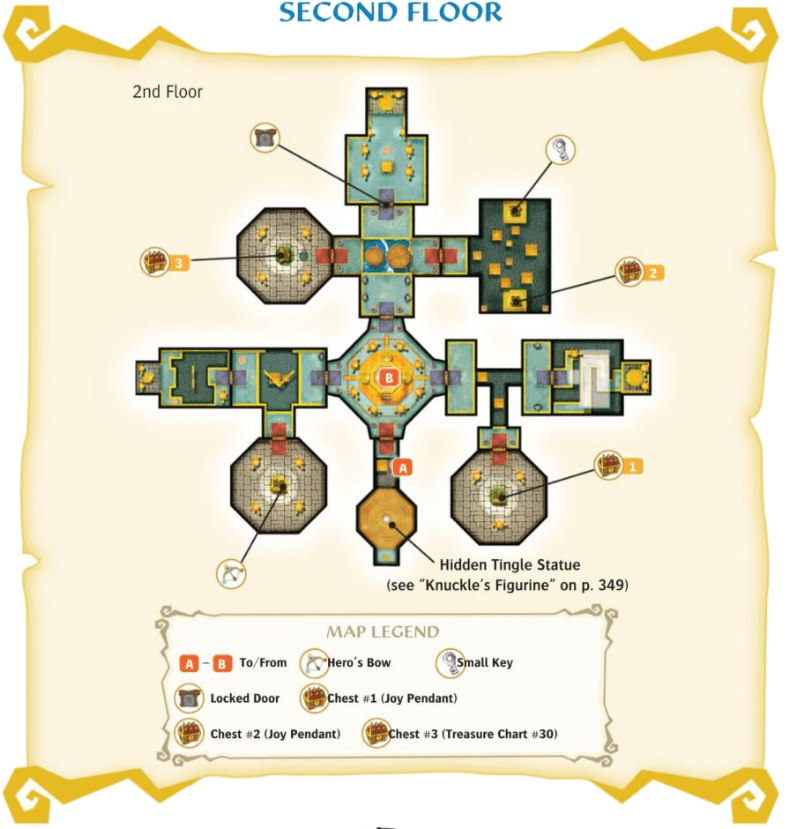
Statues, Switches, and the Command Melody
You’re now in a higher interior section of the Tower. This area is less flooded and serves as a hub for the second floor. As you enter, all doors but one are barred. Only the door on the east side is open, so head through that door first.
Before that, however, you’ll need to activate a moving platform to reach the higher levels: In this initial chamber, there are three glowing floor switches and two small statues you can pick up. There’s also a rotating Beamos (an eye statue turret) in the center and a couple of pesky Rats scurrying about.
Eliminate any rats with your Boomerang if they’re present. Grab a statue, run past the Beamos, and place it on a switch. Repeat with the second statue and another switch. Step on the third switch to activate the platforms above. Ride these platforms up and exit through the door.


You’ll emerge into a chamber where most exits are sealed, leaving only the eastern door accessible. Before you go, check the pots scattered around – smash them if you’re in need of supplies. Once you’re ready, head through that eastern doorway.


In the next area, a Yellow ChuChu will likely greet you; deal with it swiftly. Then, hop aboard the moving platform to safely cross the chasm. Watch out for any other hostiles as you make your way to the door on the far side.


Here, you’ll notice a glowing platform of light. Walk across it, then jump down at the other end. Find the nearby column and press the ZR button when you’re next to it. This action will cause the pillar directly in front of you to lower. Be ready, as this also awakens a nearby statue, which will begin to follow your movements! Your goal is to lead this animated statue along the pathway that runs beneath the platform of light you just crossed. Once you’ve guided it clear of the overhead platform, pick up the statue. With your stony companion in hand, leap across the gap and proceed through the door.


Still carrying the statue, carefully jump onto the moving platform. Ride it back and head through the door you just used, returning you to the large central room. Upon re-entering, the statue will automatically spring from your grasp and settle onto another column. As it does, a stone tablet will be revealed in the middle of the room!


A short scene plays as a result: a stone tablet rises in the middle of the room. Approach the tablet and pull out the Wind Waker. You’ll play the notes displayed on the tablet to learn a new song, the Command Melody. This sacred song allows Link to take control of certain objects or characters, notably the statues in this dungeon. (On GameCube, the melody is conducted with the C-stick; on Wii U, use the right analog stick. The song’s rhythm is in 4/4 time.)


Wind Waker Song: Command Melody
A mystical tune that lets you take control of certain characters or objects, such as statues, Medli, or Makar, to solve puzzles and explore dungeons.

With the first servant statue placed and the Command Melody in hand, it’s time to venture into the west wing of the second floor to obtain the next statue (and the dungeon’s treasure, the Hero’s Bow).


West Wing: Second Statue and the Hero’s Bow
Return to the second floor central hub and head through the now-unlocked west door. You’ll step out onto a balcony-like area with a bottomless pit separating you from the far side. Immediately, a couple of Red Bubbles (flaming skulls) will start circling in the air. Use your Deku Leaf to knock the Red Bubbles out of the air by fanning them; this will extinguish their flames and cause them to plummet so you can finish them with the sword. Alternatively, if you have the Boomerang or bombs handy, those can also take Bubbles down.
Look up to find a Grappling Hook point (a hanging pole) above the gap. Swing across to the other side using your Grappling Hook. Go through the door into the next room.


In this room, there’s another wide gap splitting the floor. On the far side, you’ll spot the second servant statue on a high ledge. First, latch onto the overhead Grappling Hook point and swing across the gap to the other side. You can’t carry the statue over yet, so call out to the statue by pressing R (or ZR on Wii U) to make it hop off its perch and start following you. The statue will walk to the edge but cannot cross the gap on its own.


Now, step on the glowing light switch on the right side of this ledge. Keeping that floor switch pressed causes a temporary bridge of light to appear across the gap. Now it’s time to use the Command Melody. Face the statue and play the Command Melody on your Wind Waker.
This will let you take control of the statue remotely. While controlling the statue (indicated by the screen tint), simply walk it across the newly formed light bridge to the other side of the gap. Once the statue is safely across, press R/ZR to return to controlling Link. Now use the Grappling Hook to swing yourself back across the gap to join the statue again. Pick up the statue and carry it through the door you entered from (back to the previous balcony room).


Back in the balcony room, set the statue down onto the glowing switch plate to the left side of the door. This depresses the switch, which unlocks another door in this room – specifically, the door on the south side leading to a new chamber. With the statue weighted on that switch, the door will stay open. Swing across with the Grappling Hook one more time, but instead of returning to where the statue was, rotate and swing to the southern ledge. Go through the door to face the dungeon’s mini-boss.


Miniboss: Darknut (Knight’s Crest Alert!)
A formidable armored knight known as a Darknut will challenge you in this arena. This is the first Darknut you encounter in the game, and while it appears intimidating in full plate armor and wielding a huge sword, there are easy ways to defeat it:
- Parry Attacks: Target the Darknut with L-targeting and keep your sword ready. When the Darknut raises its sword to strike, you should see a prompt (A button) for a Parry – hit it, and Link will leap around to strike the Darknut swiftly. A successful parry can knock off the Darknut’s helmet or cut the straps of its armor. Execute a couple of these parry attacks to strip the Darknut of its armor. (If your first parry only removes the helmet, a second parry will usually break its chest armor off.)
- Expose its Weakness: Once the Darknut’s armor is gone, it becomes much more vulnerable. You can attack it directly with your sword at this point – slash away and avoid its retaliations. The unarmored Darknut is faster, but its attacks can be sidestepped or backflipped away from with relative ease. Keep moving and don’t get cornered.
- Use the Environment: You can also try to get behind the Darknut by moving around it or using another parry. Striking it from behind (where there’s no armor) is effective. If the Darknut’s helmet came off, you can even shoot it with arrows (if you had any early) or throw things at its head, but at this point you likely don’t have the bow yet.
- Collect the Knight’s Crest: Before dealing the final blow, use your Grappling Hook on the Darknut to steal its Knight’s Crest . Darknuts carry a valuable spoil – the Knight’s Crest – which you’ll need 10 of to learn a special sword technique later in the game. You can snag it by grappling the Darknut (once its armor or at least helmet is off) or pick it up from the ground if it drops upon defeat. Don’t forget this, as this Darknut is one of the limited sources of Knight’s Crests available at this point in the game.
Dodge its big sword swings (it has a combo swing and an overhead chop – both have slow wind-ups you can avoid), and continue striking until the Darknut falls. Upon defeat, it will drop its massive sword (you can toy around with picking it up, but it’s not needed) and vanish, leaving behind some loot and a glowing chest.


Open the chest that appears to obtain the dungeon’s key item: the Hero’s Bow!

Item: Hero’s Bow
A sacred weapon that allows Link to fire arrows at enemies, switches, and distant targets. Essential for solving puzzles and defeating powerful foes from afar.
With the Bow in hand, exit the miniboss room back to the previous area where you left the statue on the floor switch.
Now that you have the Bow, defeating the flying Red Bubbles here is much easier – one arrow each will take them out from a distance. Look across the gap to the ledge where you originally found the statue. You’ll notice a diamond-shaped eye switch high on the wall opposite you. Shoot an arrow at the eye switch. A successful hit causes two floating platforms to extend from the walls, creating a path across the gap. Also be aware that two Red Bubbles may respawn; if so, snipe them with the Bow for safety.
Use the Grappling Hook once more to swing over to the statue’s ledge (where the statue is still sitting on the switch). Pick up the statue again. Now, with the two moving platforms sliding back and forth, carefully hop onto the first platform, then to the second, and cross back to the door where you originally entered with the statue. If a platform is too far, wait for it to move closer before jumping. Back in the central hub, carry the statue forward. It will leap onto the second pedestal, next to where the first one you placed is sitting, and this triggers the final sealed door (the north door) to unlock. Now only one statue remains!


Optional: Joy Pendant #2 (East Wing Side Room)
Instead of immediately going through the newly opened north door, return to the east wing (where you got the first statue) by going through the east door on the hub again. In that room with the moving platform where you originally crossed for the first statue, new enemies have appeared: several Yellow ChuChus and a Wizzrobe. Take out the Wizzrobe first: this mage summons monsters and attacks with fire – shoot it with two quick arrows to defeat it. Clear out any ChuChus as needed.
Now, ride the moving platform in the center of the room upward. While riding, look to the right (south) to spot a hidden eye switch on a wall in a gap. Shoot the eye switch with an arrow; this causes a distant platform to start moving in that gap. Jump off the current platform onto the newly moving platform when it comes near you. Ride this horizontal platform to a door on the south wall and enter it.
In the next room, you’ll face two large Armos Knight statues (bigger versions of Armos). The moment you step forward, they come to life. Defeat the Armos Knights: target one, and when its mouth opens and it prepares to charge, toss a bomb into its mouth (or shoot an arrow into the mouth, but bombs are more reliable). One bomb will destroy an Armos Knight, but you might take some damage in the process if they bump into you – try to keep some distance. Once both Armos Knights are blown up, a chest will spawn. Open it to claim another Joy Pendant. With Joy Pendant #2 secured, leave this room and head back to the central hub where the two statues are waiting.


Treasure Chart #6: Backtrack to Compass Room (Collectible #27 of 41)
Sail or backtrack all the way to the first floor entrance chamber (the big flooded hall). From the starting point, go through the northwest door again, which is the room where you picked up the Compass earlier.
In the compass room, you likely noticed a barred gate with a chest behind it. Now you can finally reach it. Look for a yellow eye switch above that gate. Shoot the eye switch with an arrow, which will open the gate below it. Open the newly revealed chest to obtain Treasure Chart #6. (This chart points to sunken treasure in the Great Sea – you can decipher it later once you have the Incredible Chart and find treasure #6 in the corresponding quadrant.) With the chart collected, make your way back to where you were (return to the central hub on 2F – you can use the King of Red Lions to quickly sail back into the tower mouth and up the elevator platform again).


Final Challenges: Third Statue & Big Key
With two servant statues placed, head through the north door in the second-floor hub (it should be glowing or obviously open now). This leads to a tall room featuring a large scale mechanism – two big round stone platforms hanging by a rope like a balance scale. This room forms the puzzle to reach the third statue and eventually the Big Key.

As you enter, defeat the two Keese (bats) fluttering around so they don’t bother you. Notice the hanging scales: when you stand on one, your weight will lower it, causing the other to rise, and vice versa. Also notice there’s a door on a high ledge to the west (left) behind a cracked wall, and another door on the east side at water level below.
Treasure Chart #30 (Collectible #28 of 41)
Before solving the scale puzzle, you can grab Treasure Chart #30 hidden here. To get it, first ride the left-hand scale (west side) to the bottom by standing on it (you may need to toss some of the small statues onto it to counterbalance if it’s not descending). Once on the scale, look toward the west wall: there’s a cracked wall a short distance away.
While standing on the left scale, time a bomb throw so that it lands and explodes next to the cracked wall when the scale rises up a bit. Alternatively, you can drop a bomb on the scale and quickly pick it up and throw when at peak height. When done correctly, the bomb will blow open the cracked wall on the west, revealing a hidden doorway.
Jump or step off onto the ledge where the wall blew open and enter that secret west door. In this hidden room, stand on the blue wind symbol on the floor. Pull out the Wind Waker and play the Wind’s Requiem (the song used to change wind direction). Doing so causes a treasure chest to materialize. It also awakens two Armos Knight enemies in the room, one on each side. Defeat or evade them (as described before: bombs in the mouth work well, or stun with arrows and attack the backs). Once they’re dealt with, open the chest to obtain Treasure Chart #30. With the chart in hand, leave this side room the way you came and return to the main scale chamber.


Back in the scale room, it’s time to get the Small Key needed for the final leg and then retrieve the last statue. From the scale room, drop down into the water below (if it’s drained, just hop down). There’s a door on the east side at the bottom (under the right-hand scale platform). Head through that door first. In this room, you’ll see floating platforms and more eye switches. Immediately use your Bow to shoot down the Red Bubbles floating here so they don’t knock you off. Now, hop onto the nearest moving platform. Face north to spot an eye switch on a column ahead; shoot the eye switch and a vertical platform will start moving up and down. Jump to that now-moving platform when it comes within reach. Ride it up and leap off to the next platform. Open the chest here to get a Small Key. This key will unlock the door to the final statue.


Optional: Joy Pendant #3 – Moving Platforms Challenge
After grabbing the small key, you can get one more Joy Pendant in this same room. Hop onto the moving platform to the west, which rises upward. From it, jump to the horizontal-moving platform nearby. As you ride it, you’ll see another eye switch on a platform to the south. Shoot that eye switch; it will activate another moving platform on the south side. Jump to it when it comes close.
Ride this platform across to the southwest, and as you pass a ledge, you’ll see another eye switch above a sealed door. Quickly shoot this eye as well while in transit. Hitting it makes a chest appear on a high ledge. Stay on the platform until you can reach that ledge with the chest. Jump off and open it to get another Joy Pendant. With that collected, use the Deku Leaf or platforms to float back to the east door you came in, and return to the scale room.


Back in the scale room, climb out of the water via the ladder on the left side. Now to reach the third statue’s room. There are several small statues scattered around the room (decorative stone idols). Pick up two of these statues and toss them onto the left scale (west platform). This will weigh it down. Now step onto the right scale (the east platform) yourself – with the left side heavier, the right side will rise up like an elevator. Ride it to the top and jump off to the ledge with the door to the north. Unlock the door with your Small Key and enter the third statue’s chamber.


In this room, a series of Beamos (laser eyes) are situated, creating a maze of laser defenses. A large stone block in the center provides cover, and on a high platform at the back is the final servant statue. Climb onto the central stone block. From here, you can see the statue on the north ledge and at least one Blue Beamos (blue means it rotates and has a more aggressive laser). Use your Deku Leaf to float from the central block northward over the laser beams. You want to land near or on the ledge with the statue. As you glide over, the Beamos lasers will try to target you, but keep moving. Land in front of the statue’s pedestal. There’s a floor switch (glowing light switch) here, but it’s blocked by a vertical column. Call the statue down first (press R/ZR to make it hop off its platform to the ground).


Now play the Command Melody to take control of the statue. Walk the statue through the gaps under the laser beams to the floor switch in front of the central stone (the statue is short enough to pass under the lasers safely). Position the statue on the light switch and let it sit there, which deactivates the remaining lasers or opens the way by lowering the column blocking the switch. Now return to Link (press R/ZR).


Pick up the statue and carry it back the way you came. The lasers should be off now (if not, it means the statue wasn’t on the switch properly). Leave through the door back into the scale room with the statue in hand. Back in the scale room, as you step out, a Wizzrobe will spawn to ambush you. Put the statue down briefly and quickly snipe the Wizzrobe with a couple of arrows to take it out.
Now to get the statue out of this room: You need to bring the statue up using the scales. The easiest method: Hop onto the right scale (east) while carrying the statue. Set the statue down on this scale. Climb up the ladder to the left scale ledge again. Now gather three of the small stone statues from around the room (there should be exactly three left if you used two earlier) and toss all three onto the opposite scale (the one your statue is not on). With three weights on that side, the scale holding your servant statue (and one Link-weight, if you stand on it) will rise up. Finally, jump onto the scale with your statue, pick it up, and then leap across to the south ledge where the door to the central hub is. (If the jump is too far, you might need to remove one statue from the other scale to lower yours a bit, but typically three statues is perfect to raise you high enough to reach the ledge with a jump.)


Go through the door back to the central pedestal chamber, carrying the statue. The statue will automatically fly into place on the third and final pedestal. All three servant statues are now returned!


All 3 statues being reunited grants the appearance of a glowing portal of light in the center of the floor. This portal is an elevator that will transport you to the upper level of the tower (where the boss awaits). But before we go, make sure you have everything from down here. At this point, you should have collected the Map, Compass, Hero’s Bow, Big Key (coming up next), both Treasure Charts (#6 and #30), and three Joy Pendants from this dungeon if you followed all optional steps.
When ready, step into the blue portal of light. It will carry you upwards to the third floor summit of the tower.
Big Key and Boss Entrance
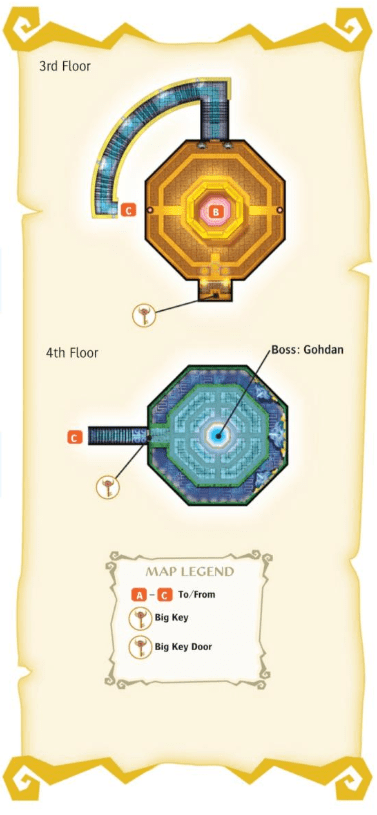
You’ll arrive in a small room at the top of the tower. This room contains the chest with the Big Key (Boss Key), but there’s a quick puzzle first. There are two small statues here and three floor switches in front of the big locked door. Place the two statues on two of the switches, and then step on the third switch yourself. With all three switches held down, a chest appears. Open it to obtain the Big Key, which will allow you to unlock the boss’s door. However, as soon as you grab it, two Armos statues in this room awaken and attack. Defeat them or simply exit – since you’ve got the key, you can leave. (To quickly dispatch these Armos, shoot an arrow into each one’s eye to stun it, then slash or shoot the crystal on its back before it recovers. Bombs in the mouth work too. Once defeated, they may drop health or arrows.)


The door on the far side (south) is now open. Go through it and climb the long staircase beyond. Partway up, a winged enemy Kargaroc (a large bird) will swoop at you. Take it down with a few sword strikes or a single arrow to the face. Tip: Use the Grappling Hook on the Kargaroc before killing it to snag a Golden Feather – a spoil item you’ll need 20 of for a future side quest. Kargarocs commonly drop Golden Feathers when grappled or defeated, so don’t miss this chance for one.
Continue up the stairs. You’ll encounter a gauntlet of stationary Beamos turrets along the path. There are red Beamos and blue Beamos here. The Red Beamos will track you but their lasers can’t be destroyed – it’s best to simply run past them in a zigzag to avoid getting zapped. The Blue Beamos, however, can be temporarily disabled by shooting an arrow into their eye, which destroys them. As you progress, quickly arrow down any Blue Beamos from a distance, and dash by the Red ones when their lasers sweep away from you. Make your way to the end of the path.
At the end, before the boss door, you’ll find a few pots. Replenish and heal up here: the pots contain arrows, bombs, and sometimes hearts or fairies. If you need a health refill, capture a Fairy in a bottle here (if a fairy appears) or just grab it to heal. Note: In Wind Waker HD’s Hero Mode (if enabled), hearts won’t drop, so use a potion or bottled fairy here instead. When you’re fully prepared, use the Big Key to unlock the big ornate boss door and step inside to face Gohdan.


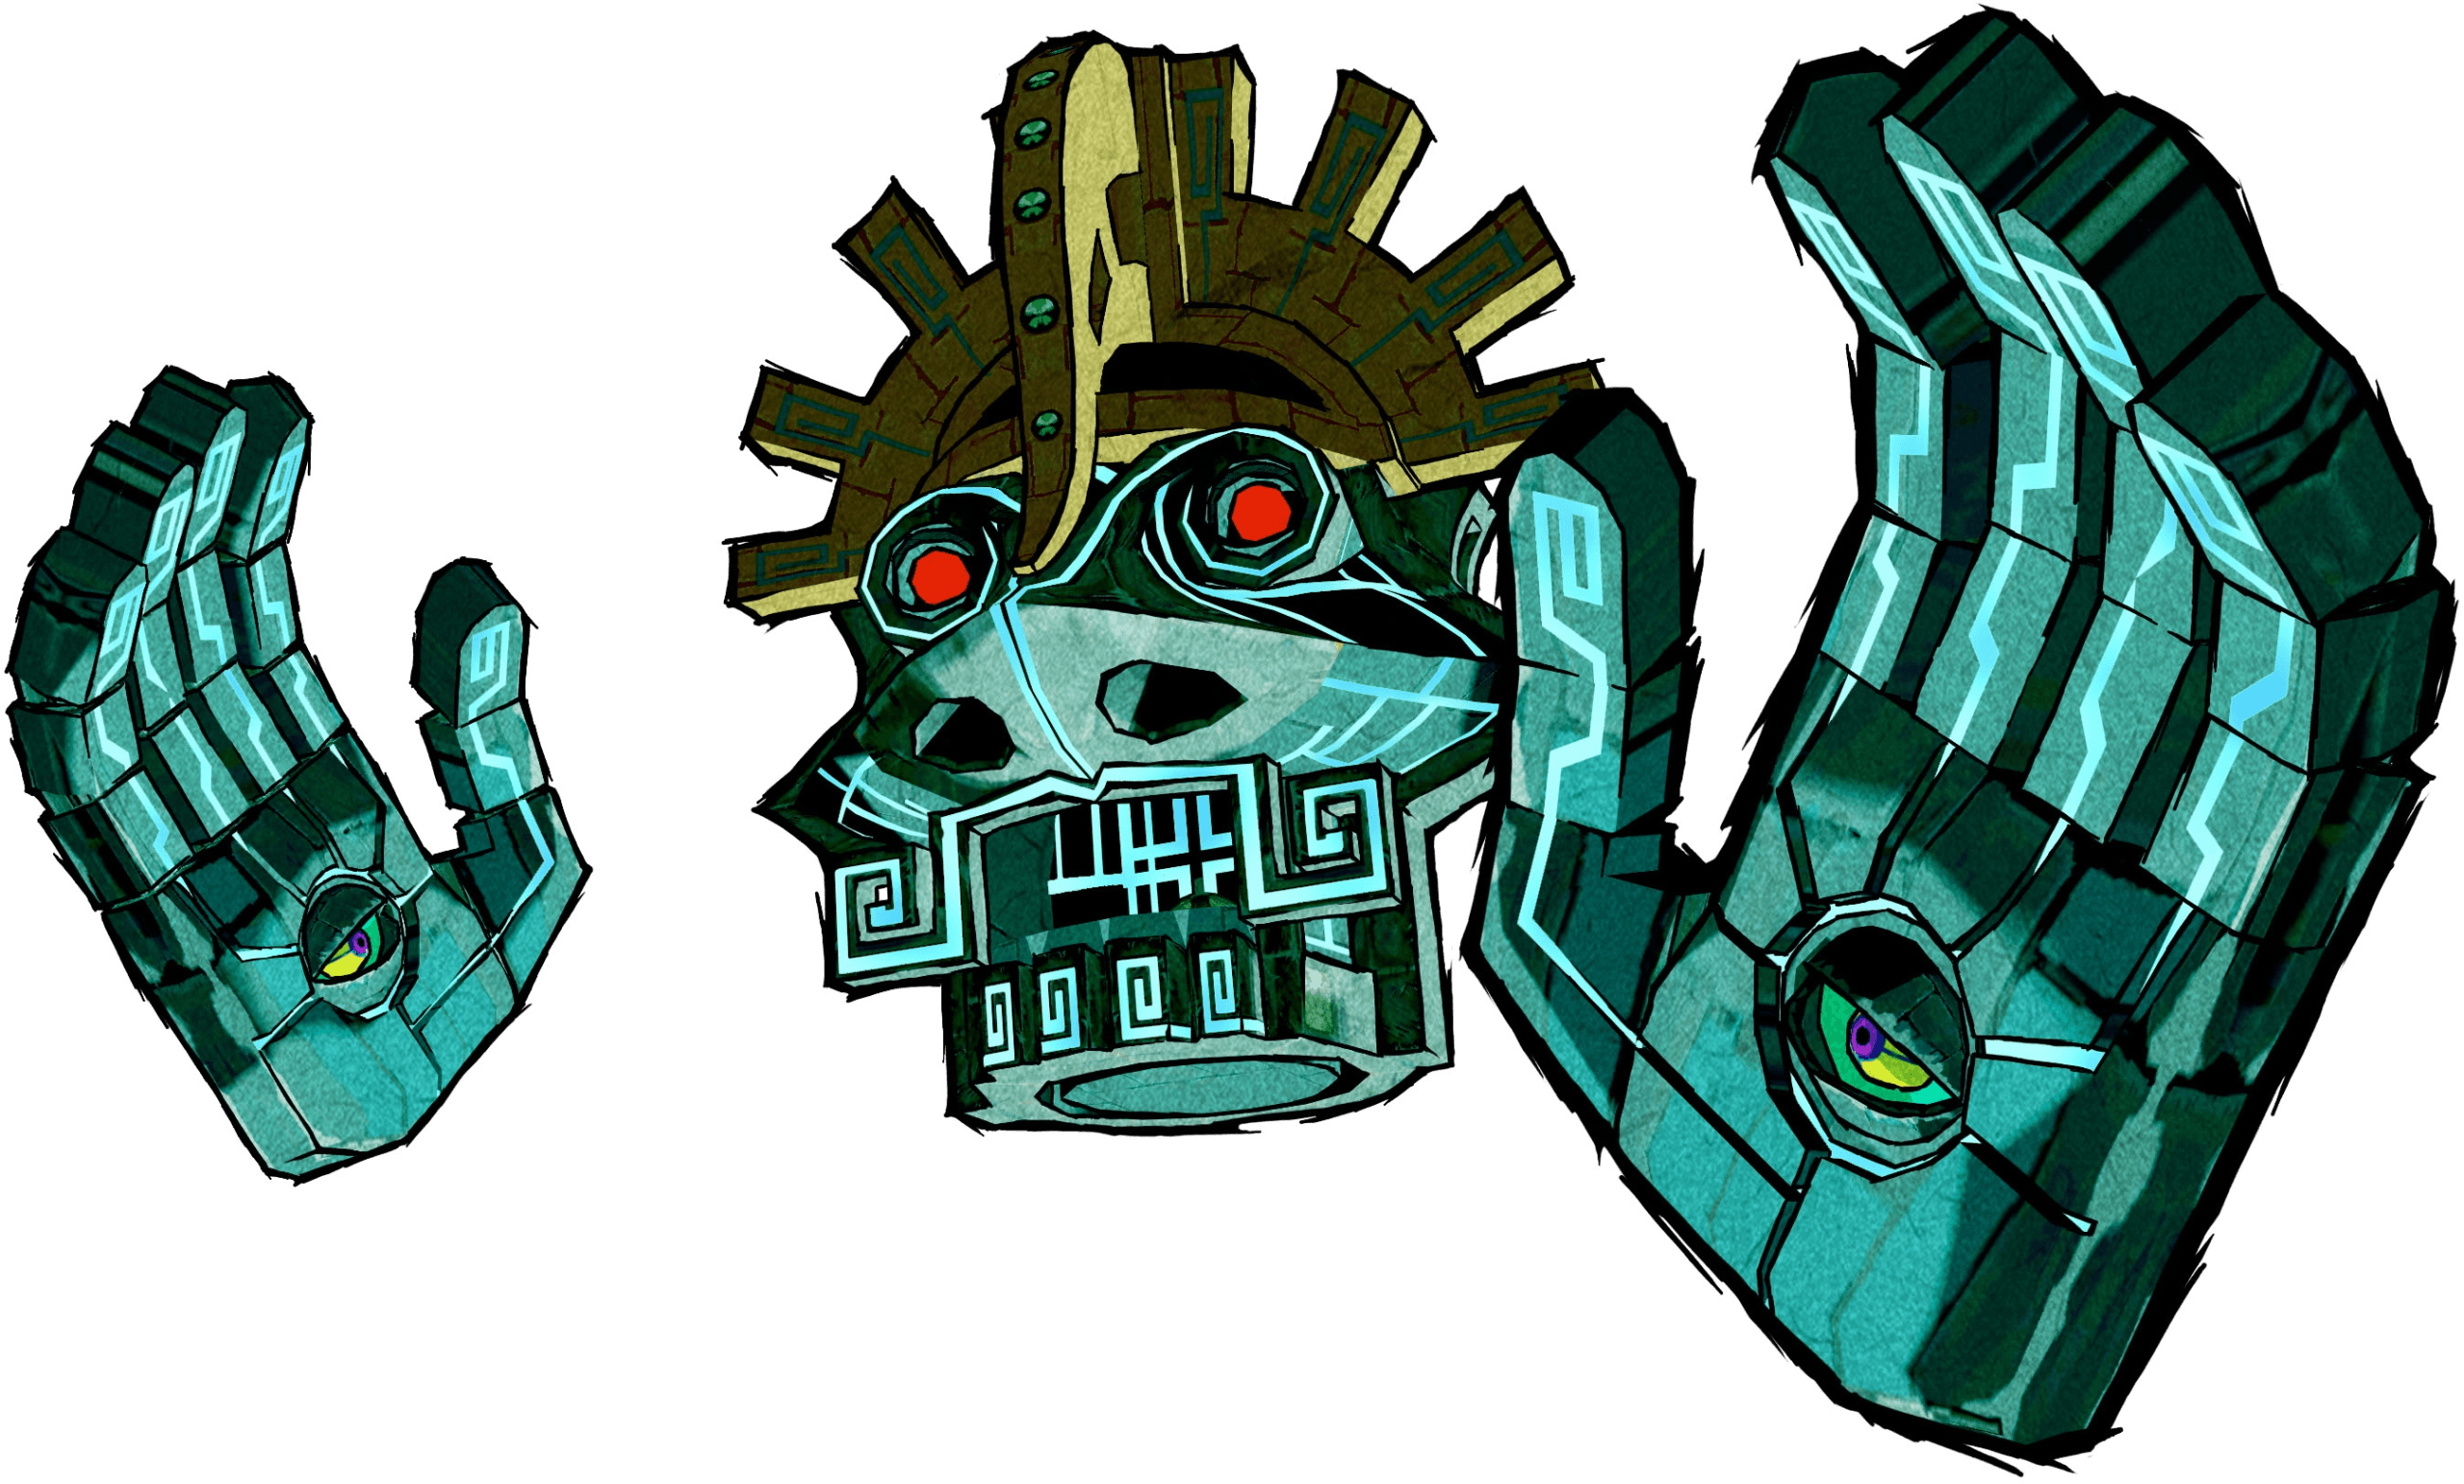
Boss Battle: Gohdan, Guardian of the Gods
Step into the wide arena and approach the center. A booming voice commends your progress and issues one final challenge. The colossal stone face on the wall comes alive, and two massive hands detach from the walls – this is Gohdan, the Great Arbiter who guards the Tower of the Gods. Gohdan’s head and hands will attack you in tandem. To defeat this boss, you’ll need your newly acquired Hero’s Bow and also your Bombs.
Gohdan’s Weak Points: The boss has two hands with glowing eyes on their palms, and two eyes on its central head. You must disable the hands first, then the head, and finally feed it bombs. Here’s the strategy:
- Shoot the Hands’ Eyes: Immediately target one of Gohdan’s floating hands. Avoid getting too close as they hover. Each hand has an eye in its palm – shoot the eye with an arrow. It typically takes two arrows to make a hand fall limp. You’ll know it’s deactivated when it collapses and stops moving. Quickly do the same to the other hand: lock on (L-target) or manually aim and fire two arrows at its palm eye. With both hands temporarily disabled, they won’t harass you while you target the head.
- Shoot Gohdan’s Eyes: Once the hands are down, Gohdan’s two large eyes on its face open up, glowing red. Equip your bow again and shoot each eye on the head. Just like the hands, each eye needs two arrows to be blinded. If you’re quick, you can get two shots per eye before the eyes close or before the hands revive. Once both eyes have been hit twice, Gohdan will be stunned and its giant mouth will open as the head slumps down to floor level.
- Throw a Bomb into the Mouth: With the mouth open and within reach, quickly toss a Bomb into Gohdan’s mouth like you’re feeding it. The bomb will explode inside, damaging the boss. Gohdan’s head then reactivates and rises, and its hands will revive.
- Repeat the Cycle: Gohdan requires three bomb “meals” to be defeated. This means you’ll need to repeat the process up to three times: disable both hands with arrows, shoot both eyes on the face with arrows (two per eye), and then bomb the mouth. The boss gets slightly faster each round, but the strategy remains the same.
Gohdan’s Attacks and Tips:
- Hand Strikes: Gohdan’s hands swipe and try to smack or push you off the platform. Keep moving to avoid their slaps. If you see a fist clenching, be ready to side-jump out of the way to avoid a crushing blow. The hands can also suddenly surge forward to shove you – running perpendicular to their charge helps avoid being pushed off.
- Fireballs: Gohdan’s head periodically spits out fireballs that home in on your last position. These can be dodged by constantly moving (don’t stand still) or by running to one side as they launch. You can also shoot the fireballs with an arrow to destroy them mid-air, but that can waste time and arrows; usually just dodging is fine.
- Falling Off / Electric Floor: The arena is a raised platform floating above a pit. If a hand knocks you off, don’t panic – there is a way back up. The surrounding floor is lined with an electric current that will shock you every few seconds while you’re down there. Quickly roll towards one of the four corners of the room where you’ll find ladders. Climb back up as fast as you can to rejoin the fight before you take too much damage from the electricity.
- Arrow Refills: If you run low on arrows during the fight, Gohdan will actually help you out. After a while of not being attacked, Gohdan will “sneeze” out a bundle of arrows (10) onto the platform, ensuring you’re not left helpless. Collect them and continue the assault. (Likewise, hearts may drop if you’re low on health in the standard mode, but in Hero Mode they will not – so bring a fairy or potion if playing HD Hero Mode.)
Stay patient and keep to the pattern. After you’ve tossed three bombs into Gohdan’s mouth, the giant head will start to sputter. Gohdan will acknowledge your skill and the challenge will end. The boss’s hands withdraw and the face returns to its place on the wall, now lifeless.


Victory! Gohdan will spit out a Heart Container as its final act – make sure to pick it up, as it permanently increases your life by one heart. With the boss defeated, the sealed door behind you unlocks and a glowing teleportation circle (a ring of light) appears, shining down from above. Step into this light to be transported upward to the tower’s summit.
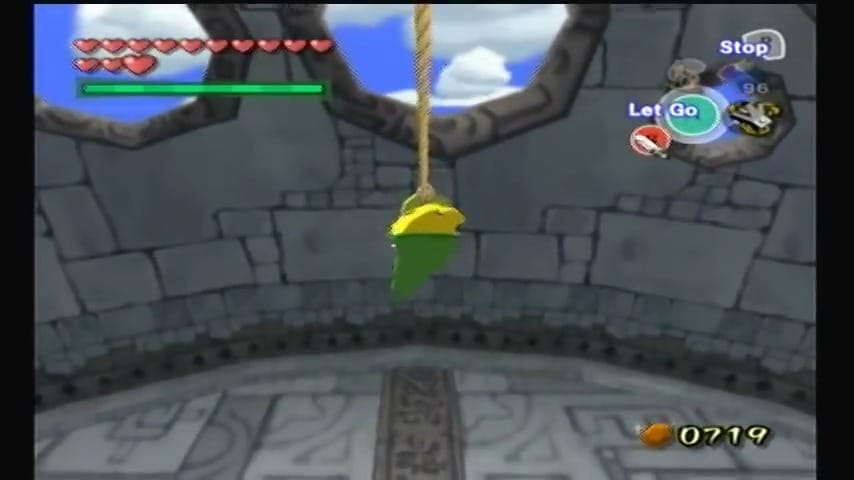
You’ll find yourself at the very top of the Tower of the Gods, under the open sky. Walk forward and climb the ladder ahead. There’s a huge bell hanging here. Target the peg attached to the bell and use your Grappling Hook to latch on. Swing back and forth to ring the Bell of the Gods. After a few swings, the bell will toll loudly, signaling the end of the dungeon’s trial. This act opens the path to the next area of the game (a bright portal of light will appear back down in the sea, leading to Hyrule).


Congratulations! You have cleared the Tower of the Gods. Enjoy the ensuing cutscenes, and get ready to descend into the secrets that lie beneath the Great Sea.
Checklist before leaving: Ensure you have collected the Dungeon Map, Compass, Hero’s Bow, Big Key, Heart Container, Treasure Chart #6, Treasure Chart #30, the Goddess Tingle Statue, all Joy Pendants (3 in this dungeon), a Knight’s Crest (from the Darknut), and a Golden Feather (from the Kargaroc). With all these spoils and items in hand, you’ve fully completed the dungeon in both content and collectibles. Onward to the next chapter of your adventure!