Introduction
The Legend of Zelda: Breath of the Wild presents players with the sprawling, post-calamity kingdom of Hyrule, a world teeming with life, danger, and secrets. Among the many tools provided to Link via the ancient Sheikah Slate is the Hyrule Compendium, an encyclopedic feature that encourages meticulous documentation of the world’s inhabitants and items. More than a mere checklist, the Compendium serves as an interactive database, reflecting Link’s growing knowledge and aiding his journey through practical application. Completing this vast catalogue, which involves photographing hundreds of distinct entries across multiple categories, represents a significant undertaking—a challenge embraced by dedicated adventurers seeking comprehensive mastery over Hyrule. This task requires not only extensive exploration and keen observation but also strategic planning and interaction with specific characters, most notably Symin of the Hateno Ancient Tech Lab. This report provides a detailed guide for players aiming to fully populate their Hyrule Compendium, covering acquisition methods, strategic location protocols, handling missable entries, and the ultimate (if symbolic) reward for this exhaustive endeavor. The process of filling the Compendium inherently pushes players to engage more deeply with the game world, scrutinizing environments, enemy behaviors, and item placements with a level of detail that passive gameplay might overlook, thereby enriching the overall experience of discovery and immersion in Hyrule.
Section 1: The Hyrule Compendium: An Overview
1.1 Defining the Compendium: Purpose and Utility
The Hyrule Compendium functions as an in-game encyclopedia, designed to catalogue the diverse elements encountered throughout Hyrule. It systematically records information on Creatures, Monsters, Materials, Equipment (encompassing Weapons, Bows & Arrows, and Shields), and Treasure. Depending on the game version and installed downloadable content (DLC), the Compendium contains approximately 385 to 394 unique entries that Link can document.
The primary purpose of the Compendium is informational storage. When Link successfully photographs a subject using the Camera Rune, an entry is created or updated, providing a description, common locations where the subject can be found, and details on recoverable materials or potential drops. This database serves as a valuable reference for understanding the properties and habitats of Hyrule’s flora, fauna, and foes.
However, the Compendium’s true utility extends beyond passive reference through its integration with the Sheikah Sensor +. After obtaining this upgrade from Purah at the Hateno Ancient Tech Lab, players can select any logged Compendium entry and set the Sheikah Sensor to actively track that specific item, creature, or monster within the game world. The sensor emits an audible pulse and visual indicator that intensifies as Link nears the targeted subject, transforming the Compendium from a simple collection log into a powerful, active tool for locating resources, hunting specific enemies, or finding rare items like treasure chests. This synergy between documentation and detection creates a compelling gameplay loop: photographing subjects makes them easier to find, which in turn encourages further exploration and photography to leverage the sensor’s capabilities, thereby deepening the player’s interaction with Hyrule’s systems and environments.
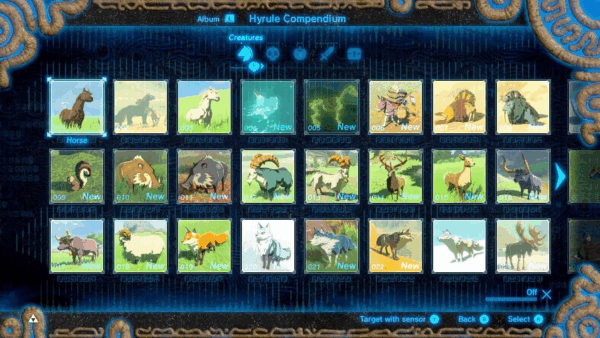
1.2 Cataloging Hyrule: Breakdown of Categories
The Compendium organizes Hyrule’s vast array of interactable elements into five primary categories. Understanding the scope of each category is essential for planning the completion effort.
- Creatures: This category encompasses all non-hostile fauna, including animals, fish, and insects. Examples range from common mounts like the Horse and wildlife such as the Woodland Boar or Grassland Fox , to various fish like the Hyrule Bass and insects like the Sunset Firefly. It also includes rarer beings like the Lord of the Mountain and helpful Fairies. The base game features 47 creature entries.
- Monsters: This section catalogues all hostile entities Link encounters. It includes common foes like Bokoblins , Moblins , Lizalfos , and Chuchus , as well as more formidable adversaries like Lynels , Guardians , Wizzrobes , and members of the Yiga Clan. Crucially, it also includes entries for all major bosses, such as the Blight Ganons and Calamity Ganon himself. There are 83 monster entries in the base game, though numbering can be affected by Master Mode exclusives.
- Materials: This category lists all collectible resources used primarily for cooking, elixir crafting, or armor upgrades. It includes fruits (Apple , Hearty Durian ), vegetables (Hyrule Herb , Fortified Pumpkin ), mushrooms (Sunshroom , Endura Shroom ), monster parts (Bokoblin Horn , Lynel Guts ), ancient components (Ancient Screw , Ancient Core ), minerals (Flint , Diamond ), and dragon parts. The base game contains 37 material entries.
- Equipment: This is the largest category, covering all usable weapons, bows, and shields. It includes swords (Traveler’s Sword , Master Sword ), spears (Traveler’s Spear ), two-handed weapons (Iron Sledgehammer), bows (Traveler’s Bow , Royal Bow ), and shields (Wooden Shield , Hylian Shield ). There are 185 equipment entries in the base game.
- Treasure: This small category includes non-weapon/material interactable objects that yield resources. The base game features 4 entries: Treasure Chest , Ore Deposit , Rare Ore Deposit , and Luminous Stone Deposit.
It is important to note that DLC additions (like The Champions’ Ballad) and Master Mode introduce new enemies and potentially equipment, which are integrated into the Compendium and can alter the total entry count and numbering sequence for entries beyond a certain point. Amiibo-exclusive items are generally not included.
The table below summarizes the categories and their approximate entry counts in the base version of Breath of the Wild.
| Category | Base Game Entry Count | Examples |
| Creatures | 47 | Horse, Woodland Boar, Hyrule Bass, Winterwing Butterfly, Fairy |
| Monsters | 83 | Bokoblin, Lizalfos, Lynel, Guardian Stalker, Thunderblight Ganon |
| Materials | 37 | Apple, Sunshroom, Bokoblin Horn, Flint, Ancient Screw, Shard of Horn |
| Equipment | 185 | Traveler’s Sword, Royal Bow, Hylian Shield, Ancient Bow, Knight’s Shield |
| Treasure | 4 | Treasure Chest, Ore Deposit, Rare Ore Deposit, Luminous Stone Deposit |
The structure of these categories mirrors the fundamental gameplay loops of Breath of the Wild. Successfully filling the Compendium requires engaging deeply with combat (for Monsters and their Equipment drops), survival and crafting systems (through gathering Materials and Creatures), and rewarding exploration (locating Treasure and unique Equipment). Thus, the quest to complete the Compendium naturally guides players toward mastering the full breadth of Hyrule’s challenges.
Section 2: Interacting with Symin at Hateno Ancient Tech Lab
2.1 Symin’s Role in Compendium Research
Symin is a Sheikah researcher and Purah’s dedicated, if somewhat overwhelmed, assistant at the Hateno Ancient Tech Lab, located atop a hill east of Hateno Village. He plays a pivotal role in Link’s interaction with the Hyrule Compendium. Upon Link’s initial arrival, likely directed by Impa as part of the “Locked Mementos” quest, Symin expresses surprise at the Sheikah Slate but notes the absence of its “basic functions”—namely the Camera, Hyrule Compendium, and Album runes.
After Purah restores these functions, Symin becomes the key NPC for advancing Link’s use of the Compendium. He is the quest giver for “Sunshroom Sensing,” a side quest that tutorializes the crucial Sheikah Sensor + tracking feature. More importantly for completionists, Symin is the sole vendor from whom Link can purchase missing Compendium entries, offering a vital alternative or supplement to manual photography. He can typically be found inside the lab, often near the Guidance Stone or his cluttered desk area—a space humorously demarcated by lines on the floor, hinting at ongoing spatial negotiations with the eccentric Purah. Symin, therefore, acts as the gatekeeper for both the advanced utility (Sensor+ tracking) and the completion guarantee (picture purchasing) associated with the Hyrule Compendium, making the Hateno Ancient Tech Lab the central hub for players pursuing this extensive collection task.
2.2 Essential Quests: “Locked Mementos” and “Sunshroom Sensing”
Accessing Symin’s full range of Compendium-related services requires completing a sequence of quests:
- Reach Hateno Ancient Tech Lab (“Locked Mementos”): Following Impa’s guidance in Kakariko Village, Link is directed to the lab in Hateno Village to seek repairs for the Sheikah Slate.
- Restore Basic Runes: Upon arrival, Purah tasks Link with carrying the ancient Blue Flame from a furnace in Hateno Village up to the lab’s furnace. This reactivates the Guidance Stone, allowing Purah to restore the missing Camera, Hyrule Compendium, and Album runes to the Sheikah Slate. Completing this also activates the Travel Gate outside the lab for convenient warping.
- Upgrade to Sheikah Sensor + (“Slated for Upgrades”): Link must then undertake Purah’s “Slated for Upgrades” side quest. By providing her with 3 Ancient Screws (farmable from various Guardians, including inactive ones), Purah upgrades the basic Sheikah Sensor to the Sheikah Sensor +. This upgrade is a prerequisite for Symin’s quest.
- Complete “Sunshroom Sensing”: With the Sheikah Sensor + installed, speaking to Symin initiates the “Sunshroom Sensing” side quest. This quest involves several steps designed to teach the player how to use the Compendium and Sensor+ together:
- First, Link must use the Camera Rune to photograph a Sunshroom growing just behind the lab building.
- Upon showing the picture to Symin, he explains how to register the photo in the Compendium and tune the Sensor+ to track Sunshrooms. He directs Link to read nearby notes for more details.
- Symin then tasks Link with using the Sensor+ to locate and gather three more Sunshrooms, suggesting the nearby Retsam Forest as a likely location.
- Returning with the three Sunshrooms completes the quest. Symin rewards Link with three Hearty Truffles. Crucially, completing this quest unlocks the dialogue option allowing Link to purchase Compendium pictures from Symin.
This structured quest progression ensures players first learn and practice the primary method of Compendium interaction—photographing subjects and using the Sensor+ for tracking—before being offered the alternative, convenience-oriented purchase option.
Section 3: Compendium Acquisition Methods
There are two distinct pathways to filling the Hyrule Compendium: manual photography using the Camera Rune and purchasing data entries directly from Symin.
3.1 The Photographer’s Path: Using the Camera Rune
The primary and intended method for populating the Hyrule Compendium is through direct photography. After Purah restores the Camera Rune at the Hateno Ancient Tech Lab , Link can activate it via the Sheikah Slate interface. Basic operation involves selecting the rune, aiming the viewfinder, and pressing the ‘A’ button to capture an image. The right joystick controls zoom, allowing for closer shots of distant or hazardous subjects, while the left joystick adjusts the camera’s angle. When a picture is taken of a subject not yet logged or one with only a placeholder entry, it is automatically registered in the Hyrule Compendium, adding its image and associated data.
While the game’s requirement for registration is simply a recognizable image, many players strive for higher quality or more aesthetically pleasing photographs. Achieving optimal shots involves several techniques:
- Zoom: Effectively utilized for capturing images of dangerous monsters from a safe distance or documenting skittish fauna without startling them. Maximum zoom can also serve as a makeshift telescope for identifying distant targets.
- Centering and Framing: Ensuring the subject is well-centered and clearly fills a significant portion of the frame generally guarantees registration. Beyond functionality, players may consider background elements, lighting, and composition to create more visually appealing entries. Some develop preferences for specific locations or surfaces (like the wooden floors in Hateno Village, the platforms in Rito Village, or the weapon mounts in Link’s house) to maintain a consistent aesthetic across their Compendium, particularly for equipment.
- Positioning Items: For inanimate objects like weapons, shields, or materials, dropping them onto a clear surface is often necessary to achieve a good angle and framing, especially for long items that are difficult to fit vertically. Using Magnesis to prop up metallic items can also create interesting compositions.
- Lighting: Good lighting is key. Natural daylight generally produces the clearest images. Indoor locations or nighttime shots can appear dim or ‘foggy’, although necessary for nocturnal creatures or luminous objects. Facing the sun correctly when dropping items can improve the shot’s quality.
- Selfie Mode: While available and allowing for creative poses , selfie mode is generally impractical for Compendium completion, as Link often puts away held creatures when activating it , and framing equipped gear can be awkward.
The player-driven pursuit of “perfect” shots transforms the Compendium task from a simple collection quest into a form of virtual photography, adding a layer of personal creativity and engagement with the game’s visual elements and camera mechanics.
3.2 The Researcher’s Path: Purchasing Data from Symin
As an alternative to manual photography, players can purchase Compendium entries directly from Symin at the Hateno Ancient Tech Lab. This option becomes available only after successfully completing the “Sunshroom Sensing” side quest.
The transaction details are as follows:
- Cost: Standard pictures, covering the Fauna, Enemy (non-elite), Material, Weapon, and Other (Treasure) categories, cost 100 Rupees each.
- Elite Enemy Pictures: A separate category exists for “Elite” enemies. These pictures cost significantly more, at 500 Rupees each. This category typically includes all Blight Ganons, Master Kohga, Calamity Ganon, Dark Beast Ganon, and high-tier standard enemies like Silver and Gold variants (Gold being Master Mode exclusive). DLC bosses like Monk Maz Koshia may also fall into this category if the DLC is installed. The total number of Elite pictures varies depending on game mode and DLC (11 base game, up to 15+ with Master Mode/DLC).
- Elite Availability: Crucially, Symin will not offer Elite Enemy Pictures for sale until Link has defeated Dark Beast Ganon at least once. This is typically indicated by a star icon next to the save file on the load screen. This gating mechanism prevents players from purchasing images of major bosses before encountering them, thus avoiding spoilers.
- Purchase Mechanism: When purchasing, Link must choose a category (Fauna Picture, Enemy Picture, Material Picture, Weapon Picture, Other Picture, or Elite Enemy Picture). Symin then provides a picture for one randomly selected entry within that category that Link has not yet registered. It is impossible to select a specific missing entry for purchase, unless only one entry remains missing in the chosen category.
- The Sunshroom Exception: Due to the structure of the “Sunshroom Sensing” quest, which requires photographing a Sunshroom to unlock Symin’s shop, the official Sunshroom picture cannot be purchased. Link’s own photo is the only way to register this specific entry.
An exploit was reported where selling a large quantity of a single item (e.g., 35 apples) just before receiving the initial free picture from Symin (after “Sunshroom Sensing”) could potentially grant multiple free Compendium entries, possibly filling sections beyond Materials if that category became full. However, the reliability and current status of this exploit are uncertain.
The design of the purchase system positions it clearly as a secondary method. The significant cost, particularly for a full Compendium (potentially tens of thousands of Rupees ), and the random nature of the pictures strongly incentivize players to rely on their own photography skills for the majority of entries. Purchasing serves primarily as a convenient, albeit expensive, failsafe for genuinely missed entries (like bosses) or for players who prioritize completion over the photographic process itself. The gating of elite photos further reinforces its role as a post-game cleanup mechanism.
Section 4: Strategic Subject Acquisition Protocols
Successfully photographing all Compendium entries requires targeted strategies for locating subjects across Hyrule’s diverse environments and encounters.
4.1 Locating Equipment (Weapons, Bows & Arrows, Shields)
Equipment is the largest category and requires diverse acquisition methods:
- Enemy Drops: This is the most common source. Bokoblins, Moblins, and Lizalfos drop basic to mid-tier gear (e.g., Boko Bows, Moblin Clubs, Lizal Shields). As the game progresses and enemies scale up (Blue -> Black -> Silver -> Gold), they drop correspondingly stronger equipment (e.g., Dragonbone Boko Bows, Royal Halberds, Steel Lizal Bows). Yiga Footsoldiers and Blademasters drop Duplex Bows and Windcleavers. Lynels are prime sources for powerful Savage Lynel Bows (multi-shot), Swords, Crushers, Spears, and Shields. Hinoxes often wear weapons and bows around their necks, which can sometimes be stolen while they sleep or looted after defeat. Guardian Scouts within “Test of Strength” shrines reliably drop Guardian and Ancient weapons and shields upon defeat.
- Fixed Locations & Respawns: Certain valuable pieces of equipment respawn in specific overworld locations after each Blood Moon. Notable examples include:
- Elemental Greatswords (Great Flameblade, Great Frostblade, Great Thunderblade) found under Leviathan Skeletons (Eldin and Gerudo Desert), on specific peaks (Cuho Mountain near Rito Village for Thunderblade), or inside Hyrule Castle.
- Royal Claymore on the Woodland Tower.
- Forest Dweller’s Shield and Sword respawn near the Deku Tree in Korok Forest.
- Zora Shield respawns on a bridge in Zora’s Domain.
- Golden Bow respawns in the Gerudo Town barracks.
- Rusty weapons found scattered in ruins can be fed to Rock Octoroks (found near Death Mountain) to be polished into standard Soldier’s, Knight’s, or Royal gear.
- Shrines: Beyond Test of Strength shrines, many regular shrines contain treasure chests holding specific equipment as rewards for solving puzzles or navigating trials. Examples include the Climber’s Bandana (Ree Dahee Shrine), Knight’s Bow (Sah Dahaj Shrine), and Edge of Duality (Kaam Ya’tak Shrine). The Ta’loh Naeg Shrine near Kakariko Village explicitly provides basic weapons and a shield as part of its combat tutorial.
- Hyrule Castle: This late-game area is exceptionally rich in high-tier equipment. Royal and Royal Guard weapons and shields are abundant, either lying in specific rooms (Library, Guard’s Chamber, Armory, King’s Study) or wielded by the powerful Moblins and Lizalfos patrolling the castle. The iconic Hylian Shield is found in a chest after defeating a Stalnox in the Lockup area beneath the castle.
- Coliseum Ruins: Located southwest of Central Hyrule, the enemies on the upper levels of the Coliseum wield weapons that scale with game progression. After clearing all four Divine Beasts, they will carry powerful elemental weapons (Flamespears, Thunderblades, Frostspears, etc.), making it a reliable farming spot.
- Arrows: While not equipment Link wields permanently, arrows have Compendium entries. Standard arrows are plentiful from defeated archers, broken crates/barrels, and shops in villages (Kakariko, Hateno, Rito, Gerudo) and stables (Beedle). Elemental arrows (Fire, Ice, Shock), Bomb Arrows, and Ancient Arrows are typically found in treasure chests, purchased from specific vendors (like the Gerudo Secret Club or Beedle at certain stables), or crafted at the Akkala Ancient Tech Lab (Ancient Arrows). A large cache of Shock Arrows can be farmed from the Lynel on Ploymus Mountain near Zora’s Domain before completing the Vah Ruta quest.
Acquiring the full range of equipment for the Compendium is thus closely tied to exploring dangerous, high-reward locations, defeating powerful foes, and revisiting fixed respawn points after Blood Moons, reflecting Link’s increasing combat prowess and knowledge of Hyrule’s secrets.
4.2 Locating Materials (Plants, Minerals, Monster Parts)
Materials are generally gathered through exploration and defeating monsters:
- Environmental Distribution: Most plants and some creatures exhibit strong regional preferences tied to climate and terrain. For example:
- Cold Regions (Hebra, Gerudo Highlands, Mount Lanayru): Chillshrooms, Cool Safflina, Wildberries, Hearty Salmon, Chillfin Trout, Winterwing Butterflies, Cold Darners.
- Hot Regions (Eldin, Gerudo Desert): Sunshrooms, Warm Safflina, Spicy Peppers, Hydromelons, Voltfruit, Sizzlefin Trout, Smotherwing Butterflies, Warm Darners, Fireproof Lizards (Eldin).
- Temperate Regions (Hyrule Field, Necluda, Akkala): Hylian Shrooms, Stamella Shrooms, Hyrule Herbs, Apples, Hylian Rice, various Bass and Carp, common insects like Restless Crickets and Hightail Lizards.
- Forests (Great Hyrule Forest, Faron): Endura Shrooms, Silent Shrooms, Hearty Truffles, Silent Princess (also near Fairy Fountains), Stealthfin Trout (Lost Woods area).
- Specific Zones: Mighty Bananas (Faron, Yiga Hideout), Hearty Durians (Faron), Fleet-Lotus Seeds (near water), Rushrooms (on cliffs), Swift Violets (on cliffs, harder to reach).
- Minerals: Ore Deposits containing Flint, Rock Salt, Amber, Opal, Topaz, Ruby, Sapphire, and occasionally Diamonds are most common in mountainous regions like Eldin, Hebra, Gerudo Highlands, and around Goron City. Luminous Stone Deposits glow at night and are found scattered, often near cliffs or caves. Rare Ore Deposits have golden veins and yield higher-value gems. Stone Talus minibosses are excellent sources of various gems upon defeat.
- Monster Parts: Obtained by defeating the corresponding monster. Basic parts like Horns and Fangs are common drops. More valuable parts like Guts drop from higher-tier versions (Black, Silver, Gold) or larger monsters (Hinox, Molduga, Lynel). Elemental parts (Chuchu Jelly, Keese Wings, Lizalfos Tails) drop from elemental variants and are used for resistance elixirs. Ancient Materials (Screws, Springs, Gears, Shafts, Cores) are dropped exclusively by Guardians of all types.
- Dragon Parts: Scales, Claws, Fangs, and Horn Shards are obtained by shooting the respective body part of the three dragons (Dinraal, Naydra, Farosh) as they fly through specific regions of Hyrule at certain times of day. Only one part can be obtained per encounter.
- Farming Strategies: Once a material is registered in the Compendium, the Sheikah Sensor+ becomes invaluable for efficient farming runs. Identify resource-rich areas (e.g., Satori Mountain for varied plants and Blupees, Faron for Hearty Durians , Eldin for minerals) and revisit them periodically, as many materials respawn daily or after a short time, often faster than the Blood Moon cycle required for enemies and weapons.
Material gathering is fundamentally tied to exploring Hyrule’s diverse biomes and understanding the ecological niches of its plants and creatures, as well as the drop tables of its monsters. This encourages broad exploration and learning the unique characteristics of each region.
4.3 Locating Monsters
Finding specific monsters for the Compendium involves understanding their habitats, the game’s scaling system, and fixed encounter locations:
- Regional Habitats: Most common monsters have preferred environments. Bokoblins and Moblins are widespread but common in Hyrule Field and forests. Lizalfos favor watery areas, deserts, and volcanic regions. Keese inhabit caves and appear frequently at night. Octoroks vary by type (Forest, Water, Rock, Snow, Sky) and are found in corresponding terrains. Wizzrobes often haunt ruins or areas with extreme weather matching their element. Guardians patrol Hyrule Field, Akkala, and areas surrounding Hyrule Castle and ancient shrines. Lynels occupy specific open plains, plateaus, and mountain passes across various regions. The Compendium’s “Common Locations” provide general guidance. Detailed maps and regional guides offer more specific locations.
- Enemy Scaling: A crucial factor is the hidden enemy scaling system. As Link defeats more enemies (especially powerful ones), the game increases a hidden counter. Reaching certain thresholds causes weaker enemy variants (Red Bokoblins, Blue Moblins) in many locations to be replaced by stronger versions (Blue -> Black -> Silver -> Gold in Master Mode). This means that photographing lower-tier common enemies might become difficult later in the game if all accessible spawn points have scaled up. Players aiming for self-photographed entries should prioritize capturing images of basic enemy types early in their playthrough.
- Fixed Encounters: Many powerful or unique monsters have fixed spawn points that are unaffected by scaling and respawn after every Blood Moon. This includes all Stone Talus variants, Hinoxes (Red, Blue, Black, Stal), Moldugas (Gerudo Desert), and Lynels (though their tier might scale up at certain locations). Decayed and active Guardians also have numerous fixed locations. These fixed points are essential for reliably finding and photographing these specific monster types.
- Specific Conditions: Stal-type enemies (Stalkoblin, Stalmoblin, Stalizalfos) only appear at night in various regions. Elemental Keese, Chuchus, and Lizalfos are found in environments matching their element (e.g., Ice Keese in Hebra, Fire-Breath Lizalfos in Eldin). Treasure Octoroks disguise themselves as chests and pop out when Link approaches. Yiga Footsoldiers and Blademasters appear randomly after Link visits Kakariko Village or confronts them at their hideout, but also have fixed ambush points.
Successfully documenting all monsters requires combining knowledge of fixed locations for bosses and minibosses with an understanding of regional habitats and the dynamic scaling system affecting common foes. Early photography of basic tiers is advisable for completionists avoiding purchases.
4.4 Locating Treasure (Chests & Ore Deposits)
The Treasure category is small but requires diverse exploration techniques:
- Treasure Chests: These are scattered throughout Hyrule in various forms and locations:
- Shrines: Nearly every Shrine contains at least one chest, often holding valuable materials, Rupees, or equipment. Shrine chests are typically Sheikah-designed (stone or metal) and do not respawn.
- Enemy Camps: Many camps feature a skull-marked chest that only unlocks after defeating all enemies in the vicinity. These often contain weapons or significant Rupee amounts and do respawn with the camp after a Blood Moon.
- Underwater/Buried: Metallic chests are frequently submerged in lakes, rivers, or ponds, or partially buried in the ground. The Magnesis rune is required to pull them out. Wooden chests can float; Cryonis can be used to lift them.
- Overworld: Chests are hidden in ruins, caves, behind destructible walls or rocks, atop pillars, and dropped by defeated Moldugas. Hyrule Castle contains numerous well-hidden chests. Overworld chests (non-shrine, non-quest) generally respawn after Blood Moons.
- Ore Deposits: These mineral nodes are primarily found embedded in cliff faces, cave walls, and rocky outcrops, particularly in mountainous regions like Eldin, Hebra, Gerudo Highlands, and Faron. They must be broken open using mining tools (Iron Sledgehammer, Cobble Crusher), heavy weapons, or Remote Bombs.
- Standard Ore Deposits: Brownish-grey rock, yield Flint, Rock Salt, Amber, Opal.
- Rare Ore Deposits: Have distinctive golden veins, yield higher chances of Topaz, Ruby, Sapphire, Diamond.
- Luminous Stone Deposits: Black rock with glowing blue veins (visible at night), yield Luminous Stones and Flint.
- Using Sensor+: Photographing any type of Treasure Chest or Ore Deposit allows the Sheikah Sensor+ to track similar objects. This is exceptionally helpful for locating hidden chests within Shrines or complex environments like Hyrule Castle, and for efficiently finding ore deposits for farming.
Photographing the Treasure entries requires engaging with nearly all aspects of exploration: puzzle-solving in shrines, combat at enemy camps, environmental interaction with runes, and diligent searching of the landscape.
4.5 Locating Fauna (Animals & Insects)
Capturing images of Hyrule’s diverse wildlife requires understanding habitats, behavior, and employing stealth:
- Habitat Specificity: Fauna distribution is closely tied to environment. Consult the Compendium’s “Common Locations” or external resources. General patterns include:
- Domesticated/Settlement Animals: Horses, Donkeys, Hylian Retrievers, Hateno Cows, Highland Sheep, Cuccos are found near Stables, Villages (Hateno, Kakariko), or specific ranches. Sand Seals are unique to the Gerudo Desert, used as mounts. Patricia is Riju’s unique Sand Seal.
- Common Wildlife: Squirrels, Boars, Goats, Deer, Foxes are found in temperate forests and fields like Hyrule Field, West Necluda, and the Great Plateau. Wolves often roam in packs in similar areas or colder regions. Water Buffalo inhabit wetlands.
- Regional Wildlife: Tabantha Moose and Great-Horned Rhinoceros are primarily in Tabantha and Hebra. Bears (Honeyvore, Grizzlemaw) inhabit forests, particularly near Hebra and Akkala. Eldin Ostriches are unique to the Eldin region. Wasteland Coyotes are found in the desert.
- Birds: Sparrows and Pigeons frequent settlements and stables. Crows, Herons, Ducks, Hawks, and Seagulls are found near their respective habitats (mountains, wetlands, lakesides, coasts).
- Fish: Bass and Carp are common in most freshwater bodies. Trout and Salmon prefer colder waters (Hebra, Tabantha, Lanayru mountains). Porgy and Crabs are found in saltwater along coastlines (Necluda Sea, Lanayru Sea). Snails inhabit freshwater shores or coastal beaches. Stealthfin Trout are famously found in the waters surrounding the Lost Woods.
- Insects & Small Creatures: Butterflies and Darners vary by type and are found near flowers or in specific climates/weather. Crickets and Fireflies are common in grassy fields (Fireflies at night). Rhino Beetles cling to trees in specific regions (check Compendium). Frogs are found near water, with Tireless Frogs appearing mainly during rain. Lizards are common in grassy areas or specific climates (Hearty Lizards near coasts, Fireproof Lizards in Eldin). Blupees appear sporadically, often near Great Fairy Fountains or Satori Mountain.
- Behavior and Approach: Most wild creatures are easily startled. Loud noises or rapid approach will cause them to flee (run, swim, or fly away). Some, like Wolves and Bears, are aggressive and will attack. Success hinges on careful approach:
- Stealth: This is paramount. Wearing the full Sheikah Armor set (ideally upgraded for the night speed bonus) significantly reduces detection range. Crouching (pressing the left stick) further minimizes noise and visibility. Stealth-boosting elixirs or food can supplement armor effects.
- Distance and Zoom: Maintain maximum possible distance and use the Camera Rune’s zoom function to frame the shot.
- Patience and Observation: Often, the best strategy is to find a good vantage point, remain still, and wait for the creature to enter the frame or pause its movement. Learning typical paths or resting spots helps. Some creatures might even approach a stationary Link out of curiosity.
- Stasis+: The upgraded Stasis rune can temporarily freeze animals, providing a brief window for a clear shot. However, the activation effect might startle them once it wears off. It’s most useful for very fast or erratically moving creatures.
- Avoid Inventory Drops: Attempting to photograph creatures dropped from the inventory is highly ineffective, as they begin fleeing the instant they are released. Always photograph fauna in their natural habitat.
- Baiting: While dropping food can distract some enemies (like Yiga with bananas ), its effectiveness for baiting fauna specifically for photography is limited and not a primary strategy mentioned in findings.
Photographing fauna often demands a different skillset than other categories, emphasizing patience, observation, and mastery of stealth mechanics over direct confrontation or simple object interaction. It closely mirrors the challenges and rewards of real-world wildlife photography.
Section 5: Addressing Data Gaps: Missable Entries
While the Hyrule Compendium is designed for comprehensive documentation, certain entries can become permanently unavailable for manual photography during a playthrough due to unique encounters or game progression mechanics.
5.1 Identifying Irretrievable Subjects
The following subjects are generally considered “missable” for players aiming to take all their own pictures, requiring them to rely on Symin’s purchase option if the opportunity is missed:
- Divine Beast Bosses (Blight Ganons): Thunderblight Ganon, Fireblight Ganon, Waterblight Ganon, and Windblight Ganon are encountered only once within their respective Divine Beasts during the main questline. Failure to photograph them during these battles means the opportunity is lost in the base game. (Note: The Champions’ Ballad DLC introduces ways to re-fight the Blights in memory sequences, but it’s unclear if these re-fights count for the initial Compendium entry or if they use predefined equipment sets ).
- Yiga Clan Leader (Master Kohga): The fight against Master Kohga in the Yiga Clan Hideout is a one-time story event. He must be photographed during this encounter.
- Unique Quest Enemies:
- Sentries: The small, drone-like Guardians deployed by Vah Rudania during the stealth approach sequence with Yunobo are unique to this mission segment and do not appear elsewhere.
- Cursed Enemies: The Cursed Bokoblin, Moblin, and Lizalfos heads spawned from Malice inside the Divine Beasts might be considered missable if not photographed before clearing the beast, as access to the Divine Beasts’ interiors is lost afterwards.
- Scaled Equipment: Due to the enemy scaling system , certain lower-tier weapons wielded by Lynels may become impossible to find later in the game as all Lynels upgrade their gear. This primarily affects:
- Lynel Spear
- Lynel Crusher
- Mighty Lynel Spear
- Mighty Lynel Crusher These items have limited or no fixed respawn locations outside of Lynel drops, making their photographs missable once Lynels universally carry Savage-tier equipment. (Note: Master Mode has different scaling and potentially different missable gear, such as the Blue-Maned Lynel itself or Guardian Scout I ).
- Limited Quantity Items:
- Kite Shield: This shield is found in only a few treasure chests and as a one-time reward from Selmie’s Shield-Surfing minigame in the Hebra Mountains. If Link obtains all available Kite Shields and then breaks or loses them, it becomes impossible to find another one to photograph. Taking a picture of the one on Selmie’s wall is possible before winning it as a prize.
- Forest Dweller’s Sword: There might be issues photographing this sword if the Trial of Wood quest mechanics make it difficult to drop and retrieve after completion, potentially making it missable if not photographed during the trial.
These missable entries arise from the confluence of unique, non-repeatable story encounters and the game’s dynamic scaling systems that evolve the world based on player progression.
5.2 Symin’s Picture Stock as a Contingency
Despite the existence of these photographically missable entries, it is crucial to understand that no Hyrule Compendium entry is permanently unobtainable. Symin, at the Hateno Ancient Tech Lab, offers the ultimate failsafe. After completing the “Sunshroom Sensing” quest, Link can purchase pictures for any missing entry in his Compendium, including all bosses, unique enemies, and scaled equipment.
The only caveat is the timing for boss pictures: images of the Blight Ganons, Master Kohga, Calamity Ganon, and Dark Beast Ganon (the “Elite Enemy” category) are only available for purchase after Link has defeated the final boss, Dark Beast Ganon, at least once. This ensures players cannot spoil major encounters by buying the pictures prematurely.
Therefore, while players aiming for a “self-photographed” Compendium must be vigilant during specific encounters and mindful of scaling, the ability to purchase entries removes the pressure of permanent missability. The challenge shifts from perfect execution during the main adventure to potential resource management (Rupee farming) for post-game cleanup if necessary. This design choice makes 100% Compendium completion achievable for all dedicated players, regardless of missed photographic opportunities.
Section 6: Field Photography Best Practices
Successfully photographing Hyrule’s diverse subjects, especially those that are dangerous or elusive, requires adopting specific field techniques.
6.1 Risk Mitigation: Safely Documenting Hostile Subjects
Approaching monsters for a photograph requires caution and strategy:
- Stealth: Utilizing the Sheikah Armor set grants significant stealth bonuses, allowing Link to get closer without detection. Crouching further reduces noise and visibility. Approaching from behind or using cover is advisable. Sneakstrikes can incapacitate an enemy temporarily, providing a window for a quick photo before delivering the final blow. Many monsters sleep at night or during the day, offering prime opportunities for stealthy photography. Disarming enemies by stealing nearby weapons can also reduce immediate threat.
- Distance and Zoom: The Camera Rune’s zoom capability is essential. Finding elevated positions or vantage points across gaps allows Link to photograph dangerous foes like Lynels, Guardians, or large encampments from relative safety.
- Stasis+: The upgraded Stasis rune is invaluable for hostile subjects. Freezing an enemy in time provides a safe, stationary target for photography. This is particularly effective against fast-moving enemies like Lizalfos or charging foes like Lynels.
- Environmental Tactics: Leverage the environment and runes. Use Magnesis to lift and drop heavy metal objects onto enemies from a distance. If enemies gather near conductive materials (metal crates, water), an electric arrow can create a stunning area-of-effect attack. Using high ground or obstacles that enemies cannot easily navigate can provide safe zones for observation and photography.
- Target Prioritization: In enemy camps, especially those with watchtowers, prioritize photographing and eliminating lookout enemies first to prevent them from sounding alarms and alerting the entire camp.
Applying these techniques integrates the act of photography into the broader strategic thinking required for combat and exploration in Breath of the Wild, rewarding careful planning even when the immediate goal isn’t defeating the enemy.
6.2 Capturing Elusive Subjects: Techniques for Skittish Fauna
Photographing non-hostile but easily frightened creatures presents a different set of challenges:
- Stealth Gear: As with hostile subjects, the Sheikah Armor set is highly recommended, ideally fully upgraded for the Set Bonus (increased movement speed at night). Stealth-boosting food or elixirs provide additional benefit.
- Slow and Steady Approach: Move slowly and deliberately, always while crouching, when nearing skittish animals, birds, or insects. Avoid sprinting or jumping, which creates noise. Some creatures, like lizards, may tolerate closer proximity if Link is wearing full stealth gear.
- Maximize Zoom: Utilize the camera’s maximum zoom to capture the image from the furthest possible distance that still allows for registration.
- Patience and Observation: Often, success requires patience. Find a spot near the creature’s habitat, remain still, and wait for it to move into a favorable position or even approach Link. Learning the creature’s movement patterns (e.g., a bird’s perch, a fish’s swimming route) can help anticipate opportunities.
- Stasis+: Can be used to freeze a fast-moving creature (like a dragonfly or frog) momentarily, but the activation sound or visual effect might scare it immediately after the stasis ends. Use judiciously.
- Photograph in the Wild: Do not attempt to photograph creatures by dropping them from the inventory. They will flee instantly, making it extremely difficult to get a usable shot. Patience in finding them in their natural environment is key.
- Persistence for Small Subjects: Very small or fast-moving insects like darners, crickets, or butterflies can be particularly challenging. Sometimes, the best approach involves getting as close as possible with stealth and rapidly taking multiple photos, hoping one captures the subject clearly enough for registration before it darts away.
Success with elusive fauna hinges on shifting from direct action to passive observation, patience, and the skillful application of stealth mechanics, offering a distinct and often rewarding gameplay challenge compared to other Compendium categories.
Section 7: Acknowledgment of Completion
The culmination of the effort to fill every entry in the Hyrule Compendium involves a final interaction with Symin.
7.1 Reporting to Symin: Presenting the Full Compendium
Once Link has successfully registered every creature, monster, material, piece of equipment, and treasure, either through personal photography or by purchasing the remaining entries, he should return to the Hateno Ancient Tech Lab. Speaking with Symin with a fully completed Compendium triggers a unique dialogue sequence where he expresses astonishment and admiration for Link’s dedication to their research project.
7.2 The Classified Envelope: Nature of the Reward
As recognition for this significant achievement, Symin presents Link with a unique Key Item: the Classified Envelope. According to its description and Symin’s dialogue, the envelope contains a picture of a “beautiful young woman of the Sheikah tribe”. Symin mentions finding it tucked away in a book and muses about the identity of the woman depicted, leaving it somewhat ambiguous.
Despite being classified as a Key Item, the Classified Envelope serves no known gameplay purpose. It cannot be used, equipped, or traded, and it provides no buffs or abilities. It simply resides in the Key Items tab of the inventory as a memento of completing the Compendium. While its subject remains officially unconfirmed, context strongly suggests the picture likely depicts a younger version of either Impa or Purah.
The purely symbolic nature of this reward underscores that the true benefits of completing the Hyrule Compendium lie in the process itself—the enhanced exploration, the mastery of game mechanics, the practical utility of the Sensor+ tracking feature, and the personal satisfaction of achieving 100% documentation of Hyrule’s rich world. The Classified Envelope serves as a quirky, memorable acknowledgment of the player’s commitment rather than a tangible gameplay advantage.
Conclusion
Completing the Hyrule Compendium in The Legend of Zelda: Breath of the Wild is a substantial undertaking, demanding extensive exploration, keen observation, strategic combat, proficient stealth, and meticulous documentation. It represents a journey through every facet of Hyrule’s world, from its diverse ecosystems and inhabitants to its ancient technologies and hidden treasures.
Players can pursue this goal through diligent fieldwork with the Camera Rune, a path enhanced significantly by the Sheikah Sensor+ upgrade which turns the Compendium into an active tool for discovery. Alternatively, the option to purchase data from Symin provides a crucial, albeit costly, failsafe, ensuring that even missed opportunities or particularly challenging subjects do not permanently hinder completion. The existence of missable entries, primarily tied to unique boss encounters and the game’s scaling mechanics, adds a layer of strategic consideration for those aiming for self-sufficiency, but Symin’s comprehensive stock ultimately guarantees attainability for all dedicated players.
Ultimately, the Hyrule Compendium serves as more than just a collection quest. It actively encourages players to engage deeply with the environment, learn the behaviors of creatures and monsters, understand the distribution of resources, and master the game’s core mechanics. While the final reward, the Classified Envelope, is purely symbolic, the process of filling the Compendium offers its own intrinsic rewards: a richer understanding of Hyrule, the practical benefit of targeted Sensor+ tracking, and the profound satisfaction of having thoroughly documented one of gaming’s most expansive and detailed open worlds.