Table of Contents
- Journey to Goron City (Eldin’s Heat and Flame Resistance)
- Goron City: Meeting Bludo and the Divine Beast Crisis
- Abandoned North Mine: Rescuing Yunobo
- Scaling Death Mountain: Assault on Vah Rudania
- Inside Divine Beast Vah Rudania
- Boss Battle: Fireblight Ganon (Scourge of Divine Beast Vah Rudania)
- Aftermath in Goron City
Journey to Goron City (Eldin’s Heat and Flame Resistance)
Begin your trek to Goron City through the Eldin region, where the air itself burns. From Foothill Stable (at Eldin’s foothills), stock up on Flame Guard protection. [Optional] Activate the Mo’a Keet Shrine behind the stable as a fast-travel point. Speak to Gaile at the stable to buy Fireproof Elixirs (3 for 150 rupees) – each elixir grants about 6 minutes of flame resistance. You won’t need to chug one immediately, but have them ready. If you prefer gear, you can also complete a side quest for flame-resistant armor: head up the road to Southern Mine.
As you ascend into the Maw of Death Mountain, the temperature steadily climbs. Soon you’ll hit a threshold where everything combustible ignites – wooden weapons and shields will start smoking then burst into flame. Important Tips for Heat Survival:
- Equip Metal Gear: Swap out all wooden items for metal to prevent them from burning up.
- Scavenge Quickly: Fallen monster parts or wooden arrows can combust in the superheat – grab loot immediately before it chars.
- Cook on the Ground: The ground is so hot you can simply drop food to roast it (though you can’t cook full meals this way).
March north along the trail, dealing with any Red Chuchus (they explode in flame when killed) and other foes quickly – or simply run past enemies to save your precious flameproof time. Soon you’ll spot a tall Sheikah Tower off the path. [Optional] Eldin Tower: Before entering Death Mountain proper, consider detouring west up a slope to activate Eldin Tower for a map. To find the path, look for a dead Guardian by the road; opposite it, a trail leads uphill. Beware of rolling boulders and fire Chuchus as you climb. At the top, activate Eldin Tower to reveal the region. From this vantage, you can actually see Foothill Stable below – a reminder to use a fireproof elixir now if you haven’t already.
Glide or climb down from the tower and continue north on the main path into Southern Mine. Here, chat with Kima, the Hylian in armor, to start the “Fireproof Lizard Roundup” side quest. [Optional] Fireproof Lizard Quest: Collect 10 Fireproof Lizards found crawling on rocks around Southern Mine (they tend to scurry under stones or on the ground – crouch or use a quick arrow to snag them). Turn them in to Kima, and he’ll reward you with the Flamebreaker Armor (torso) for free. This piece, combined with an elixir, provides enough heat resistance to reach Goron City safely. (You can also buy the rest of the Flamebreaker set later in Goron City, though at a high price.) If you see any Smotherwing Butterflies on your way, grab them too – they can be cooked with monster parts for DIY flameproof elixirs.
When ready, cross the bridges north of Southern Mine toward Goron City. The final leg is brief – about a minute up a curving slope. As you approach the city, the volcano erupts in the distance, triggering a deadly magma bomb rain: fireballs will fall from the sky onto the path. Sprint for the nearest rock overhang on the left side of the road and huddle underneath until the eruption passes. Once the bombardment stops, dash up the remaining trail to arrive at Goron City.
Goron City: Meeting Bludo and the Divine Beast Crisis
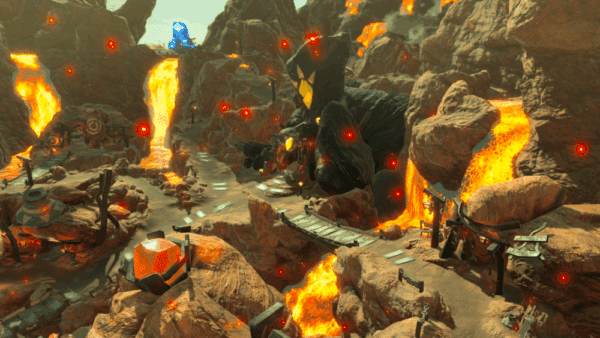
The rocky settlement of Goron City nestles amid flowing lava streams on Death Mountain. The Divine Beast Vah Rudania—visible as a dark, lizard-like silhouette with glowing red spots—clings to the volcano above, casting its ominous gaze over the city.
Upon entering Goron City, you’re greeted by intense heat, glowing lava falls, and the hearty welcome of the Gorons. Take a moment to gear up and prepare in town. [Optional] Activate the Shae Mo’Shah Shrine near the entrance for a warp point. Visit the armor shop (on the right as you enter) to purchase Flamebreaker gear if needed. You’ll want two levels of flame protection for the next leg, so mix and match armor and elixirs as necessary. For example, wearing the Flamebreaker Armor plus Flamebreaker Boots covers you (600 + 700 rupees), or use one piece of armor and keep an elixir effect running. Don’t forget you can cook meals at the local cooking pot to boost your health or defense – every Goron City inn or pot is a welcome respite in this scorching environment.
When you’re ready, seek out the Goron boss Bludo. He’s a gruff older Goron with an eye-patch, found at the far end of the city in the Boss’s House (you’ll see a large Goron elder there). Speak to Bludo to learn of the crisis: Divine Beast Vah Rudania (the giant mechanical lizard on the volcano) has been acting up, crawling around Death Mountain and causing eruptions that rain boulders on Goron City. Bludo has been trying to calm the Beast by blasting it with cannons, but his chronic back pain has flared up, rendering him unable to fight. He sent his protege, Yunobo, to the Abandoned North Mine to retrieve some painkillers from a storage vault, but Yunobo hasn’t returned. With Rudania still raging and Bludo incapacitated, he asks for your help. Your next mission: head to Abandoned North Mine to find Yunobo (and hopefully get those painkillers to Bludo). Bludo hands you the quest “Divine Beast Vah Rudania” and marks the path north out of Goron City.
Before leaving, you can [Optional] approach the Goron Stone Memorial just outside Bludo’s house. Examining this stone monument triggers a memory cutscene (“Daruk’s Mettle”) where Link recalls Champion Daruk (the Goron hero). It’s a touching scene that provides backstory – Daruk once protected Goron City with his mighty shield ability – and reveals that Yunobo is actually a descendant of Daruk. (This is why Yunobo can use Daruk’s Protection, a red protective bubble, when he’s launched from cannons.) The memory is optional, but highly recommended for story immersion. With lore and objectives in mind, set out for the North Mine.
Abandoned North Mine: Rescuing Yunobo
Leave Goron City via the north exit and follow the winding trail upward. Shortly, you’ll reach the Abandoned North Mine area, marked by lava pools and scaffolding. At the entrance, a panicked Goron named Drak will stop you. He warns that the North Mine is even hotter than Goron City – you’ll need Level 2 flame guard here. Make sure you have two pieces of Flamebreaker armor equipped, or one piece plus an active Fireproof Elixir, before proceeding beyond Drak. If you’re short on supplies, quickly return to Goron City to gear up; otherwise, press on.
The Abandoned North Mine is a fiery gauntlet of lava islands connected by rickety bridges and mine tracks. Scattered around are large cannons – these will be your key to navigating the area. Immediately, you’ll notice enemies (Fire Bokoblins and Fire Lizalfos) on platforms and rocks blocking pathways in the lava. Use the cannons to clear a safe route. Here’s how the cannons work:
- Loading and Firing: Stand at the cannon’s rear and use your Bomb Rune to drop a round bomb into the open tube. The bomb will roll into the cannon’s barrel.
- Aiming: Nearby, a rotatable lever controls the cannon’s facing. Hit the lever with a weapon to swivel the cannon between set positions (usually pointing at an enemy outpost or a blockage).
- Fire! Once the cannon is aimed where you want, move back and detonate the bomb with L. KA-BOOM! The explosion launches a bomb straight ahead, obliterating rocks and foes in its path.
Use the first cannon to blast the enemies on the platform ahead to the east. The explosion creates a powerful updraft in the hot air – you’ll see flames shooting upward. Jump and paraglide on that thermal to lift yourself to the next rock island. Continue northward through the mine by leapfrogging from one safe zone to the next: glide between islands using updrafts, and whenever a wall of boulders or a fortified enemy camp blocks your way, look around for a cannon to blow the obstacle apart. Enemies will rain fire arrows at you from towers, but you can return the favor with the cannons. If you see a particularly tall enemy base, try to find a cannon that targets it and fire away.
Work your way towards the marker at the far end of the mine. Eventually, you’ll come to a cannon aimed at a massive pile of rocks sealing a cave. This is the entrance to the vault where Yunobo is trapped. Tip: Hit the cannon’s lever to adjust its aim if needed, then fire a bomb at the rubble when the cannon’s barrel swings over the cave entrance. Time the detonation just right, and the shot will shatter the boulders, freeing the way inside. A gust of wind will begin rising from the newly opened entrance – use it to glide over to the cave.
Head into the vault to find a young Goron curled up inside – Yunobo at last. A brief cutscene plays as Yunobo realizes the rock slide has been cleared. At first, he panics, mistaking you for a monster, but soon sees you’re a Hylian. Yunobo is immensely relieved and grateful. He explains he got stuck in here when a magma bomb triggered the cave-in. After thanking you, he asks if Bludo sent you. When he learns you came on Bludo’s behalf, Yunobo remembers his mission: he was fetching painkillers for Bludo’s back. He’ll hurry back to Goron City to deliver them (so Bludo can finally get some relief). Yunobo sprints off, urging you to claim a reward from Bludo for the help.
Before you leave the Abandoned Mine, take a moment to loot the vault. There are crates and treasure chests with goodies (weapons, ore, etc.) leaning against the walls. [Optional] Shora Hah Shrine: Now that Yunobo is safe, a shrine in this area becomes accessible. Look north from the cave – you’ll see a large hollow rock structure with minecart tracks leading into it. That’s where Shora Hah Shrine is hidden. To reach it, step outside the vault and paraglide north toward the opening of that rock structure. If you catch the updraft from the cave entrance, it should carry you right into the tunnel. Activate the Shora Hah Shrine inside for another warp point (solving it now or later as you wish). This shrine is [Optional] but handy for return visits.
When ready, either travel back on foot or simply fast-travel (use the Goron City shrine if you activated it) to return to Bludo. Speak with him again. Yunobo will already be there, having delivered the painkillers. Bludo is overjoyed and praises you for rescuing Yunobo. True to his word, he rewards you – three Fireproof Elixirs for your trouble. More importantly, with Bludo’s back feeling better and Yunobo safe, it’s time to deal with Vah Rudania once and for all. Bludo outlines the plan: drive off Vah Rudania from the mountain by using the city’s cannons, with Yunobo’s help. Yunobo (cheerfully volunteering despite some nervousness) will accompany you up Death Mountain. Bludo notes Yunobo can use Daruk’s Protection to shield himself, so don’t worry about launching the young Goron from cannons – he can handle it! Just as you’re about to set out, Bludo’s back twinges again, preventing the old boss from joining the fight personally. “Of course…”, he grumbles, leaving the task to you and Yunobo.
Your new objective appears: escort Yunobo up Death Mountain to Rudania. Make sure you’re still equipped with Flame Guard (the path ahead is still in the volcanic zone), then follow the trail north of Goron City to begin the ascent. It’s time to take on the Divine Beast.
Scaling Death Mountain: Assault on Vah Rudania
Exit Goron City with Yunobo in tow. You’ll soon approach the Bridge of Eldin area, but the direct path is cut off. Instead, the road curves around past some old mining apparatus. Keep going and you’ll reach a high wooden bridge above Goron City and a dead end… except for a mining cart on the left track. It’s time to ride a minecart!
Minecart Ride #1: Use Magnesis to lift the metal minecart and place it onto the tracks if it’s not already there. Climb in with Yunobo. Just like the cannons, drop a round Bomb into the cart’s receptacle (a tube at the back), and detonate to propel the cart forward like a rocket-powered rollercoaster. Enjoy the ride as you blast past a group of enemies on the ridge. The cart will carry you across a huge gap and deposit you near the Goron Hot Springs. Here, you can hop out. [Optional] Goron Hot Springs: These small bubbling pools act like a fairy fountain – soak in them briefly to restore hearts for free. There’s also a Goron sunbathing here who offers a side quest (feel free to chat for some flavor). When you’re healed up, continue along the path.
Minecart Ride #2: Not far past the springs, on your left is another set of tracks with an overturned minecart nearby. Use Magnesis to set this cart back on the rails. Climb in, load a Bomb, and blast off again. This ride bypasses another enemy camp entirely, sparing you a difficult fight in the blazing heat. You’ll come to a stop at a fork in the road on the mountainside. Ahead (uphill) is our destination where Yunobo waits, but first consider a quick detour: just downhill from the fork is a shrine.
[Optional] Daqa Koh Shrine: Take the lower path at the fork and within a few steps you’ll see the Daqa Koh Shrine (called “Daha Quo” in some texts) tucked off the path. Activate it for a convenient fast-travel point near Death Mountain. (You can complete its “Stalled Flight” puzzle now or save it for later.) With the shrine registered, return up the slope to rejoin Yunobo.
Up the other path, you’ll find Yunobo cowering behind a rock, under attack by two Moblins. Time to protect our Goron friend! Engage the Moblin duo: try to draw them one at a time. Use ice arrows or stasis to slow them if you have to, as Moblins hit hard. Fortunately, one Moblin seems preoccupied, making it easier to take them one-on-one. Dodge their giant club swings and strike back, or use Yunobo as distraction. Once the Moblins are defeated (don’t forget to snag their Moblin guts quickly before they burn up in the heat), approach Yunobo. He’s shaken but okay.
Nearby you’ll see the colossal Bridge of Eldin hanging above a lava chasm – and a cannon pointed right at it. To lower the bridge, have Yunobo hop into the cannon (he does so automatically when you both approach it). Adjust the cannon’s aim if needed and drop in a bomb. Fire the cannon to launch Yunobo smack into the Bridge of Eldin’s supports! The explosion causes the metal bridge to slam down into place, forming a path across. Yunobo’s protective bubble makes him none the worse for wear. Now cross the Bridge of Eldin together.
On the far side, a cutscene triggers. Vah Rudania, alerted by all the commotion, climbs further up the mountain, and the sky darkens. Yunobo outlines the plan: Rudania is hiding partway up Death Mountain’s summit. You and Yunobo will advance up the trail in Rudania’s wake, using the mountain’s defensive cannons to fire Yunobo at the Beast whenever possible (each direct hit will drive Rudania further up). However, the path is guarded by floating Guardian Sentries – small drone-like sentinels scouting the area with searchlights. If they spot either of you, Rudania will rain down a barrage of magma bombs from above. Getting caught means scrambling for cover while molten rocks pummel the area – not good. Thus, you need to sneak Yunobo past the sentries or eliminate them. Luckily, Yunobo will follow your lead closely: whistle (press Down on the D-pad) to make him stop in place, and whistle again to signal him to follow. Use this to your advantage so he doesn’t blunder into a searchlight. It’s essentially an escort stealth mission now.
Proceed cautiously up the volcanic trail. Sentry #1: Almost immediately, you’ll see the first drone patrolling. There are two rocky overhangs providing cover on this stretch. Wait for the drone to face away, then run to the first overhang and hide. When its spotlight moves, dash to the second overhang. Once the drone looks away and the path ahead is clear, quickly sprint past its patrol route. If at any point you or Yunobo are spotted (an alarm will sound), magma bombs will start crashing down. If that happens, find shelter under a sturdy rock or ledge until the fiery rain stops, then carry on.
Sentry #2: Around the next bend, you’ll find a stationary sentry hovering above some bombable boulders blocking the path. There’s a slope to the right you can climb that leads above the drone. Sneak up there and you’ll notice a pile of round boulders perched just above the sentry. Push those boulders and watch gravity do the work – they’ll tumble down and smash the drone to bits. With the sentry destroyed, the path is clear. Use a Remote Bomb or Yunobo’s charge (tell him to follow and he’ll run into the rocks) to clear the boulder obstruction on the trail if the falling rocks didn’t already.
Move forward to the next cannon. As before, Yunobo will jump into the barrel eagerly. Rotate the cannon toward Vah Rudania (the Divine Beast might be visible higher up the volcano) and fire Yunobo at it. BOOM! Direct hit. Rudania roars and retreats further up, one “hit” down. (If Rudania wasn’t visible, it means you might have missed a cannon; Rudania only progresses when you’ve scored all hits in sequence. In that case, backtrack to ensure each cannon was used.)
Continue up the trail, which now winds under some cliffs. Sentries #3 and #4: The next area has two flying sentries circling ahead, covering the path in tandem. To the right, you’ll see metal crates and boxes lying around. Use Magnesis to grab a metal box and simply smash the sentries out of the sky with it! You can lift the box high and whack the drones – being spotted by the drone’s searchlight doesn’t matter if it’s the box that enters the beam. As long as you or Yunobo stay out of the light, you can destroy the drones without triggering the alarm. Two or three good thumps and the coast is clear. If one box breaks, there are a few spares around. (Don’t worry if the drone catches sight of the floating box; it won’t call down magma on a random crate.)
Past those sentries, you’ll come to a dead end of sorts – a sheer rock face to your left and right, with another sentry hovering between two tall pillars of stone ahead. Sentry #5: This one is tricky to get close to. Instead, use the same strategy: look around for a metal box (there should be one nearby). You may need to climb up one of the tall pillars to have line-of-sight; place the metal box on a pillar, climb up next to it, then use Magnesis to swat the drone from above. Knock it out and proceed.
Up ahead is another cannon, guarded by a lone Moblin on a ledge. Take out the Moblin (a quick arrow or two while it hasn’t noticed you does the job). Then call Yunobo forward and line up this second cannon. As before, rotate and fire Yunobo at Vah Rudania to score another hit. (Pro-tip: You can also aim this cannon at a pair of sentries further up – by moving the barrel between its two positions and detonating the bomb mid-swing, you might shoot down two drones with one blast. If you succeed, great! If not, no alarm will sound as long as you stay out of their lights, so you can handle them shortly.)
Press on after the second cannon blast. Final Sentry Cluster: The last challenge is a trio of drones (#6, #7, #8) hovering in a tight group over a narrow pathway, with intermittent lava updrafts shooting up behind them. This area is very open, making it hard to sneak Yunobo through. The best approach is to neutralize the drones. Do NOT bring Yunobo in yet – tell him to hold position. First, to the right of the path is a tall spire of rock. Climb it to get above the drones’ altitude. When the nearest drone turns away, paraglide from the high rock over the drone trio, using the updraft to boost higher. Glide to a ledge on the left side of the path, past the drones. Here you’ll find more metal crates. Use Magnesis to slam these boxes into the drones from behind, shattering them one by one. Take out as many as possible (even if you only get 1 or 2, it helps). With the sentries gone or their patterns broken, head back to fetch Yunobo and lead him safely through. Alternatively, if gliding is tricky, you can try to simply time running through the gusty path between their searchlight cycles, but removing them is safer.
At last, you reach the third and final cannon, overlooking Death Mountain’s fiery crater. Load up Yunobo and fire the final shot at Vah Rudania. With a direct hit, Rudania lets out a metallic bellow. Three cannon blasts have done the trick – the hulking Divine Beast finally succumbs. Rudania slinks further up and then plunges into the volcano’s caldera, disappearing into the depths of Death Mountain. A victory cutscene plays as Rudania is effectively neutralized on the outside. Yunobo cheers your success and thanks you profusely. Now it’s up to you, as Champion, to board the Divine Beast and free it from Ganon’s control.
Right at the crater’s edge, Rudania’s metal body lies still, with an entry point now accessible. Climb into the Divine Beast Vah Rudania to begin the dungeon segment.
Inside Divine Beast Vah Rudania
You drop down into Rudania’s interior and find yourself in pitch blackness. The only light comes from glowing red eyes of Calamity scattered around. Equip a torch if you have one (if not, feel your way around and open the nearby chest – it conveniently contains a Torch). Ignite the torch using one of the persistent blue flames on sconces near the entrance. The blue flame casts an eerie light, revealing gooey pools of Malice and several eyeball-like Calamity Eyes on the walls and ceiling. Shoot down those Calamity Eyes with arrows to clear the gunk; doing so will also drop a couple of treasure chests that were stuck in the sludge. Take care moving in the dark – avoid stepping in Malice puddles. With the eyes cleared, proceed deeper and find a locked door with an unlit furnace beside it. Light that torch pedestal with your blue flame to open the door.
In the next chamber, you’ll still be shrouded in darkness, navigating by torchlight. There are more Calamity Eyes here (two on the left wall, one on the right) – snipe them to clear out the room and possibly reveal supplies. Ahead, you’ll see another sealed door with a furnace. Before lighting it, note the inactive Guidance Stone (map terminal) visible through a window. When you’re ready, re-light your torch if needed and set fire to the second furnace. The door opens, granting access to the Guidance Stone. Use the Sheikah Slate on it to download Rudania’s map. This restores power to the dungeon and lights up the interior with a dim red glow. You can finally see your surroundings! More importantly, you now gain the ability to tilt/rotate Divine Beast Rudania 90 degrees at will. This will be central to solving the puzzles here.
Your goal is to activate five terminals inside Rudania to unlock the Main Control Unit. Each terminal is tucked behind clever obstacles involving fire and machinery. Take a moment to familiarize yourself with the map: by selecting the Divine Beast icon in your map screen, you can choose to tilt Rudania either level or on its side. Tilting essentially rotates the entire dungeon, turning walls into floors. This mechanic lets you traverse otherwise unreachable areas.
Terminal 1: From the Guidance Stone room, peer back out to the previous larger room. You might spot the first glowing terminal on a wall out of reach. To get it, stand in the doorway and activate Rudania’s tilt (choose the 90° position). As the Beast rotates, the whole room shifts. When the motion stops, you’ll find yourself literally walking on the wall that was once the floor! The terminal is now oriented above you. Find a sloped rock ramp in this chamber – when Rudania is rotated, it forms a makeshift path up to the terminal’s level. Climb up the slant, then drop down carefully onto the ledge with Terminal 1 and activate it. (You might lose a heart or two from the fall, but it’s worth it.) One down, four to go.
Next, tilt Rudania back to flat (upright position) and return to the central area. Terminal 2 lies somewhere on Rudania’s back outside. Find a high ledge or window that lets you go out to the Beast’s exterior. One way is to go back to the big starting room and look for a path upwards: there was a slanted concrete beam leading to an opening. Climb up and emerge on Rudania’s back under the open sky. Be cautious: outside, it’s still scorching hot (if you unequipped flame gear inside, put it back on). Also, any wooden weapons will ignite out here, so stick to metal gear. Now, on Rudania’s back, you’ll see rib-like structures (its “spines”) and pools of Malice blocking passage. Tilt Rudania 90° again to change the layout. This allows you to run along its side. Make your way across the Beast’s back, looking for an eye embedded in Malice. There is a large blob of Calamity Gunk on the spine – shoot the Calamity Eye in its center to clear it. This frees up movement and often reveals a chest. With the goo gone, tilt Rudania back if needed and climb onto that cleared spine. From here, you can spot another eye ABOVE you on a higher part of Rudania’s back (toward where you came). Shoot that eye to purge another patch of Malice, revealing Terminal 2 beneath it. Activate Terminal 2, which is now accessible on the spine. (If you need a visual: Terminal 2 was hidden on an upper ledge on Rudania’s outside. Clearing the malice dropped it down or exposed it.)
Terminal 3: Head back inside the beast. (Use any open window or the path you came out; you can also tilt to create a slope leading back in.) Now that a lot of malice is cleared, new routes open up. Return to the starting area with the blue flame torches (near where you entered the Beast). Make sure Rudania is level. There’s a locked gate here you haven’t opened yet. Notice a small hole in the metal door and an unlit furnace beyond. The trick is to shoot an arrow through the hole lit with blue flame to ignite the furnace on the other side. Stand by one of the still-burning blue torches, draw a regular arrow, and let the arrow tip catch fire from the blue flame. While keeping the arrow drawn (it’ll burn slowly, but you have time), aim through the gap in the door and release. If done right, the arrow passes through and lights the torch inside, opening the door. In the next room, you’ll see a wall of orange flames blocking a passage. There’s another unlit torch on the far end beyond the fire. Again, light an arrow on the blue flame you just activated and shoot it over or through the fire at some dry leaves you notice above the flames. The burning leaves drop a hidden metal cube from the ceiling. Use Magnesis to grab that metal cube. Now tilt Rudania 90°, causing the cube to slide or drop. Your goal is to use this metal cube to block the jet of flames. While tilted, maneuver the cube so it falls and wedges, then flip Rudania back if needed to place it firmly in the path of the fire jets. Once the flames are blocked by the metal crate, you can safely pass through. On the other side, claim Terminal 3.
Terminal 4: Backtrack to the area with the two blue starter torches (near the entry). Ensure Rudania is flat. Face toward the front of the Beast (where you haven’t been yet) – you should see a large sealed room with two giant metal doors. The doors have wooden planks and dried leaves covering their center. Just like before, light an arrow with a blue flame and shoot the flammable stuff. The leaves burn up, exposing the metallic door halves. Now stand close and use Magnesis to grab and slide each door apart. Pull them open like you’re unbarring a giant gate. Inside is Terminal 4, unguarded. Activate it. (Also, don’t miss a bonus: there are more leaves on the wall inside this room – burn them to drop a chest with an Ancient Gear.)
Terminal 5: The last terminal involves a small puzzle on Rudania’s top side. Return once more to the initial area with blue torches at the entrance. Confirm Rudania is level (flat). Grab a torch (there should be one or you still have yours) and light it with blue flame. Now, you need to carry this flame to an unlit furnace high up on Rudania’s back. This is tricky: You must move with the lit torch through a rotation. Stand at a spot where you have open sky above you (like near the entrance or under a hole) and will be on a surface after tilting – one good method is to go to the long slanted ramp that leads outside (the same ramp used for Terminal 1). Light your torch, then tilt Rudania 90° while holding the torch aloft. As the dungeon tilts, Link will shift but keep the torch lit as long as you don’t sheathe it. Now you’ll effectively be walking on a wall with the blue flame still burning. Carefully carry the flame up that long ramp all the way to the top outside. You should find an unlit furnace (torch pedestal) on Rudania’s curved back that wasn’t reachable before. Light it with your blue flame. This activates some ancient machinery: a giant metal orb is released and starts rolling down a track. Follow the orb as it travels through a chute back into the interior of Rudania.
Chase the orb inside. It will get stuck behind a barred gate at the bottom of a slope. To get it past the gate, you’ll need to manipulate the environment. Notice the gate can slide horizontally with Magnesis. Also notice there’s a slot in the floor nearby meant for that ball. Here’s the solution: While Rudania is still tilted, use Magnesis to pull the metal gate aside (to open the path for the ball). The moment you have the gate moved, quickly use Stasis on the gate to freeze it in the open position. Now immediately tilt Rudania back to flat orientation. Gravity will send the metal orb rolling forward, and with the gate frozen out of the way, the orb drops through and lands into the waiting socket. The door ahead opens, revealing Terminal 5 right behind where the gate was. Go activate the final terminal. You’ve done it – all five terminals are online.
With all terminals activated, the main control unit on Rudania’s back is unlocked. A message prompts you to return to the Main Control Unit (the glowing platform you’ll find topside, probably near the center of Rudania’s back). Make sure you’re prepared before you activate it – a boss fight is about to begin. If you need to heal or buff, do so now. Equip metal weapons and a sturdy shield, as you likely already have (anything wooden will burn). Also, grab any remaining treasure chests in the Beast if you want [Optional]. When ready, climb up to the Main Control Unit (it’s up on Rudania’s back, roughly where you lit the final blue flame, but now it’s glowing orange). Press A to activate it. Link will thrust the Sheikah Slate in… and darkness gathers as Fireblight Ganon materializes.
Boss Battle: Fireblight Ganon (Scourge of Divine Beast Vah Rudania)
A fiery phantom of Ganon appears, brandishing a huge flaming cleaver. Fireblight Ganon has three phases, but with the right tactics you can take him down efficiently.
Phase 1 (100%–50% health): Fireblight Ganon lumbers toward you for close combat. His attacks are huge, overhead swings and sweeping strikes with his greatsword. These hits have massive range and can one-shot a careless player with low hearts, but they’re slow. The key is to stay very close to Fireblight – counterintuitive as it sounds, being near his body causes him to swipe downward where you can more easily sidestep. Keep your shield up to block any glancing blows. When you see him winding up, dodge to the side (a well-timed side hop may trigger a Flurry Rush). Get behind him or to his side and attack with your strongest melee weapon. Two-handed weapons work great for damage during his recovery frames. If you have Urbosa’s Fury (from a different quest) it can also be used, but assuming you don’t, simple swordplay works. Whenever Fireblight jumps back and starts lobbing fireballs, raise your shield or sprint sideways – the small fire projectiles can be blocked or easily avoided. Keep whittling his health; after enough hits, he’ll be briefly stunned, allowing more free hits. By staying aggressive but defensive (shield up when not striking), you should carve him down to half health without too much trouble.
At 50% HP, Fireblight Ganon roars and initiates Phase 2. He floats to the center and envelops himself in a swirling flame shield, a huge ball of fire that surrounds his body. While in this fiery shell, he’s invulnerable to normal attacks; arrows just ping off. He also begins charging a gigantic fireball attack. You’ll see flames gathering into a single large orb above him as he sucks in air. Daruk’s voice warns you about the danger. If you let him finish, he’ll hurl the massive fireball which explodes in a wide radius – very painful to get caught in. To counter this, do what Daruk did 100 years ago: toss a Remote Bomb into the vortex! As Fireblight inhales, quickly switch to your Bomb rune, chuck a bomb towards him (you don’t have to be super precise; the vortex will pull objects in), and detonate it mid-air. The explosion will disrupt his fire shield, stunning Fireblight Ganon and canceling the super fireball. He’ll crash to the ground, giving you a big opening – rush in and land as many hits as possible. Two-handed weapon spin attacks or a flurry of blows work well here. Remove a good chunk of his health during this downed state.
Fireblight will recover and Phase 3 begins (around ~25% HP). This phase is similar to Phase 1 but with added tricks. Now his sword is super-heated and every swing can create trails of lingering flame on the ground. Don’t stand in the fire patches – they will continuously hurt you. However, these flames generate updrafts of hot air. You can use these updrafts to your advantage: if you need breathing room or a chance to shoot arrows, jump into an updraft with your paraglider. This will lift you high, enabling slow-motion bow shots from above. A well-placed arrow to Fireblight’s eye can stun him momentarily, bringing him to one knee. Or, simply use the height to reposition and avoid his rush. Fireblight will continue his normal melee combos, which you should still dodge and punish as before. He might also charge up a laser-like beam (similar to other Blights) – if you see him aiming a red laser, be ready to sprint or side jump out of its line because a fiery laser blast will follow. Keep moving at all times in this phase to avoid being cornered by fire on the ground. Stay patient, chip away when you see an opening, and use those updrafts if things get too hot underfoot.
After enough hits, Fireblight Ganon will collapse and explode in a burst of flames. You’ve defeated the scourge of Rudania! Collect the Heart Container that materializes (don’t forget to pick it up – leaving without it means it’s lost forever). With heart in hand, approach the Main Control Unit one last time. Activate it to finish the Divine Beast.
A cutscene plays as Daruk’s spirit is freed. In a heartfelt moment, the Goron Champion thanks you for saving Rudania and his people. He bestows upon you Daruk’s Protection, his signature power. This blessing encases you in an automatic red sphere when you guard: as long as you’re holding ZL to guard, the next three attacks that hit you will be completely nullified! It’s like a free super-shield that can block even devastating blows (including Guardian beams) – immensely useful for the trials ahead. Daruk’s Protection has 3 charges and will recharge on its own after use. With a final proud laugh, Daruk and Rudania turn their gaze to Hyrule Castle. Rudania climbs the volcano and takes position, ready to target Calamity Ganon when the final battle comes.
Aftermath in Goron City
You are transported back to Goron City, appearing just at the city entrance. Yunobo greets you eagerly, thrilled that Rudania has been tamed. He runs off to tell Bludo the good news. Head into the city to find Bludo and Yunobo celebrating. Talk to Bludo, who will cheerfully declare Divine Beast Vah Rudania conquered and the crisis resolved. Quest complete! Yunobo thanks you deeply, and Bludo, ever the generous boss, insists you take a reward for all your heroics. He leads you to the hut behind him (Bludo’s house). Inside, open the chest to obtain the Boulder Breaker, a massive 2-handed stone club that once belonged to Daruk. This weapon has a whopping 60 attack power and is super effective against rocks and Talus monsters. Bludo mentions that if it breaks, Rohan the Blacksmith in Goron City can reforage it for you (at the cost of a Cobble Crusher, diamond, and flint).
With Divine Beast Rudania now friendly, volcanic eruptions subside and Goron City is safe again. You also carry Daruk’s Protection as a permanent buff, visible as a red orb when you guard. Take a moment to relish your victory – perhaps chat with Yunobo, who is now revered as a local hero and is coming into his own thanks to your example. [Optional] If you haven’t already, you can still view Daruk’s Memory at the statue or do any Goron City side quests you skipped (they’ll be much easier in peacetime).
When you’re ready to continue your adventure, you have choices. You can set out to tackle another Divine Beast (perhaps Vah Medoh of the Rito, Vah Naboris of the Gerudo, or Vah Ruta of the Zora). Bludo even hints that a legendary sword (the Master Sword) is now within reach, should you seek it. And of course, if Rudania was your last Divine Beast, you now have all the pieces in place to march on Hyrule Castle and confront Calamity Ganon whenever you feel prepared.
Congratulations, you have freed Divine Beast Vah Rudania and earned the Gorons’ eternal gratitude. Death Mountain grows quiet once more, and with Daruk watching over you, you’re one step closer to saving Hyrule. Now onward, to your next adventure!