Prepare yourself, hero! The lands of Hyrule and the encroaching Twilight Realm in The Legend of Zelda: Twilight Princess are filled with dangerous creatures and shadowy foes. This bestiary serves as your guide to identifying and understanding the enemies that stand in Link’s path. Below is an alphabetical list detailing each monster’s behavior and providing tips and strategies for defeating them. Know your enemy, and victory shall be yours!
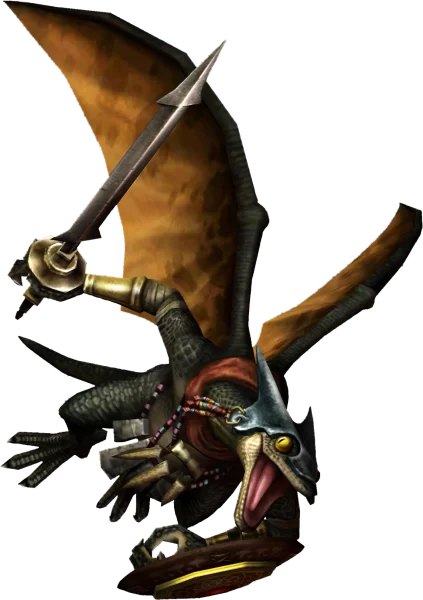
Aeralfos
Description: Winged, armored Lizalfos variants found primarily in the City in the Sky. They often wield a sword and shield and utilize flight to their advantage.
Attacks: Swooping sword strikes, blocking with their shield, hovering out of reach.
Strategy: The Clawshot is essential. While they are guarding or hovering, use the Clawshot to pull them down to the ground, making them vulnerable to sword attacks. Anticipate their swoops and dodge or use a Shield Bash.
Drops: Rupees, Hearts.
Armos
Description: Animated, stone statues often found guarding pathways or treasures, particularly in the Temple of Time. They remain dormant until approached.
Attacks: Hopping towards Link, attempting to crush him. Some may have specific weak points.
Strategy: Their primary weak point is usually a crystal on their back. Either circle around them quickly or use the Clawshot (if applicable) or the Ball and Chain to strike the weak point. In the Temple of Time, the Dominion Rod can sometimes be used to move them onto switches.
Drops: Rupees.
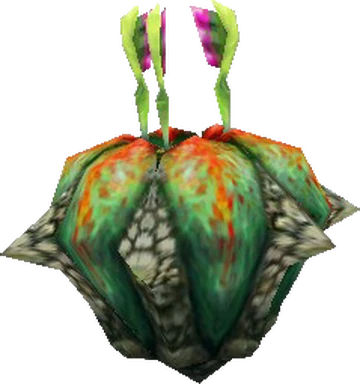
Baba Serpent (Deku Baba)
Description: Aggressive, carnivorous plants found in forest areas and dungeons like the Forest Temple. They lunge out from their base or detach entirely (Baba Serpent). Twilit Babas exist in Twilight-covered areas.
Attacks: Lunging bite. Baba Serpents detach and slither/lunge. Twilit Babas may spit projectiles.
Strategy: Z-target and wait for them to lunge, then strike with your sword. For Baba Serpents, attack quickly before they retreat or attack. The Gale Boomerang can cut them down temporarily or bring Bomb Insects towards them. Twilit Babas may drop seeds that can be used as Bombs.
Drops: Deku Nuts, Deku Seeds (Twilit).
Bari
Description: Small jellyfish commonly found floating in aquatic environments like the Lakebed Temple.
Attacks: Periodically release an electrical discharge in a radius around themselves, shocking Link on contact.
Strategy: Approach cautiously. Attack with your sword (underwater attack or standard strikes with Iron Boots) only when they are not actively pulsing with electricity. Avoid contact during their electrical discharge phase. They are relatively fragile otherwise.
Drops: Rupees, Hearts.
Beamos
Description: Cylindrical statues with a single rotating eye that shoots a powerful laser beam upon detecting Link. Common in dungeons like the Temple of Time and Goron Mines.
Attacks: Continuous laser beam that follows Link.
Strategy: The eye is the weak point. Shoot the eye with the Hero’s Bow to destroy the Beamos permanently. You can often hide behind pillars or walls to avoid the beam while aiming. Some can be destroyed with the Ball and Chain.
Drops: None (usually).
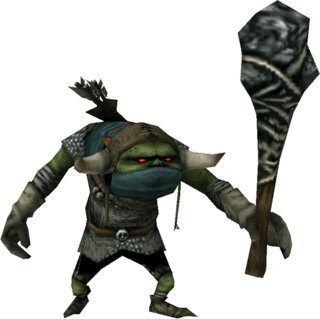
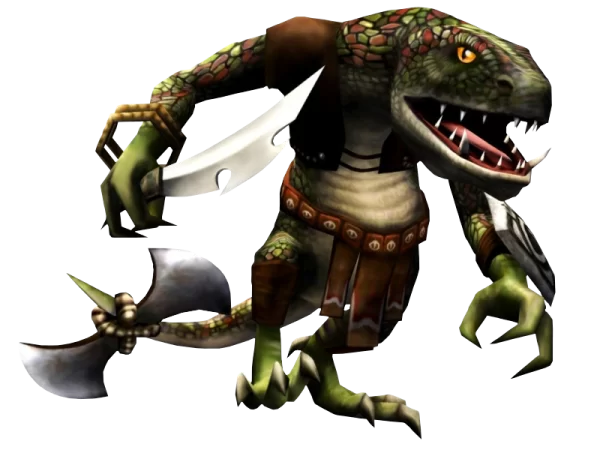
Bokoblin
Description: Common goblin-like humanoid enemies found throughout Hyrule Field and many dungeons. They come in various colors (Red, Green, Blue indicating strength) and often wield clubs, machetes, or torches.
Attacks: Simple sword/club swings, lunging attacks. Sometimes throw rocks from a distance.
Strategy: Basic sword combos are effective. Z-target and use Shield Bash to stun them. Hidden Skills like Helm Splitter and Back Slice work well. Prioritize stronger (Blue) Bokoblins in groups.
Drops: Rupees, Hearts.
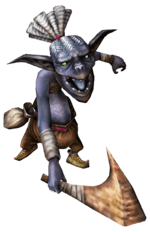
Bulblin
Description: Green-skinned, brutish enemies often found riding Bullbos or guarding encampments in Hyrule Field and the Gerudo Desert. Typically armed with clubs, bows, or bomb arrows. King Bulblin is their leader.
Attacks: Club swings, shooting arrows (regular or bomb), charging on Bullbos. Horn blowers summon reinforcements.
Strategy: On foot, treat them like stronger Bokoblins; Shield Bash and sword combos work. Archers should be prioritized; shoot them with your own bow or use the Gale Boomerang/Clawshot. When they ride Bullbos, use your sword or arrows, aiming for the rider. Spin attacks are good for crowd control.
Drops: Rupees, Hearts, Arrows.

Chilfos
Description: Ice-based warriors found exclusively in the Snowpeak Ruins. They form spears of ice to attack Link.
Attacks: Throws ice spears, performs a quick stabbing lunge with an ice spear.
Strategy: Their ice spears can be shattered with the Ball and Chain, leaving them briefly vulnerable. Alternatively, dodge their spear throws and move in close for sword attacks. They are quite fragile once you get past their offense.
Drops: Rupees, Hearts.

ChuChu
Description: Gelatinous blob-like enemies that come in various colors (Red, Blue, Yellow, Green, Purple, Rare/Gold). They often fall from ceilings or emerge from the ground.
Attacks: Slowly hop towards Link, attempting to engulf him. Can merge into larger Chus. Purple Chus can solidify and require bombs or the Ball and Chain.
Strategy: Simple sword strikes work on most standard Chus. Yellow Chus contain Lantern Oil when defeated. Purple Chus need a Bomb, Ball and Chain, or careful swordplay when they liquefy. Attacking merged Chus splits them. The Rare (Gold) Chu is uncommon and drops significant Rupees.
Drops: Chu Jelly (matching color, can be bottled), Rupees (especially Purple/Gold).
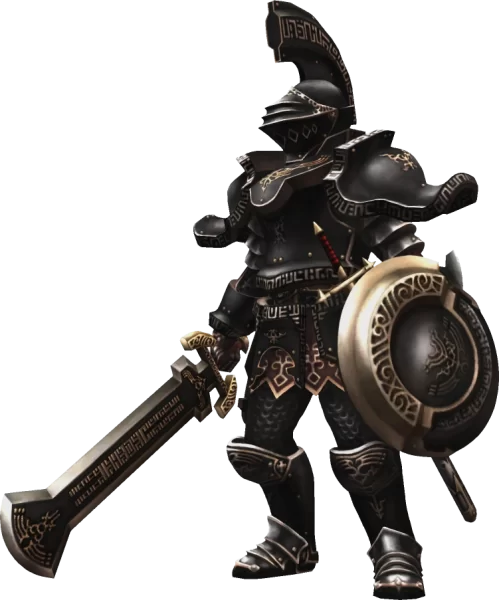
Darknut
Description: Formidable, heavily armored knights encountered as mini-bosses in dungeons like the Temple of Time, Hyrule Castle, and the Cave of Ordeals.
Attacks: Powerful sword slashes, charges, shield blocking. Phase 1: Heavy armor. Phase 2: Sheds armor for increased speed and agility, using a thinner sword.
Strategy:
- Phase 1: Focus on defense. Use Shield Bash/dodge to parry their attacks, creating openings. Use Helm Splitter and Back Slice Hidden Skills repeatedly to break off armor pieces. Bombs can sometimes help stagger them.
- Phase 2: They become much faster. Precise dodging and parrying are key. Use sword combos when they are open after an attack sequence. Back Slice is still very effective if you can get behind them.
Drops: Rupees, Hearts.
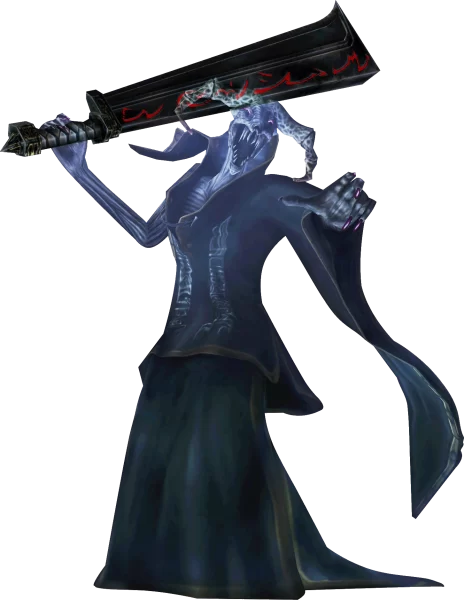
Death Sword
Description: A unique mini-boss found in the Arbiter’s Grounds. It appears as a large, ornate sword held by spectral ropes, possessed by an unseen spirit.
Attacks: Once freed, the sword flies rapidly around the room, performing swooping slashes and spinning attacks. It may also conjure spectral energy.
Strategy: Initially, the sword is inanimate. Use the Gale Boomerang or sword strikes to cut the ropes holding it. The sword will then animate. To defeat it, you must attack the spirit possessing it. Use Wolf Link’s senses to see the spirit and attack it directly. Alternatively, in Hylian form, dodge its attacks and wait for it to pause; shoot the glowing symbol on its hilt with the Hero’s Bow. Using Wolf Link is generally faster.
Drops: Rupees, Hearts (upon defeat).
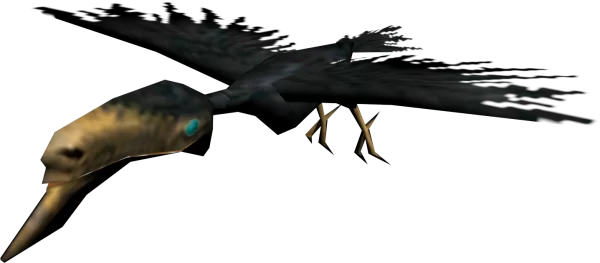
Guay
Description: Small, dark, crow-like birds that often fly in flocks over open areas such as Hyrule Field. They are related to, but smaller than, Kargaroks.
Attacks: Dive-bombing Link from the air, usually in groups.
Strategy: Easily defeated. Use the Slingshot or Hero’s Bow to pick them off from a distance. If they swoop close, a quick sword strike or Spin Attack will take care of them. Z-targeting helps isolate individual birds in a flock.
Drops: Rupees, Hearts.
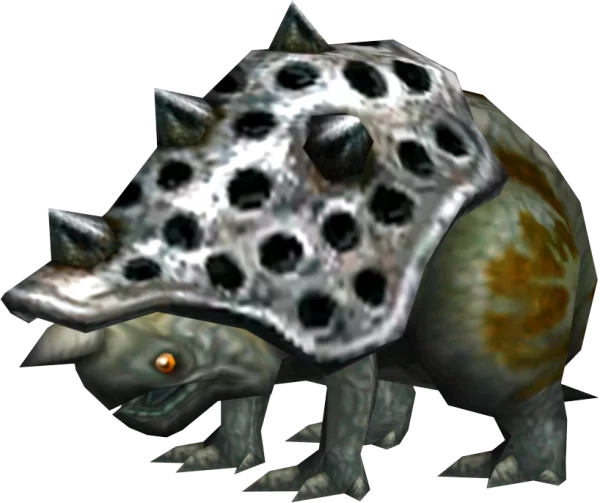
Helmasaur
Description: Reptilian creatures protected by a hard, metallic mask covering their face. Found in areas like the Goron Mines.
Attacks: Charging headfirst at Link, biting if Link is close.
Strategy: The frontal mask deflects almost all attacks. You must target their vulnerable backside. Circle around them while Z-targeting and strike their tail end. Alternatively, use the Clawshot on their back armor; this will rip the helmet off entirely, allowing you to attack their face directly. Bombs placed in their path can also damage them.
Drops: Rupees, Hearts.
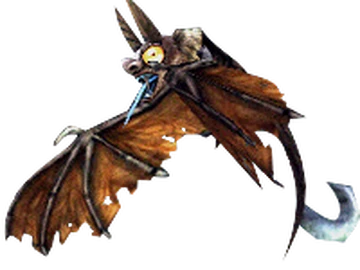
Keese
Description: Bat-like enemies found in caves, dungeons, and at night. They often appear in swarms. Variations include Fire Keese, Ice Keese, and Shadow Keese.
Attacks: Fly towards Link and ram into him. Fire/Ice Keese inflict corresponding elemental effects. Shadow Keese appear in Twilight areas.
Strategy: Use the Slingshot (early game) or Hero’s Bow. A quick Spin Attack can clear out a swarm. The Gale Boomerang can stun them. Z-targeting helps pick them off individually.
Drops: Rupees, Hearts (occasionally).
Leever
Description: Small, spinning creatures that emerge from the ground, primarily in desert areas like the Gerudo Desert. They move erratically along the ground.
Attacks: Damage Link through direct contact as they spin and move.
Strategy: Simple sword strikes are effective, but their erratic movement can make them tricky to hit. A Spin Attack works well if multiple Leevers appear. They often retreat underground after a short time or when Link moves away. They pose little threat individually but can be annoying in groups.
Drops: Rupees, Hearts.
Lizalfos / Dinolfos
Description: Agile, reptilian warriors that often fight in pairs, typically found in dungeons like the Goron Mines and Lakebed Temple. Dinolfos are a stronger variant, sometimes breathing fire.
Attacks: Quick sword slashes, jumping attacks, coordinated attacks with partners. Dinolfos may breathe fire.
Strategy: Z-target one at a time. Use Shield Bash to parry their attacks and create openings. Be ready to dodge their jump attacks. Try to separate them if facing a pair. Hidden Skills are effective. Use arrows from a distance if possible.
Drops: Rupees, Hearts.
Peahat
Description: Strange floating creatures resembling jellyfish with spinning propellers on top, found hovering over Hyrule Field. Some larger ones carry Peahat Larvae underneath.
Attacks: Mostly passive, floating obstacles. Larger variants may drop smaller Peahat Larvae that attack Link. Can become temporarily invulnerable while spinning quickly.
Strategy: Often easiest to simply avoid them. If necessary, target their main body/eye with the Hero’s Bow or try stunning them with the Gale Boomerang. Attack when their propellers slow down. Watch out for any larvae dropped by larger Peahats.
Drops: Peahat Larva (specific variants).

Poe / Imp Poe
Description: Lantern-carrying ghosts found in dark areas, graveyards, and notably the Arbiter’s Grounds and Cave of Ordeals. They are required for Jovani’s sidequest. Imp Poes are smaller variants.
Attacks: Swing their lantern, disappear and reappear.
Strategy: Must be in Wolf Link form to see and attack them properly. Use Wolf Link’s senses (press X) to make them fully visible, then Z-target and attack. After defeating them, target the lingering Poe Soul and press A to collect it. Imp Poes just need to be defeated normally.
Drops: Poe Soul (standard Poes only), Rupees, Hearts.
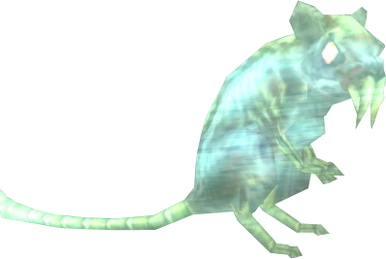
Rat / Ghoul Rat
Description: Common nuisance enemies found in dungeons and caves. Ghoul Rats (or Ghost Rats) are spectral versions found in areas like the Arbiter’s Grounds, visible only with Wolf Link’s senses.
Attacks: Simple biting attacks. Ghoul Rats can latch onto Wolf Link, hindering movement and senses.
Strategy: Basic Rats are easily defeated with the sword. Ghoul Rats require Wolf Link; use his spin attack (Midna’s energy field) to clear them out quickly when they swarm and latch on.
Drops: Rupees, Hearts (standard Rats).

ReDead Knight
Description: Terrifying undead knights found in the Arbiter’s Grounds. They emit a paralyzing shriek when Link gets close and attack with a large sword.
Attacks: High-pitched scream that freezes Link in place, slow but powerful sword slash.
Strategy: Avoid their gaze/scream cone. Attack them from behind with Wolf Link’s jump attack or standard sword combos. The Ball and Chain is highly effective, often destroying them in one hit. If frozen, mash buttons to break free quickly.
Drops: Rupees, Hearts.
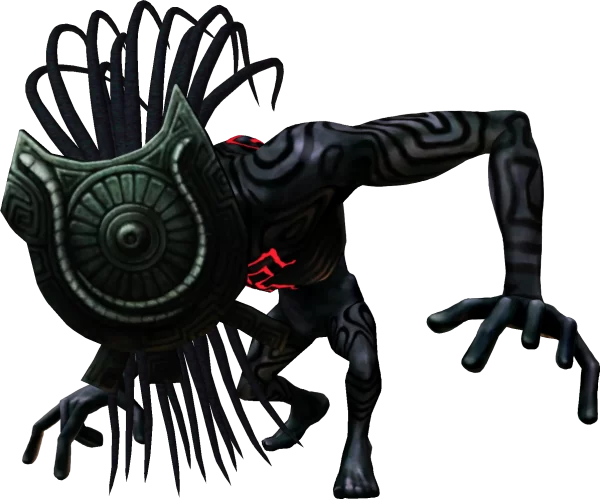
Shadow Beast (Twilit Messenger)
Description: Creatures originating from the Twilight Realm, summoned by Zant or appearing through portals in Twilight-covered areas. They have distinctive black bodies and masked faces.
Attacks: Lunging bite attack. If one remains, it can scream to revive fallen comrades. When two or more are alive, they can generate a dark energy field.
Strategy: The key is to defeat all Shadow Beasts in a group simultaneously. Lure them close together and use Wolf Link’s energy field attack (hold and release B) to damage all within the radius. If only one remains, finish it quickly before it revives others. If two remain, kill them together with the energy field.
Drops: Rupees and Hearts (appear after the portal closes).
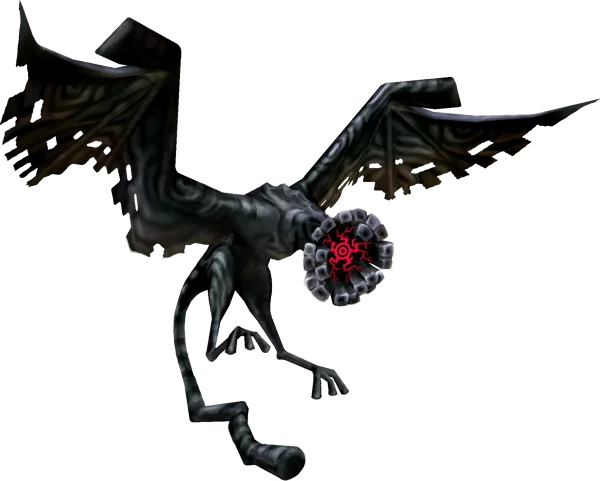
Shadow Kargarok
Description: The Twilit version of standard Kargaroks, these dark birds patrol the skies in Twilight-covered areas and the Palace of Twilight. Often serve as mounts for Shadow Bulblins.
Attacks: Swooping down to strike Link, carrying Shadow Bulblin archers.
Strategy: The Hero’s Bow is the most effective weapon. Z-target and shoot them down. If they are carrying a Bulblin archer (especially one with Bomb Arrows), prioritize the rider first. The Clawshot can sometimes be used to snag them out of the air.
Drops: Rupees, Hearts.
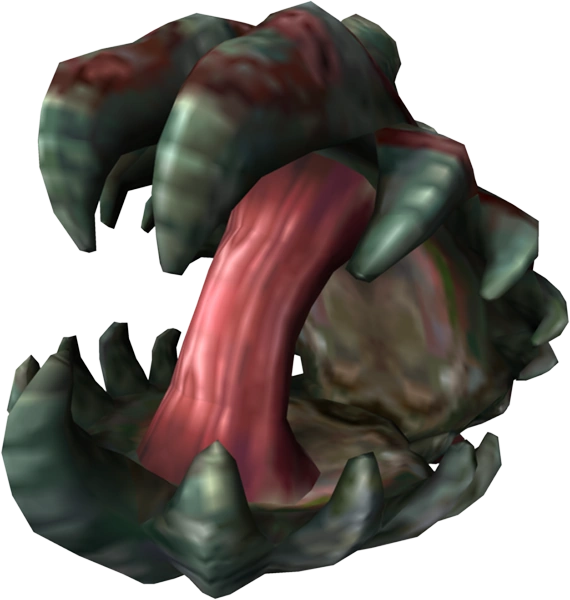
Shell Blade
Description: Large, aggressive bivalves found dwelling underwater, especially within the Lakebed Temple. They possess a hard outer shell protecting a vulnerable fleshy interior.
Attacks: Lie dormant until Link approaches, then open their shell briefly to expose their weak point before snapping shut forcefully, damaging anything caught within.
Strategy: Direct attacks on the closed shell are useless. Keep a safe distance and Z-target. Wait for the Shell Blade to open its shell, then quickly use the Clawshot to latch onto the fleshy pearl inside and pull it out, destroying the enemy.
Drops: Rupees, Hearts.
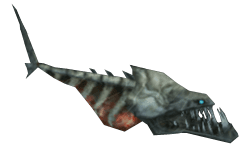
Skullfish
Description: Aggressive skeletal fish found in the waters of the Lakebed Temple and other aquatic areas. They often attack in groups.
Attacks: Swim quickly towards Link and bite.
Strategy: While swimming (without Iron Boots), use the underwater attack (press A with Kokiri Sword/Master Sword) to dispatch them. With Iron Boots equipped, standard sword slashes work. They are relatively weak but can be dangerous in swarms.
Drops: Rupees, Hearts.
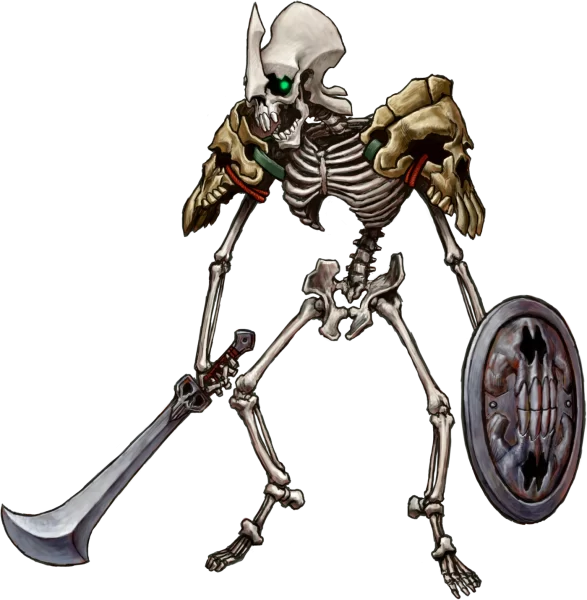
Stalfos
Description: Animated skeletons, usually armed with swords and shields, commonly found in dungeons like Arbiter’s Grounds and Hyrule Castle.
Attacks: Sword swings, blocking with shields. Can reform after being knocked down if their remains aren’t destroyed.
Strategy: Use sword combos and Shield Bash. Once they crumble into a pile of bones, quickly use a Bomb to destroy the remains permanently. Alternatively, the Ball and Chain can often destroy them in one hit.
Drops: Rupees, Hearts.
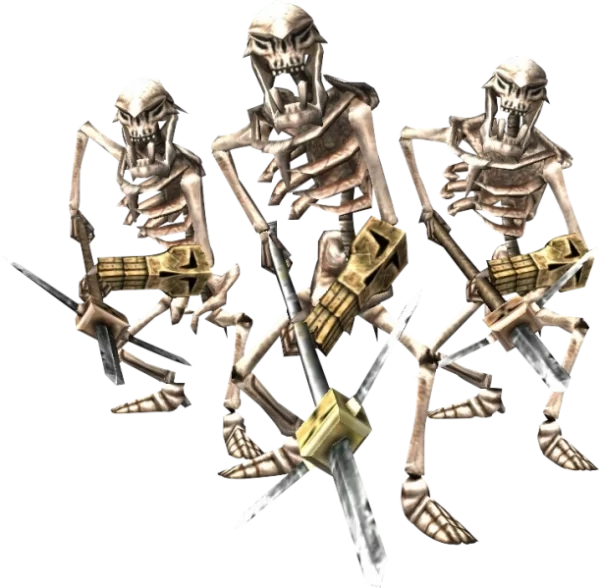
Stalkin
Description: Smaller, weaker versions of Stalfos, essentially just reanimated skeletal heads and torsos. Often found alongside Stalfos or emerging from the ground in graveyards and dungeons like Arbiter’s Grounds.
Attacks: Simple biting or clawing attacks. Very weak.
Strategy: Easily defeated with a single sword strike. They pose minimal threat but can swarm Link. A Spin Attack clears them out easily.
Drops: Rupees, Hearts.
Tektite
Description: One-eyed, spider-like creatures that hop around erratically. Blue Tektites typically hop on the ground, while Red Tektites can sometimes be found near volcanic areas. A common sight near Death Mountain.
Attacks: Jumping towards Link, causing contact damage.
Strategy: Their constant hopping can make them difficult to target. Z-targeting helps track them. Use well-timed sword strikes as they land, or shoot them from a distance with the Hero’s Bow.
Drops: Rupees, Hearts.
Toadpoli
Description: Small, tadpole-like creatures found swimming in schools within the Lakebed Temple’s waters. They are the larval form related to the dungeon boss Morpheel.
Attacks: Swim towards Link and perform minor biting attacks. Primarily a threat due to numbers.
Strategy: Very weak individually. Use the underwater sword attack (press A while swimming) or standard sword strikes with the Iron Boots equipped. A Spin Attack can clear out multiple at once if they swarm.
Drops: Rupees, Hearts.
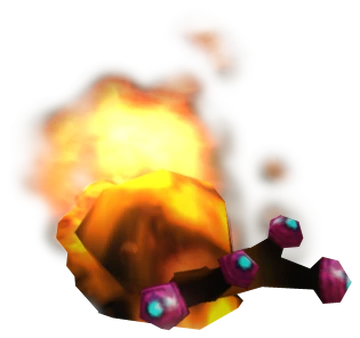
Torch Slug
Description: Large slugs enveloped in flame, commonly found in volcanic environments like the Goron Mines. They leave a temporary trail of fire.
Attacks: Contact damage (fire). Sets the ground briefly on fire where it crawls.
Strategy: Striking them directly with the sword causes fire damage to Link unless their flame is extinguished. Use the Gale Boomerang or Hero’s Bow to temporarily put out their flame, making them vulnerable to sword strikes. The Ball and Chain is also very effective. Wearing the Iron Boots can prevent knockback from their attacks.
Drops: Rupees, Hearts.
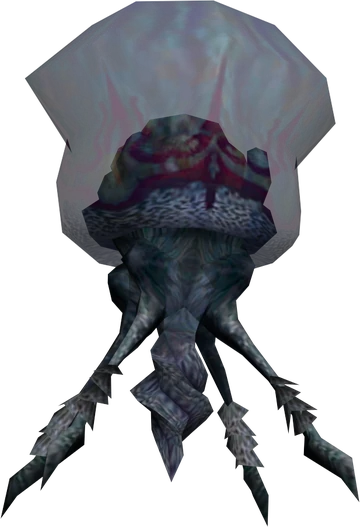
Twilit Bloat
Description: Floating, purple, jellyfish-like enemies found within the Twilight Realm and the Palace of Twilight. They are filled with volatile dark gas.
Attacks: Slowly float towards Link. Their main threat is exploding upon defeat, releasing multiple Shadow Vermin.
Strategy: Keep your distance. Use ranged weapons like the Hero’s Bow or Gale Boomerang to destroy them safely. Be prepared to deal with the Shadow Vermin that emerge immediately after the Bloat explodes. Avoid using the Clawshot, as it pulls them dangerously close.
Drops: Releases Shadow Vermin upon death.
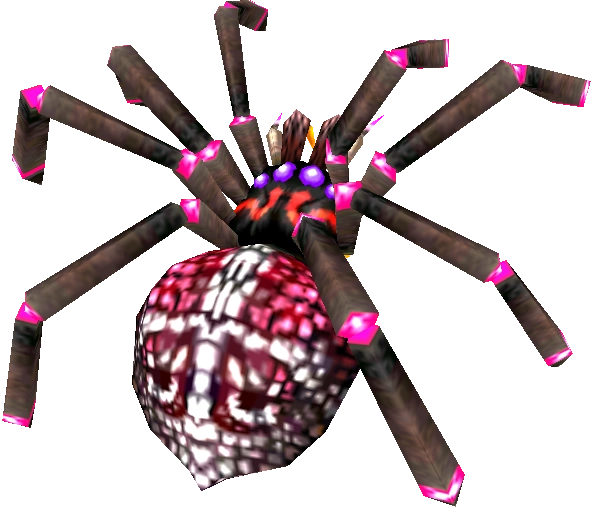
Walltula / Skulltula
Description: Spider enemies. Walltulas are smaller spiders that cling to climbable walls and vines, dropping down when Link gets close. Skulltulas are larger, hanging from ceilings by a silk thread and descending to attack.
Attacks: Walltulas drop onto Link, causing minor damage and knocking him off vines. Skulltulas descend and perform a spinning attack.
Strategy:
- Walltulas: Shoot them from a distance with the Slingshot or Bow before climbing. If already climbing, a quick shield bash or vertical sword slash can sometimes knock them off.
- Skulltulas: Z-target them. Use the Boomerang or a ranged weapon (Bow/Slingshot) to flip them over, exposing their vulnerable underside. Shoot the underside or use the Clawshot to finish them off. A well-timed sword strike can also work when they lower themselves, but attacking their hard back is ineffective.
Drops: Rupees, Hearts.
Zant Head
Description: Floating replicas of Zant’s helmet that appear as summoned enemies during certain phases of the Zant boss fight and within the Palace of Twilight.
Attacks: Fire projectiles of dark energy at Link. Tend to float passively otherwise.
Strategy: Treat them like mobile turrets. Dodge their energy shots and shoot them down with the Hero’s Bow (usually takes one or two arrows). The Gale Boomerang might stun them. They are primarily meant to distract or add pressure during other encounters.
Drops: Rupees, Hearts (often).