- Prologue: Outset Island: Introduction to Link’s home, initial quests, and obtaining the Hero’s Sword and Shield.
- Forsaken Fortress (First Visit): Stealth mechanics and rescuing Aryll.
- Windfall Island: Acquiring the Sail, meeting key characters, and side quests.
- Dragon Roost Island & Cavern: Assisting the Rito tribe, dungeon exploration, and obtaining Din’s Pearl.
- Forest Haven & Forbidden Woods: Meeting the Great Deku Tree, aiding the Koroks, and securing Farore’s Pearl.
- Greatfish Isle & Nayru’s Pearl: Story progression and obtaining the final pearl.
- Tower of the Gods: Dungeon challenges and gaining access to Hyrule.
- Hyrule Castle: Discovering the Master Sword and storyline developments.
- Forsaken Fortress (Second Visit): Confronting the Helmaroc King and rescuing Aryll.
- Earth Temple: Partnering with Medli, solving light-based puzzles, and defeating Jalhalla.
- Wind Temple: Collaborating with Makar, utilizing the Hookshot, and overcoming Molgera.
- Triforce Shard Quest: Locating Triforce Charts, deciphering them, and retrieving Triforce shards.
- Ganon’s Tower: Final challenges, boss rematches, and the ultimate confrontation with Ganondorf.
After conquering the Wind Temple, Link’s next mission is a grand scavenger hunt across the Great Sea to reassemble the Triforce of Courage. This quest is famous (or infamous) for making you scour the world for eight Triforce Shards. In the original GameCube version, each shard’s location is marked on a special Triforce Chart that you must find and have deciphered by Tingle (for a hefty fee), then haul up the shard from the sea floor. The Wii U Wind Waker HD version streamlines this by skipping most charts – five of the charts were removed and the shards can be obtained directly at those locations. We’ll cover both versions as we go, pointing out where things differ. Spoilers ahead! But if you’re diving into an endgame walkthrough, you’re probably okay with that. Let’s set sail!
Preparation Tips: Before hunting shards, check your mail for Tingle’s IN-credible Chart (it arrives after the Forsaken Fortress part 2) and pay 201 Rupees to claim it. This special chart marks all Triforce Chart locations and, once deciphered, the shard locations on your sea map. It’s extremely helpful for tracking your progress. Make sure you have the required gear for island challenges: Bombs, Bow, Hookshot, Power Bracelets, Iron Boots, a couple of Hyoi Pears, etc. Having the Ballad of Gales song (to warp around) is a huge time-saver. Also, upgrade your wallet and stockpile Rupees – on GameCube you’ll need a total of 3,184 Rupees just to pay Tingle (398 each for 8 charts), so break pots, dig up treasure, and sell those Joy Pendants if you must. (In Wind Waker HD, you only have 3 charts to decipher, but Rupees are still useful for arrows, bait, etc.) Now, on to the shards!
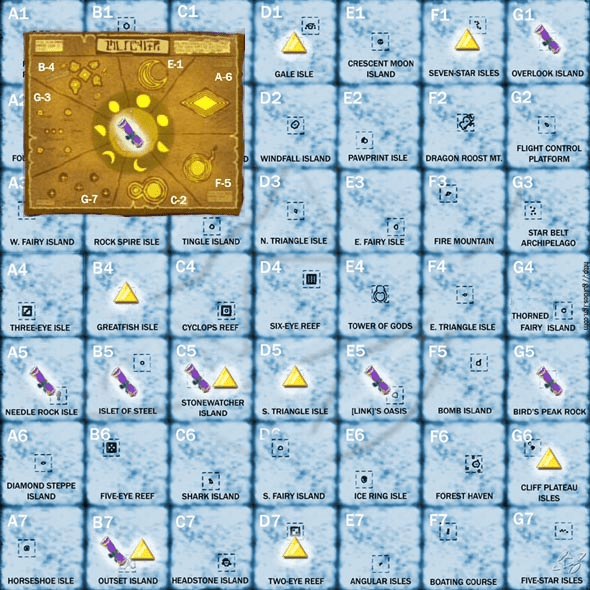
Map of the Great Sea with Triforce Chart (purple scroll icons) and Triforce Shard (yellow triangle icons) locations in The Wind Waker. Each shard is hidden around a specific island, often requiring Link to solve a mini-dungeon or challenge.
Locating the Triforce Charts & Shards
Below is a list of all eight Triforce pieces and where to find them. Each entry describes the island or area, the challenge to get the chart/shard, and differences between the GameCube and HD versions. You can tackle them in any order, but this sequence flows well:
Islet of Steel (B-5)
A small fortress island one square south of Greatfish Isle. It’s guarded by a big Warship (a cannon boat). Blast the Warship with your Bomb Cannon to clear the way. Sail inside the steel islet and you’ll see a Wind Waker crest on the floor. Stand on the crest and conduct the Wind’s Requiem to make a treasure chest appear. Open it to claim your prize. On GameCube, this is Triforce Chart #1, which points to the shard near Greatfish Isle. In Wind Waker HD, they spare you the extra step – the chest contains the Triforce Shard itself here. (If you’re on GameCube, take the chart to Tingle for deciphering, then sail to Greatfish Isle. Use the now-readable chart to pinpoint the spot in the ocean and haul up Triforce Shard 1 with your Grappling Hook.) Don’t forget to snag the 200 Rupee chest here as well if you have Treasure Chart #35– you’ll need the cash!
Private Oasis (E-5)
Also known as Link’s Cabana, this luxury isle south of Dragon Roost is home to a cozy vacation house – and a secret underground maze. You must have obtained the Cabana Deed from Mrs. Marie (the teacher on Windfall Island) by giving her 20 Joy Pendants. Show the deed to the talking door (yes, the door has a face) to get inside. Indoors, use your Grappling Hook on the ceiling lever to douse the fireplace, revealing a crawl hole. Drop into the hole to enter a labyrinth of crawlspaces beneath the cabana. Navigate through the maze by breaking wooden boards and crawling through tunnels (tip: listen for the squeaks of Miniblins and watch out for a couple of lurking ReDeads down there!). The goal is to find and hit three wooden pegs with the Skull Hammer, which opens gates in the maze. Eventually, you’ll reach a room with a Wind Waker crest. Play the Wind’s Requiem on the crest to spawn a chest containing the prize. On GameCube this is Triforce Chart #2, which, once deciphered, leads to the shard near Gale Isle (D-1). In the HD version, the chest gives you the Triforce Shard directly. Notable items: There’s a hidden 100 Rupee chest in the cabana maze (behind an optional crawl tunnel) – grab it to help fund Tingle’s decipher fees!
Bird’s Peak Rock (G-5)
A tall, rocky island cluster guarded by Kargarocs (big birds) and with several thin spires surrounding a central pillar. Sail here and clear out some Kargarocs with your bow from a distance so they don’t harass you. You’ll notice a locked door at sea level and five crystal switches perched atop the surrounding peaks. This is a job for a seagull. Stand on the shore and equip a Hyoi Pear on your bait bag. When you release the pear, a seagull comes under your control – steer it to fly through all the switches on the rock spires. Avoid or outrun the Kargarocs as you hit each switch; when all five are triggered, you’ll hear a chime and the door below opens up. Cancel seagull control and head through that door. Inside, as usual, play Wind’s Requiem on the crest to summon a chest with your reward. In the original version this is Triforce Chart #3, which points to a shard near Stone Watcher Island (C-5). In the HD version, Bird’s Peak Rock still holds a chart (Nintendo only cut five charts, and this isn’t one of them), so you get Triforce Chart (Wii U)#2 here, leading to the shard by Stone Watcher. (Either way, you’ll be visiting Stone Watcher Island itself for another shard – see below – so you can double up that trip.) Fun extra: if you need Golden Feathers for a side quest, every Kargaroc drops one.
Ghost Ship (various locations)
One of the coolest (and spookiest) shard locations is the Ghost Ship, a literal haunted ship that fades in and out of existence at specific places only at night. First, you’ll need the Ghost Ship Chart to even enter the ship. Sail to Diamond Steppe Island (A-6), a tiny island with tiered platforms. Use the Hookshot on the lone palm tree to get on the island, then drop into the hollow tree stump. You’ll fall into a warp jar room puzzle. Several warp pots here will teleport you around – you must choose the correct sequence of pots to reach the chest at the end. Watch out for Floormasters (the giant hand enemies) trying to grab you in a few rooms. The correct path is: from the entry platform, drop into the pot right next to it, then in the next room climb up and enter the highest pot on the ledge, which eventually lands you by a chest. Open it to obtain the Ghost Ship Chart. This special chart shows a spooky map with moon phases and islands. It reveals where the Ghost Ship will appear each night, based on the phase of the moon. Now, find the Ghost Ship itself: check the moon in your game’s night sky and compare it to the chart to know which island to haunt. (For example, a crescent moon means the ship is near Crescent Moon Island; a full moon means outside Spectacle Island, etc..) The Ghost Ship looks like a spectral galleon lit by blue flames, and you might hear an eerie wailing when it’s nearby. To board it, simply sail into the glowing ship when it appears. Link will automatically teleport on deck.
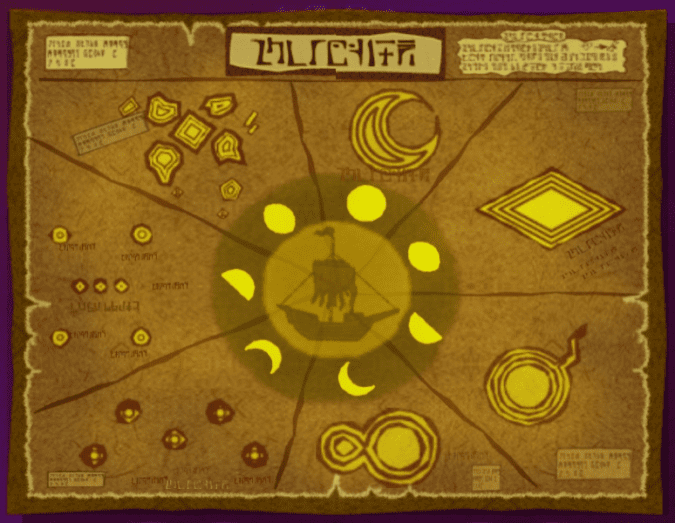
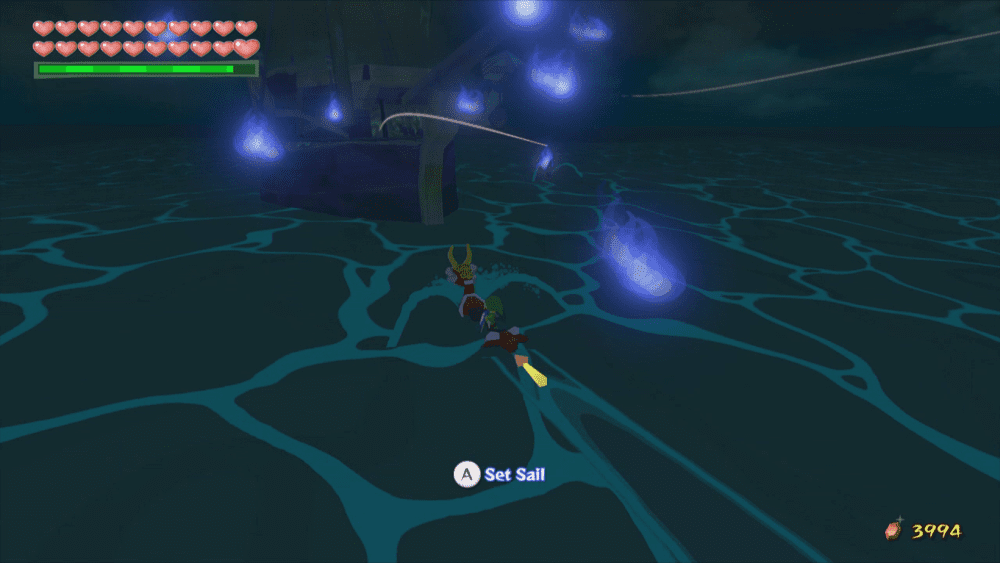
Inside the Ghost Ship, you’ll face a mini-battle royale with undead enemies. In the confines of its dim cabin, defeat the ghosts and ghouls: a couple of Poes, a Wizzrobe, and a ReDead will attack. Use your Mirror Shield to stun the Poes under the shaft of moonlight, take out the Wizzrobe quickly with an arrow or boomerang, and don’t let the ReDead scream freeze you. Once all enemies are defeated, a ladder drops down. Climb up to the captain’s quarters and open the ornate chest. In Wind Waker HD, you’ll directly obtain a Triforce Shard here! On GameCube, you get Triforce Chart #4 instead, which Tingle’s deciphering will reveal as the shard location near Outset Island (B-7). (On GC, you’ll need to sail to Outset and salvage the shard from the sea there.) The moment you claim your prize, Link is automatically ejected from the Ghost Ship as it vanishes – spoOoOky! Tip: The Ghost Ship can be tricky to chase down because night can turn to day quickly. A helpful trick is to sail to the quadrant where it will appear and then play the Song of Passing repeatedly to cycle the day/night until it spawns right where you are. That way you’re not racing the sunrise. With the Ghost Ship loot obtained, one more “X” is crossed off on your IN-credible Chart.
Needle Rock Isle (A-5)
A small island with a distinctive tall “needle” spire. When you sail into this sector, you’ll be greeted by a trio of hostile Warships. One of them is a special golden Warship that holds what we need. Equip your Bombs and engage in a high-seas battle! Sink the regular ships if they get in your way, but focus on the golden Warship – it’s tougher than the others, but a few well-placed cannon shots (or Fire/Ice arrows to stun, then bombs) will do it in. Once it’s destroyed, watch for a glowing ring of light in the water marking where it sank. Sail over that spot and use the Grappling Hook to salvage the treasure. On GameCube, you fish up Triforce Chart #5 here. On HD, this location was changed to give the chart as well (since only three charts remain in HD, Needle Rock’s chart is one of them). That chart (after deciphering if needed) points to the shard near Cliff Plateau Isles (G-6). However, Wind Waker HD actually skips the extra step here: upon defeating the golden Warship in HD, the salvage treasure is already a Triforce Shard (corresponding to what would have been the Cliff Plateau shard). Either way, blasting pirate ships to grab loot is a good time. Notable extra: On the Needle Rock island itself, you can use a Hyoi Pear to control a seagull and hit a switch atop the needle spire to make a chest appear containing a Piece of Heart. It’s not required for the Triforce, but if you’re low on health, why not?
Outset Island – Savage Labyrinth (B-7)
Time to return home! Outset has a deep secret: the Savage Labyrinth, a 50-floor underground trial of combat. Warp or sail to Outset and climb up to the peak of the island (where you met the Fairy Fountain earlier). Near the Fairy’s grotto, there’s a large stone slab that you couldn’t lift early in the game. Now that you have the Power Bracelets, pick it up and toss it aside to reveal a hole. Stock up on health and fairies before dropping in – you’re about to fight through many floors of enemies. The Savage Labyrinth consists of multiple levels filled with increasingly tough enemies (Bokoblins, Moblins, Darknuts, etc.). Every ten floors you’ll get a breather with some recovery items in jars. The goal for the Triforce quest is to reach floor 30. At floor 30, you’ll find a teleport pot back to the surface and, more importantly, a big treasure chest. Open it to claim Triforce Chart #6 (GameCube) or an actual Triforce Shard (HD). On GameCube, decipher Chart 6 to find the shard’s location at Southern Triangle Island (D-5) and salvage it from the sea. In HD, you’re done here – shard in hand. You can choose to continue deeper in the labyrinth for more rewards: if you conquer all 50 floors, you’ll earn a Piece of Heart at the bottom. But for the purposes of the Triforce, floor 30 is sufficient. When ready, step into the teleporter pot to exit (or warp out with Farore’s Wind if you set it, or just Save & Quit to respawn atop Outset).
Stone Watcher Island (C-5)
A relatively nondescript round island with a big stone head statue blocking a hole. It’s located one square west of the Tower of the Gods. Sail there and land on the shore. You’ll need the Power Bracelets to pick up and remove the giant stone head that “watches” the island. Drop into the revealed hole to enter a mini-dungeon full of enemies. In this underground chamber, you’ll find a central sealed door and four surrounding doorways leading to small combat trial rooms. This setup should feel familiar from other Zelda games: you must clear all four rooms. Enter each room and defeat all enemies inside – you’ll face combinations of Moblins, Darknuts, and Wizzrobes (plus some minor Miniblins that spawn). Once a room is cleared, its door light will turn blue. (If a Darknut drops a Knight’s Crest, be sure to snag it!) When all four side rooms are cleared, the central large door opens. Go through and you’ll find the Wind’s Requiem crest on the floor. Play the song and open the chest that appears. On GameCube, this yields Triforce Chart #7, pointing to a shard hidden in the sea near the Seven-Star Isles (E-1). In the HD version, they removed this chart; instead Stone Watcher Island gives you the Triforce Shard directly in the chest. Job done! This underground area also has plenty of jars with Magic and hearts, and you likely racked up some spoils from the fights (Skull Necklaces, crests) – not a bad haul.
Overlook Island (G-1)
Our final shard is at the far northeast corner of the map. Overlook Island is a series of tall, bare pillars sticking out of the sea. There’s no beach to land on, so sail up close and look for the withered trees on top of the cliffs. Use your Hookshot on one of the trees to pull yourself onto the island. Like Stone Watcher, Overlook features a multi-room combat trial. Drop down the hole on the main plateau. You’ll enter a cavern with several doors and a familiar routine: clear each room of enemies to unlock the next. Here you’ll encounter things like multiple Wizzrobes summoning enemies, Moblins, and Darknuts. One room even has two Darknuts at once – put your parry skills to use or try to get them to friendly-fire each other. Once all the side rooms are cleared and their insignias lit, the central door opens. Play Wind’s Requiem on the crest and open the chest for the prize. On GameCube, this is Triforce Chart #8, leading to the final shard located in the sea by Two-Eye Reef (D-7). In Wind Waker HD, this chest simply contains the Triforce Shard (since Overlook is one of the locations that gives a shard outright). Either way, you’ve now obtained the last piece of the Triforce of Courage!
With all eight shards in hand, Link’s Triforce of Courage is complete. In an emotional scene, the Triforce symbol glows and the pieces fuse together, marking Link as the true Hero of Winds. Congratulations! The hard part is over. (Tingle can finally stop extorting you for Rupees – whew.) If you open your Quest Status subscreen, you’ll see the Triforce of Courage restored to its former glory. Now it’s time to confront the final challenge.
Rupee Management Tip: If you were struggling for Rupees at any point, note that many shard locations hide extra treasures to help you out. For example, Islet of Steel’s submerged chest (Treasure Chart 35) holds a Silver Rupee (200), the cabana maze had 100, and both Stone Watcher and Overlook caverns have many loot drops from enemies. Using Treasure Charts you’ve collected throughout the game to salvage Rupees from the sea is also wise. In Wind Waker HD, it’s generally easier to accumulate Rupees (and you need fewer for charts), so most players won’t have too much trouble affording Tingle’s fees or other expenses by this stage.
When you’re ready, warp to the Tower of the Gods and sail to the glowing ring in the sea to descend once more to Hyrule. The King of Red Lions will take Link back below the waves, where the final showdown awaits.