Table of Contents
- Prologue: Escape from Hyrule Castle: Step-by-step guide to escaping the castle, introducing basic mechanics.
- Chapter 1: Suthorn Forest & The Mysterious Rifts: Navigating Suthorn Village and completing the Suthorn Ruins dungeon.
- Overview
- Suthorn Beach – First Steps in the Overworld
- Suthorn Village – Restock and Explore
- Suthorn Forest – Through the Woods to the Rift
- Stilled Suthorn Forest – Into the Rift
- Suthorn Ruins Dungeon – Echoes and Shadows
- Boss Fight – Seismic Talus
- Post-Dungeon Cutscene – Reuniting at Lueburry’s House
- Tips for Chapter 1 Completion
- Chapter 2: Gerudo Desert: Guidance on completing quests and dungeons in the Gerudo Desert region.
- Chapter 3: Jabul Waters: Strategies for tackling quests and dungeons in the Jabul Waters region.
- Chapter 4: Return to Hyrule Castle: Progressing the main storyline upon returning to the castle.
- Chapter 5: Eldin Volcano: Strategies for navigating the Eldin Volcano region and its challenges.
- Chapter 6: Faron Wetlands: Guidance on completing quests and dungeons in the Faron Wetlands.
- Chapter 7: Hebra Mountains: Navigating the Hebra Mountains region and overcoming its challenges.
- Chapter 8: The Eternal Forest & Endgame: Preparation and strategies for the final challenges and boss encounters.
Overview
In Chapter 1 of The Legend of Zelda: Echoes of Wisdom, you’ll guide Princess Zelda from a dramatic castle escape to the lush Suthorn region. This chapter covers the Mysterious Rifts main quest through Suthorn Beach, Suthorn Village, Suthorn Forest, and into the Still World version of the forest. By the end, you’ll complete the first dungeon (Suthorn Ruins) and defeat its boss. Below is a step-by-step guide with puzzle solutions, combat tips, hidden items, and key story beats to ensure you don’t miss a thing.
Suthorn Beach – First Steps in the Overworld
Zelda awakens on Suthorn Beach on the southern coast of Hyrule, beginning the exploration phase of Chapter 1:
Beachhead Basics: As you regain control, cut tall grass with a spin attack (Zelda’s basic spin is available now that she’s outdoors; press the attack button repeatedly or charge if available). Cutting grass can yield small rupees or hearts. Nearby, examine a shimmering rock to learn the Rock Echo.
Defeat the Zol: A green blob enemy called a Zol appears. Rather than engaging it with low damage from Zelda’s kick attack, use the newly learned Rock Echo: summon a rock and toss it at the Zol to defeat it. This teaches Zelda the Zol Echo – the ability to spawn friendly Zol blob echoes to fight for her. (Tip: Echoes of enemies act like summoned allies. The Zol Echo creates a blob that can distract or slowly damage foes. It’s not strong, but it can occupy enemies while you maneuver.)
Sea Urchin Encounter: Farther to the right along the beach, you’ll find spiky Sea Urchins blocking the path. Use Rock Echoes (or pick up and throw existing rocks) to safely destroy the urchins from a distance. This grants the Sea Urchin Echo, letting you summon spiky mines that damage enemies on contact. Sea Urchin echoes can be useful as a defensive barrier in future fights.
Heart Piece on the Ledge: Keep an eye out for a Piece of Heart on a low cliff to the south (downward from the main path). To reach it:
- Walk east along the sand until you can go up onto the grassy ledge on the right.
- Use several Old Bed Echoes to build a staircase/ramp from the beach up to that ledge. Climb up and claim the Heart Piece. (Collecting 4 Pieces of Heart increases your maximum hearts by one. This is the first available Heart Piece in the game.)
Optional Cave (Beach Cave): To the north (upper side of the beach), there’s a cave entrance on a high ledge. Clear more Sea Urchins around its base by throwing rocks, then use Old Bed echoes to create a bridge or platform to reach the Beach Cave entrance. Inside:
- Keese Echo: In the first room, defeat a few Keese (bat enemies) by throwing a rock or simply jumping and attacking if possible. This yields the Keese Echo, allowing you to summon bat allies.
- Hidden Heart Piece: The next chamber has wooden crates blocking a ledge. Stand on the higher ground and drop a Rock (or Boulder) Echo onto the crates. The weight will break them, revealing another Piece of Heart. That’s 2/4 pieces so far in Chapter 1.
- Exit the cave and continue north to leave the beach area.
To Suthorn Village: Exiting the cave places Zelda in Suthorn Prairie. Before heading east into the village, look around:
- On a small plateau (accessible using Table or Bed echoes to climb), there’s a treasure chest containing 50 Rupees. Collect these to bolster your wallet – you’ll need rupees soon.
- When ready, go right (east) to enter Suthorn Village.
Suthorn Village – Restock and Explore
The village is a safe area with friendly NPCs and a few important items to collect. There’s no combat here, so take the time to prepare for the forest ahead:
Talk to Villagers: The townsfolk share rumors and hints:
- They mention a person named Link living in the village – interestingly, Zelda (and the player) know Link, but the villagers speak as if he’s a local hero they haven’t seen today. (This ties into story lore: Link was from this village and left to confront the rifts, explaining why the villagers recognize the name but not Zelda.)
- One villager might mention strange rifts appearing in the nearby forest and people gone missing. This reinforces your next objective.
Item Shop & Heart Piece: In the northeast of the village is the Suthorn Village Shop (a small building with a rupee sign). Check inside:
- The shop sells a Piece of Heart for 80 Rupees. If you grabbed the 50 rupee chest and cut some grass (or broke pots) for extra rupees, you might have enough. If you’re short on rupees, you can skip it for now and return later once you have 80 – but buying it now can give you an early health advantage.
- When you examine the heart piece, the shopkeeper says, “That’s a piece of heart! Quite valuable, yes. We’ve only got the one in stock.” You have the option to buy it for 80 or decline. Beginner Tip: More heart pieces = more survivability. It’s recommended to get this now if possible. You can always farm a few rupees in the village (cut grass, check under rocks, etc.) to reach 80.


Learn New Echoes in Town: There are several shimmering objects around:
- In the southwest house (a small hut), find a hanging cured meat or similar object to learn the Meat Echo. This lets Zelda summon a chunk of meat – often used to lure monsters or activate pressure plates that require weight.
- In another house or the same area, look for a regular clay pot (different from the Hyrule pot) to get a Pot Echo (if you didn’t already from the castle, the village provides a chance). Pot echoes can be thrown at enemies for decent damage or used like boxes for puzzles.
- Near the village center (next to the item shop or a training area), there’s a bouncy platform object – examine it to learn the Trampoline Echo. The Trampoline Echo creates a springy pad that can launch Zelda upward. This is useful for reaching high ledges or shortcuts. Practice by placing one and jumping on it; you’ll bounce to a higher elevation.
Well Secret – Floral Nectar: There’s a well in the village (often near the center). Jump into the well (don’t worry, there’s no fall damage in this small scene). At the bottom, open the chest to obtain 5 jars of Floral Nectar. Floral Nectar is a low-grade healing item (restores a small amount of health) – not huge, but it can be mixed later to brew better potions or “smoothies.” Climb the ladder to get back up. (Advanced Tip: Save Floral Nectar for crafting rather than using it alone. Combining it later can create more potent drinks.)
Leaving the Village: Once you’ve gathered items and info, exit the village to the east. As you leave, there’s a village signpost at the outskirts – it shimmers, so capture the Sign Echo. This echo isn’t especially powerful (a sign isn’t a great weapon), but if you’re aiming for 100% echo collection, grab it now. It can also be a quirky projectile to throw at foes.Now you’re ready to enter Suthorn Forest, where combat will ramp up and you’ll search for Lueburry’s rift-covered house.
Suthorn Forest – Through the Woods to the Rift
The forest east of the village is more dangerous, filled with monsters and secrets. Your goal is to reach the location marked on your map (Lueburry’s House) and investigate the rift there.
Forest Entry & Waypoint: As soon as you enter Suthorn Forest, Zelda discovers her first Waypoint statue (a glowing totem). Activate the Waypoint by examining it. Tri will explain that Waypoints allow fast travel (warping) between each other. Make sure to activate any waypoint you find – they are invaluable for quick travel and saving time.

(Tri: “These are waypoints. We use these a lot.”)
Follow the Path: Head east along the main path. Be cautious of enemies hiding in grass:
- Hidden Rope Enemy: In tall grass, a snake-like enemy called a Rope may lunge at you. If you see grass rustling, be ready to dodge. Defeat the Rope (a quick way is to summon a Zol echo or throw a rock) and you’ll gain the Rope Echo. Rope echoes summon a small snake that slithers toward enemies; it’s not strong but can harass or distract foes. Notably, the Rope Echo can combine with others (like swarming multiple weak echoes at a tough enemy).
Electro Apple Chest: Just across a small pond, you’ll spot a treasure chest on a ledge. Open it to collect 5 Electro Apples. These special apples can be eaten to restore some health and also grant a temporary electric effect to your attacks (useful for stunning enemies). Save them for a tough fight or when you’re low on hearts.
Cave #1 – Ignizol’s Lair: Continuing east, you’ll see a cave entrance along the cliff. Enter this first forest cave:
- Inside, you’re ambushed by an Ignizol – a fiery jelly-like creature that lunges with flame attacks. Without a Sword, Zelda shouldn’t get too close. Instead, use Rock or Sea Urchin Echoes to hit it from afar. Two or three hits will douse the Ignizol.
- Capture the Ignizol Echo from its remains. This allows you to summon a little fire-spirit. Puzzle use: In the next room, there’s an unlit torch. Summon an Ignizol Echo near the torch – the flame it emits will light the torch.
- Lighting the torch causes a chest to appear. Open it to obtain your first Fairy Bottle! (If you already had a bottle, this would be a second one, but at this point this should be Zelda’s Bottle #1.) Using Bottles: If you encounter a Fairy (glowing winged orbs often found near ponds or in jars), touching it will automatically store it in a bottle. Fairies will revive you if you fall in battle, making them extremely valuable. Remember this location – you can refill on fairies later if needed (there’s one nearby in the forest).
Cave #2 – Heart Piece Puzzle: Further along the forest path, you’ll find another cave on the north side. Enter this second cave:
- Immediately to your right as you enter, you can see a Piece of Heart on a high ledge behind some rocks. You can’t reach it from the entrance; you’ll need to navigate through the cave and come out a higher exit.
- The cave is a small maze. As you proceed, you’ll face a Caromadillo enemy – a rolling armadillo-like creature. It curls up and bounces off walls to hit you. Combat Tip: Time your move and throw a Rock Echo or use a Sea Urchin echo when it bounces near you to flip it over. Once stunned, finish it off.
- Learn the Caromadillo Echo after defeating it. This echo creates a rolling armadillo ball that ricochets around – useful for hitting switches or enemies around corners.
- Use the Caromadillo Echo in the cave’s puzzle: In one corridor, wooden boxes block your way to the heart piece. Summon a Caromadillo echo and watch it smash through the crates. Now you can loop around to the entrance area but on the higher ledge. Claim the Piece of Heart (this should be your 3rd one if you got the two earlier).
- Exit the cave once done.
Forest Pond Fairy: Just west of Cave #2’s exit, there’s a small pond. A Fairy hovers above the water here. If you have an empty bottle, grab the fairy to store it. If your bottle already has something (like Floral Nectar), consider using or disposing of that so you can carry the fairy. Having a bottled fairy gives you a free revive if you die – very useful for upcoming challenges.
Spear Moblin Ambush: Near the pond, as you move forward, a Spear Moblin attacks. This bulky Moblin throws spears from range. Dodge the spear (side-step or keep moving) and close in by using echoes:
- A quick strategy is to summon a Rope or Zol Echo to draw its attention, then hit it with a Rock echo or even pick up and throw its own spear back at it if possible.
- Once defeated, you acquire the Spear Moblin Echo. This is your first ranged offensive echo – when summoned, a Spear Moblin ally will toss spears at enemies from a distance. It’s very helpful for softening targets or hitting flying foes. (Advanced Tip: The Spear Moblin echo can target enemies that you might not easily reach, making it a bread-and-butter combat echo. Use it to start fights while you hang back.)
Investigate Lueburry’s House (Story): Continue along to the marker on your map. You’ll find a small house built against a cliff – this is Lueburry’s House, the one Impa marked. Unfortunately, half of the house and its door are enveloped in a gigantic purple-black Rift field. Zelda cannot enter. A cutscene triggers where Tri and Zelda observe the rift blocking the house. Tri deduces this is an oversized Rift and suggests that to save Lueburry (and others trapped in it), they need to enter the Still World (the dimension inside the rift) and mend the rift from within. Zelda steels herself to enter her first mysterious rift.
Monster Camp & Goodies (Optional): Before following Tri to the rift, you can do a couple of optional tasks in the forest:
- Monster Camp (NE Corner): To the northeast, there’s a clearing with a Moblin camp. A few Spear Moblins (and possibly Bokoblins) are gathered around a fire and a chest. Clear them out using your echoes (Spear Moblin echo to fight from afar works great, or Caromadillo echo to bounce through multiple foes). Once the camp is defeated, the chest unlocks. Open it to get 10 bunches of Refreshing Grapes. Refreshing Grapes are an item that restores some stamina/energy and a bit of health; they can also be used in cooking or quests later. It’s a nice stockpile to have.
- Peahat Cave (SE corner, optional): In the southeast part of the forest, there’s another small cave off the main path. Inside you’ll find a Peahat (a helicopter-like plant enemy) hovering. Defeat the Peahat (use Spear Moblin echo or throw a spear/rock when it swoops down). Capturing it gives the Peahat Echo. Peahat echoes spawn a small flying plant that can create a gust or distract aerial foes. The echo also has a traversal use: you might be able to ride the gust upward or across short gaps (experiment in open areas). It’s not required, but collectors will want it.
- Advanced Prep – Restock: Ensure you have at least one fairy in a bottle, and your health is topped up. You can cut grass or eat an apple/grapes to heal if needed. Also consider the echoes you’ll want ready for the upcoming Still World section – Rope and Spear Moblin echoes are reliable choices for combat.
Enter the Still World: Head to the far northeast of Suthorn Forest, where Tri is waiting by a swirling portal he has created. Save at the nearby Waypoint statue (it should be just south of the portal). When ready, approach Tri’s portal. He will open a rift for Zelda to jump into, transporting you to the dark mirror version of the forest: Stilled Suthorn Forest.
Stilled Suthorn Forest – Into the Rift
Inside the rift, the world takes on an eerie atmosphere. Colors are muted and everything feels frozen in time. This area mirrors the layout of Suthorn Forest but with ghostly enemies and new obstacles. Your mission is to find a way to “mend” (close) the large rift from in here, which likely involves reaching the dungeon at the heart of this Still World.
Rift World Basics: In the Still World, physics can be strange. Some platforms float, and time is stopped for anything (or anyone) that was caught in the rift. You might see flickering silhouettes of wildlife or people, but you can’t interact with them yet. Tri might give a brief tutorial on moving in the Still World – essentially, Zelda can jump across suspended debris and use echoes as usual. Movement is a bit like a platforming challenge here.
Beware the Tecuum: Early in the area, you’ll encounter a dark, floating blob called a Tecuum (a Rift creature). It will chase Zelda slowly. When you hit it or after a short time, it splits into two weaker enemies: a Dark Zol (shadow blob on the ground) and a Dark Keese (shadow bat). Combat Tip: The Tecuum can’t be permanently killed until it splits – focus on quickly defeating the Dark Zol and Dark Keese after a split. A couple of hits or a summoned echo (Spear Moblin works well here too) can dispatch them. If you’re overwhelmed, remember you have that fairy insurance. Try to fight one at a time by luring the Tecuum blobs separately.
Still World Cave & Switch Puzzle: On the right (east side) of the first area, there’s a cave entrance. Inside this cave:
- It’s quite dark, and you’ll immediately be attacked by a pair of Dark Keese. Use a quick echo or your own attacks to take them out or simply run past if you prefer.
- Step on the floor switch in the cave room. This will open a door or gate within the cave.
- Proceed through to a second chamber where several Dark Zols emerge from the shadows. Clear all five Dark Zols; defeating all of them causes another door to open (the path onward). If you have an AOE attack (like throwing a bomb if you had one, but you don’t yet) or using Caromadillo echo to bounce around, this can clear multiples. Otherwise, pick them off one by one.
- Exit the cave on the other side. You’ve bypassed a barrier and are now deeper in the Still Forest.
More Enemies Outside: Back outside, you’re met with another Tecuum blob immediately. This one will again split – but this time it spawns a Dark Zol and a Dark Spear Moblin! The Dark Spear Moblin acts like the normal one but hits harder. Strategy: Use cover and echoes. For example, summon your own Spear Moblin echo to duel it at range while you focus on the Dark Zol. Or use a Zol/Rope echo to occupy the Moblin while you circle around and attack it. Keep moving to avoid its spear throws. Once both enemies are down, proceed.
Rupee Ledge: In the northeast corner of this Still World area, there’s a ledge you can climb (or some floating debris you can platform on) that leads to a cluster of 5 green Rupees (total 5 rupees). It’s a small reward, but every bit helps. Use Old Bed or Table echoes if you need extra height to reach them.
Dungeon Entrance Revealed: Navigate towards the northwest part of the map. You should find what looks like an old stone entrance – this is the sealed Suthorn Ruins entrance in the normal world, now accessible via the Still World. There may be a few last enemies guarding it; defeat them or slip past. Approach the entrance, and Tri will likely have some dialogue confirming this is where the rift’s core is. Enter the Suthorn Ruins to begin the first true dungeon of the game.(A waypoint or portal might appear here for convenience, but if not, don’t worry – you can exit the dungeon the way you came if you need to return to the surface. Ensure you’re ready: your hearts are filled (there might be pots with hearts inside the dungeon start), and you have your fairy bottle.)
Suthorn Ruins Dungeon – Echoes and Shadows
The Suthorn Ruins is an ancient temple overgrown by the forest and partly frozen by the Still World’s influence. This dungeon will test your mastery of the Tri Rod’s echo powers with puzzles and combat challenges. Below is a structured path through the dungeon, highlighting key items and strategies:
Dungeon Overview & Key Objectives
- Dungeon Map: Find the Dungeon Map early to navigate the ruins.
- Small Keys: You’ll need to obtain multiple small keys to unlock doors. Keys are usually in chests that appear after solving a room’s puzzle or defeating all enemies.
- Echo Puzzles: Use your echoes creatively – look for shimmering objects in each room. Common puzzle elements include weighing down floor switches, hitting distant crystal switches, or building platforms to reach high doors.
- Mini-Boss (Midpoint): Defeat Shadow Link to progress and gain a crucial ability (Swordfighter Form).
- Dungeon Boss: Conquer the boss Seismic Talus at the end of the ruins.
1. Finding the Map and First Key
- Entry Hall: You start in a hall with sealed exits. Defeat a couple of low-level enemies (likely Dark Keese or Dark Zols here as well). Note any sparkling objects – perhaps broken Ancient Pots or Statues – and capture their echoes if you can. One might be a Light Lantern Echo if a lantern is present, useful for lighting dark areas.
- Map Room Puzzle: Shortly after, you’ll enter a room with multiple pressure plates on the floor and a high ledge with a chest. The chest likely contains the Dungeon Map. To reach it:
- Notice a shimmering Old Bed or Wooden Box in the room. Use that echo to create objects and hold down the floor switches simultaneously. For example, summon a Wooden Box echo on one switch and a Rock Echo on another, while Zelda stands on the third switch. When all switches are pressed, a ladder might drop or a door opens allowing you to climb to the chest.
- Open the chest to get the Map. This will reveal the dungeon’s layout on your screen.
- Rising Platforms: In the next chamber, you might see a gap with a platform that’s too low. If there’s a shimmering Trampoline or similar object, use the Trampoline Echo to bounce to the other side. Alternatively, look for a mechanism: sometimes lighting all torches in a room (using Ignizol Echo or a lantern) can raise platforms.
- First Small Key: You’ll come across a locked door early on. Explore side rooms to find a small key:
- One room might have a fight against a couple of Dark Moblins (sword-wielding dark Moblins). Defeat them and a chest spawns with a Small Key.
- Another puzzle room might involve reflecting a beam or projectile – for instance, hit a crystal switch by bouncing a Caromadillo echo off a wall, etc. Solving it also yields a key.
- Use the key to unlock the door and proceed deeper.
2. Shadow Link – Mini-Boss Showdown
Midway through Suthorn Ruins, Zelda will face a sinister doppelgänger: Shadow Link. This fight is pivotal as it grants Zelda a new power.
Shadow Link Appearance: Entering a wide chamber, a cutscene triggers where a dark form coalesces into what looks like Link, but with red glowing eyes. This impostor Link draws a sword, challenging Zelda. Tri warns that this shadow blocks frontal attacks.
Battle Strategy – Flank and Echo: Shadow Link is agile and will block or parry any attack from the front. He moves similarly to Link, performing quick sword strikes and occasionally a spin attack. Here’s how to beat him:
- Distract with Echoes: Summon one of your combat echoes to engage Shadow Link from the front – a Spear Moblin Echo is very effective, as it will throw spears that Shadow Link will have to dodge or block. You can also spawn a Zol or Rope Echo to nip at him. Shadow Link will focus on fighting these summons if they threaten him.
- Back Attack: While Shadow Link is occupied, circle around behind him and land a hit. Use Zelda’s basic attack (a kick or wand whack) or even toss a rock from behind. He cannot block from behind, so you’ll deal damage.
- Repeat: He has a decent amount of health. Keep up the pattern – keep an echo active to distract him, then strike from behind. If your echo is destroyed, summon another. If Shadow Link turns to you, retreat and let the echo grab his attention again.
- Avoid Head-On Combat: If you try to fight him directly, he’ll likely dodge and counterattack. Be patient and use teamwork with your echoes.
Tri Rod “Bind” Tip: If you’re having trouble, remember you can also use the Tri Rod’s power directly on enemies when they’re vulnerable. Some players report using a “Bind” ability of the Tri Rod here – for example, perhaps after hitting Shadow Link from behind, he could be momentarily stunned, allowing you to use the Tri Rod to bind him (though this might just be the mechanic of learning an echo, which doesn’t apply to a major enemy like him). Generally, stick to the distract-and-flank method.
Victory and Reward: Upon defeating Shadow Link, a cutscene shows the dark figure dissipating, leaving behind a gleaming Mysterious Sword stuck in the ground. This is actually the Sword of Might that Lueburry forged (the game doesn’t explicitly call it that here, but lore confirms it). Pick up the sword. Zelda will automatically absorb its power, unlocking the Swordfighter Form ability.
Swordfighter Form Unlocked: Tri explains (or the game tutorial pops up) that Zelda can now temporarily assume Link’s fighting style. By pressing the indicated button (Up on the D-Pad) when the Energy gauge is sufficiently filled, Zelda will transform: she dons Link’s attire (the cloak’s hood comes up, etc.) and wields the Sword of Might (with an ethereal Hylian Shield). In this form:
- Zelda can directly use sword combos, block with a shield, and perform jumps with greater height.
- She cannot use the Tri Rod or summon echoes while in Swordfighter Form– it’s a trade-off for pure combat ability.
- The form lasts until the energy bar depletes. The energy refills by collecting blue energy orbs in the Still World (often dropped by enemies) or by drinking stamina potions (like certain smoothies).
- Tip: Use Swordfighter Form sparingly for tough fights or when you need to personally deal high damage (like an upcoming boss). For now, you might use it once to test it on remaining enemies. It’s a powerful tool, essentially letting Zelda fight like Link for short bursts.
After the Mini-Boss: A door unlocks allowing you to continue. You might find a recovery room with hearts or a fairy in pots right after Shadow Link (common in Zelda design). Refill health if needed. You’re now in the latter half of the dungeon.
3. Deeper into the Ruins – Puzzles and Preparation for Boss
Switch & Door Puzzles: With the Swordfighter Form available, some puzzles might optionally allow use of arrows or bombs if you had them, but since Bow of Might and Bombs of Might are not unlocked until later dungeons, you’ll still rely on echoes here.
- One room might have a distant eye switch – typically one would shoot an arrow. Instead, consider creative echo use: for instance, a Caromadillo Echo could bounce and hit the switch, or a Spear Moblin Echo might throw a spear that triggers it.
- Another scenario: multiple floor buttons far apart. Now that you have Swordfighter form, one trick is Zelda in Swordfighter form can move faster/jump higher – but she still can’t be in two places at once. Better to use echoes like Rock, Box, etc., to weigh down each switch.
- Weighted Blocks: If you see large blocks that need moving, summon a Boulder Echo above them to weigh them down or push them.
New Echoes: Keep an eye out for new enemy types in the dungeon and capture their echoes:
- Octoroks might appear in some rooms, spitting rocks at you. Defeat one to get the Octorok Echo. (The guide hints that Zol and Octorok echoes aren’t very useful in the boss fight, but it’s good to collect them regardless.)
- Sword Moblins or Darknuts: If you face a Sword Moblin (melee variant of Moblin), grab its echo – it will fight up close with a sword, complementing your spear thrower echo.
- There may be other rift creatures; capture whatever glows to build your arsenal.
Compass and Extra Chests: If you find the Compass, it will reveal chests on your dungeon map. Look for an off-path room where a chest is up high or behind bars – usually solving a smaller puzzle yields the Compass. Use echoes to retrieve it (e.g., trampolines to reach a high chest).
- With the compass, consider backtracking to any unopened chest icons. They could hold extra rupees, another fairy, or just dungeon lore, but in a 100% run you’d collect them. In this first dungeon, none of the optional chests contain new items critical for progression (aside from map/compass), so you can focus on moving forward if you’re adequately geared.
Boss Door Key (Big Key): As you near the end, you’ll come to the classic large locked door with a boss emblem. The Boss Key (Big Key) is needed.
- Typically, the Big Key chest appears after a significant puzzle or mini-boss (in older Zelda games). Since we already fought Shadow Link, the Big Key might have been given then, or it could be in the room right after.
- If you don’t have it yet, check your map for any rooms you missed. One likely scenario: A puzzle involving aligning echoes – for instance, maybe summoning three Ignizol echoes to light three torches simultaneously, which opens the Big Key chest.
- Once you have the Boss Key, unlock the ornate door and step into the boss arena.
Boss Fight – Seismic Talus
The final challenge of Chapter 1 is the Seismic Talus, a giant golem-like creature formed of boulders and rift energy. This battle is a two-phase fight that tests both your echo-summoning skills and your newly acquired Swordfighter Form.
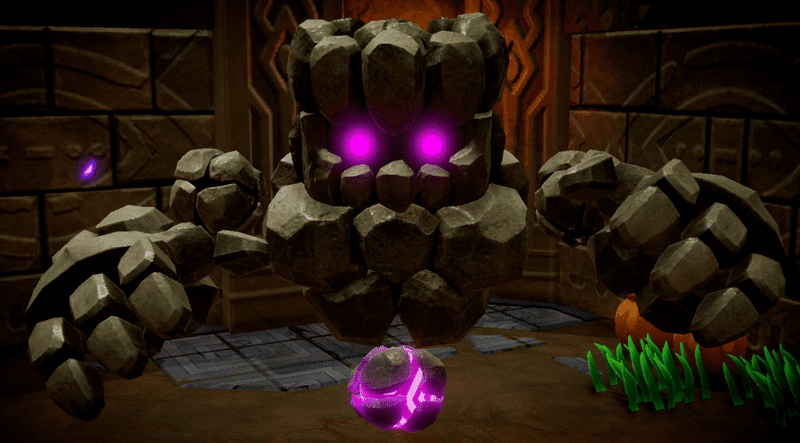
Zelda faces the hulking Seismic Talus, a rift-infused golem. Use Echoes wisely to expose its weak point (the glowing orb) during the battle.
Phase 1: Stony Sentinel
Boss Description: The Seismic Talus is a rocky titan with glowing purple cracks and a floating orb core. It stomps around the arena and can smash its arms down to cause shockwaves (hence “Seismic”). The weak point is the purple orb embedded in its body – but it’s protected by rock until you can knock it out.
Keep Moving: The Talus’s shockwave attack cracks the ground and can stun you. When you see it raise its arms, jump or move away to avoid the tremor radius. The edges of the room often have safer spots during these quakes.
Use Echo Allies: Summon your combat echoes to attack the boss. However, not all echoes are effective:
- Ineffective: Zol and Octorok echoes do almost nothing to a giant rock monster. They won’t harm its stony exterior.
- Effective: Sword Moblin and Spear Moblin echoes are very useful. A Sword Moblin echo will run up and hack at the Talus’s legs, while a Spear Moblin echo pelts it from afar. These can steadily chip at the boss and possibly make it lose balance.
- Also, Ignizol Echoes might deal some damage over time (fire vs. plant creatures is great, but vs rock it’s moderate). Still, the flame could help if you have an extra slot to summon.
- You can have multiple echoes active, but there’s a limit to how many the Tri Rod can sustain at once – manage your “echo energy” so you don’t overload (if the game has an echo limit mechanic).
Avoid Overwhelm: The Talus may spawn smaller enemies or fling boulders in Phase 1:
- If any Dark Keese or Dark Zol spawn, quickly dispatch them so you don’t get distracted.
- If it pulls chunks of ceiling down, watch for falling shadows and keep moving.
Expose the Orb (Using Bind): The goal in Phase 1 is to knock the purple orb out of the Talus’s body. After enough damage or a certain pattern:
- The Talus might kneel or a prompt might appear to use Tri Rod Bind. For example, when the Talus is momentarily stunned (perhaps after it slams and your echoes wail on its arms), target the glowing orb with the Tri Rod. The Tri Rod’s magic can “bind and yank” the orb out. Alternatively, the boss might expose the orb on its own after taking damage.
- Once the purple orb falls out onto the ground, Phase 1 is effectively over. The Talus will be temporarily inert while the orb is out.
Phase 2: Orb and Onslaught
Orb Weak Point: Now the fight focuses on the Rift Orb itself, which is the Seismic Talus’s core. It will hover and emit energy. The Talus body might reanimate partially to defend it.
- The orb may float around the room, protected by debris or regrowing rock pieces. You need to damage the orb directly.
Swordfighter Form for Damage: This is a great time to activate Swordfighter Form if you have energy. With the sword, Zelda can directly strike the orb for significant damage. Rush the orb and slash it when it’s exposed. Each hit will count big. If the orb is high up, use the trampoline echo or wait for it to lower during an attack.
- If you prefer not to go sword mode, you can also continue using echoes – Spear Moblin echoes will target the orb now. But the fastest way is likely using the sword.
Defensive Maneuvers: The orb will create new dangers:
- It might shoot purple projectiles at you. Strafe or reflect them: If in Swordfighter form, you can actually raise your shield to block or even bounce some projectiles back.
- The old Talus arms might still swipe at you, albeit more slowly. Don’t get complacent about positioning.
Bind and Smash: If you have Caromadillo or other heavy echoes, feel free to deploy them for extra damage on the orb. The orb may occasionally fall to the ground to reattach to rocks; when it’s down, hit it hard. Zelda’s spin attack in Swordfighter form or a thrown boulder can do wonders.
Finishing the Fight: After three solid hits on the orb (roughly), the orb will crack. The Seismic Talus shudders and then collapses entirely, defeated. Enjoy the satisfying victory cutscene as the rift energy dissipates from the monster.
Collect Your Rewards: Upon defeat, the Seismic Talus drops a large amount of loot:
- A Heart Container – pick this up to increase Zelda’s maximum hearts by one. (Now you should have at least 4 hearts total, assuming you collected enough heart pieces and this container).
- A special item: likely a Might Crystal, which is a plot-important item from the rift. (In story, these crystals power the weapons Lueburry makes. In-game, it might be presented as a key item or just implicitly used to mend the rift.)
- Possibly some rupees or consumables as well.
Mend the Rift: With the boss defeated, the oversized rift in Suthorn Forest begins to stabilize. Tri and Zelda likely perform a brief ritual or simply exit the dungeon, which closes the Still World portal and restores Lueburry’s House in the real world. You’ll automatically be taken out of the rift.
Post-Dungeon Cutscene – Reuniting at Lueburry’s House
Back in Suthorn Forest (normal world), the giant rift covering the house is gone. Zelda and Tri enter Lueburry’s House to find… Minister Lefte alive and with them (he was rescued from the rift)!
Inside the house, a cutscene plays:
Meeting Lueburry: At first, Lueburry (Impa’s brother, a Sheikah scholar) is busy packing, intending to go save Link himself. He barely notices Zelda until he realizes she’s wearing Link’s cloak. Startled, he asks Zelda what happened to Link. Zelda recounts the events – the attack at the castle, Link’s disappearance into the rift, and her journey to close the forest rift.
Revelations: Lueburry explains his research about the rifts and Might Crystals – the artifact you just retrieved. He created the Sword of Might that Link used, hoping Ganon’s defeat would end the rifts, but clearly more is at play. Minister Lefte chimes in, concerned for Zelda’s safety, but Lueburry insists Zelda is uniquely able to mend the rifts with Tri’s help.
Forming a Plan: Lueburry and Minister Lefte decide they will return to Hyrule Castle to inform others and continue researching the rifts from the safety of the real world. Lueburry encourages Zelda to continue closing rifts across Hyrule, since people like the King and General Wright (and Link) may be trapped in those distant rifts. He also notes that Tri’s presence is special – most can’t see fairies like Tri, but surviving a rift seems to allow it.
Next Destination: They mention the next rift disturbance might be in a different region (Impa’s clues or Lueburry’s intel suggest heading to Jabul Waters or another area next). The Chapter 1 quest “The Mysterious Rifts” concludes, and you’ll receive a new main quest for Chapter 2.
Before you leave the house, don’t forget to check Lueburry’s House for goodies:
There might be a chest or Lueburry might hand you something like a stash of Bombs of Might or a diary entry item (though Bombs of Might are said to come later, so perhaps just lore).
Refill your supplies, save your game, and prepare to journey to the next area marked on your map.
Tips for Chapter 1 Completion
Efficient Echo Use: Try out all the echoes you learned in this chapter. Each has situational uses:
- Combat: Spear Moblin (ranged) and Sword Moblin (melee) echoes provide a balanced offense. Ignizol (fire) can deal continuous damage. Rope and Zol are weaker but can swarm enemies.
- Puzzle: Table, Box, Rock, Old Bed, etc., are invaluable for reaching high places and holding switches. Trampoline helps with vertical movement.
- Item Combos: You can stand on an Old Bed echo and then place a Table on top to make an even higher platform – useful if one object height isn’t enough.
Exploration: If you ever feel stuck, use the Map and Compass (if obtained) to see unopened doors or chests. Backtracking in the Still World or dungeon can reveal missed echoes that might help solve puzzles.
Health Management: By the end of Chapter 1, you can have up to 5 hearts (4 from start + 1 from boss heart container). If you missed any Pieces of Heart, consider going back to collect them (the village shop heart piece, the two on Suthorn Beach, and the one in Cave #2 – those four give you another full heart container). The next areas will be tougher, so more health is a boon.
Saving and Warping: Remember you can fast-travel between Waypoints. You have one at Suthorn Forest entrance and one likely near the dungeon or in Suthorn Village. Use them to return to the village to buy supplies (like that heart piece or a shield potion if available) before moving on.
Prepare for Next Chapter: With the first dungeon complete, stock up on anything you used (fairies, arrows if you’ve unlocked the bow in Swordfighter form, etc.). Chapter 2 will introduce new regions and challenges, but the skills you learned here – echo usage, stealth, and clever combat – will carry forward.
Congratulations! You have successfully completed Chapter 1: Suthorn Forest & The Mysterious Rifts. Princess Zelda is one step closer to rescuing Link and unraveling the mystery behind the rifts in Hyrule. Save your game and get ready to venture into the next area of Echoes of Wisdom!