


Welcome to the comprehensive bestiary for The Legend of Zelda: Tears of the Kingdom! Following the cataclysmic Upheaval, Hyrule is beset by dangers old and new. Familiar foes return, often empowered by the mysterious Gloom emanating from the Depths, while entirely new threats emerge from the newly revealed Sky Islands and the chasms below. Link must understand and overcome these adversaries using his enhanced abilities and the power of Fuse and Ultrahand.
Mastering combat in this era of Hyrule relies heavily on clever use of the Fuse ability to enhance weapons and shields, strategic deployment of Zonai Devices, understanding elemental interactions, and leveraging the unique powers of Link’s Sages. Learn about each enemy’s behavior, attack patterns, common locations, effective strategies, and valuable drops.
(Note: This guide focuses on common, respawning enemies, constructs, and overworld mini-bosses. Unique main story Dungeon Bosses like Colgera, Marbled Gohma, Mucktorok, Queen Gibdo, Seized Construct, and the final encounters with Ganondorf are covered in dedicated Boss guides).
Common Enemies (Surface, Sky, and Depths)
These are the foes Link encounters frequently throughout Hyrule’s varied landscapes, from the fields and forests of the Surface to the floating islands above and the dark chasms below. Many return from the Calamity era, but often with new tricks.

Bokoblin
Description: Small, pig-like humanoids, often found in groups. They use basic melee weapons (often Fused) and bows. Notoriously common across Hyrule.
Attacks: Basic club/sword swings, charges, throwing rocks or explosive barrels, basic archery. Can be commanded by Boss Bokoblins.
Behavior: Found in camps, often patrolling or gathered around fires. Will sometimes ride horses or Bears. Flee if their leader is defeated.
Drops: Bokoblin Horns (varying tiers), Bokoblin Fangs, Bokoblin Guts (rarer). Sometimes drop basic weapons.
Strategy: Easily dispatched individually. Use bombs or multi-shot arrows for groups. Prioritize defeating Boss Bokoblins. Headshots are effective.
Variations: Red, Blue, Black, Silver (increasing strength/HP/horn quality), Stal-Bokoblin (undead), Gloom-infested versions (in the Depths).

Boss Bokoblin
Description: Larger, stronger Bokoblins wearing elaborate monster masks. They lead groups of regular Bokoblins, blowing horns to coordinate attacks.
Attacks: Powerful swings with large weapons, ground pounds causing shockwaves, throws Bokoblins, blows horn to command troops (causing coordinated attacks or charges).
Behavior: Leads Bokoblin squads, often found in larger monster encampments or forts. Usually sits on a makeshift throne until alerted.
Drops: Boss Bokoblin Horn (varying tiers), Boss Bokoblin Fang, Boss Bokoblin Guts (rarer). Often drops stronger fused weapons.
Strategy: Target the Boss first to disrupt the group. Its large size makes it relatively easy to hit, but its attacks have wide reach. Use strong weapons or Fuse materials. Stunning it can provide openings.
Variations: Red, Blue, Black, Silver.

Moblin
Description: Taller, lankier humanoids than Bokoblins, with longer reach and more powerful attacks. Can wield large weapons or throw other enemies.
Attacks: Wide swings with large clubs/spears/axes, charge attacks, uprooting and throwing smaller enemies (like Bokoblins) or environmental objects.
Behavior: Often found alongside Bokoblins in camps or patrolling roads. Their height allows them to wade through shallow water.
Drops: Moblin Horn (varying tiers), Moblin Fang, Moblin Guts (rarer). Often carry heavy weapons.
Strategy: Their long reach can be tricky. Use Perfect Dodge/Parry for openings (Flurry Rush), or attack from range. Headshots can stun them. Vulnerable during their charge wind-up.
Variations: Red, Blue, Black, Silver, Stal-Moblin (undead), Gloom-infested.

Lizalfos
Description: Lizard-like enemies known for their speed and agility. They often use camouflage and spit projectiles or perform quick melee strikes.
Attacks: Quick swipes with arms/horns/weapons, jumping attacks, tongue lashes, spitting projectiles (water, fire, ice, electricity depending on type), camouflage ability.
Behavior: Highly agile, often found near water, in deserts, or volcanic/icy regions depending on type. Can climb walls and swim quickly. Often hunt in pairs or small groups.
Drops: Lizalfos Horn (varying tiers/elements), Lizalfos Talon, Lizalfos Tail (valuable, especially elemental variants). May drop Lizal Boomerangs or Spears.
Strategy: Their speed makes them hard to hit. Use arrows (especially headshots or elemental counters) to stun them. Ice attacks slow them down. Electric attacks can make them drop weapons. Fire/Ice variants have obvious elemental weaknesses.
Variations: Green, Blue, Black, Silver, Fire-Breath, Ice-Breath, Electric, Stal-Lizalfos (undead), Gloom-infested.

Horriblin (New)
Description: Cave-dwelling, ape-like monsters that primarily cling to ceilings, attacking with long arms or by throwing rocks.
Attacks: Long-reaching swipes from ceilings, throws rocks or Bomb Flowers, basic club attacks when on the ground.
Behavior: Primarily cave dwellers, preferring to hang upside down. Often found in groups. Will drop if hit with arrows, stunned (Dazzlefruit), or if the surface they cling to is destroyed.
Drops: Horriblin Horn (varying tiers), Horriblin Claw, Horriblin Guts (rarer).
Strategy: Knock them off the ceiling first using arrows (aim for hands/feet) or Dazzlefruits. Once grounded, they are much less mobile and easier to defeat, though they can still hit hard.
Variations: Regular (Reddish), Blue, Black, Silver.

Chuchu
Description: Gelatinous blobs that hop towards Link. Easy to defeat but can be annoying in groups. Drop Chuchu Jelly.
Attacks: Hops towards Link and bumps into him for minor damage. Elemental variants explode upon death or when struck by external elemental forces.
Behavior: Often appear from the ground, sometimes in large groups. Attracted to Link’s presence.
Drops: Chuchu Jelly (changes to Red/White/Yellow Jelly if exposed to Fire/Ice/Electricity respectively).
Strategy: Very easy to defeat. Use ranged attacks for elemental ones to trigger area damage safely. A useful source of elemental jelly for upgrades or combat use.
Variations: Regular (Blue/Clear), Fire (Red), Ice (White), Electric (Yellow).

Keese
Description: Bat-like creatures that often attack in swarms, especially at night or in caves.
Attacks: Fly towards Link and perform a small dive attack. Often appear in swarms. Elemental variants inflict corresponding elemental status. Gloom Keese inflict Gloom damage.
Behavior: Emerge from caves, forests at night, or disturbed ruins. Can be summoned by Aerocudas sometimes.
Drops: Keese Wing, Keese Eyeball (excellent arrow-fusing material for homing shots). Elemental variants drop corresponding elemental wings/eyes.
Strategy: Swarms can be annoying. Use bows with multi-shot capabilities or wide-swinging melee weapons. Bombs are effective against clustered groups.
Variations: Regular, Fire, Ice, Electric, Gloom Keese.
Octorok
Description: Octopus-like enemies that hide (in water, snow, rocks, ground) and spit projectiles.
Attacks: Spits rocks (or specialized projectiles for elemental variants) with high accuracy from hiding. Retreats underground/underwater when approached. Treasure Octoroks mimic chests and suck Link in.
Behavior: Camouflages itself based on terrain. Can inhale rusty weapons and spit them out clean (but damages Link if he’s too close).
Drops: Octorok Tentacle, Octorok Eyeball (good homing fuse material), Octo Balloon. Sometimes drop rusty weapons (or the cleaned version!). Treasure Octoroks drop rupees or gems.
Strategy: Shield parrying their rocks back at them is the most effective way to defeat them instantly. Otherwise, use arrows when they pop up, or sneak up and attack before they hide. Bombs can also work.
Variations: Water, Forest, Rock, Snow, Treasure.

Wizzrobe
Description: Magic-wielding enemies that teleport around, casting powerful elemental spells and altering the local weather.
Attacks: Casts powerful elemental spells (fireballs, ice blasts, electric orbs), summons elemental Keese/Chuchus, changes local weather temporarily, teleports frequently. Higher-level Wizzrobes cast wider area spells.
Behavior: Float above the ground, dance mockingly, and teleport erratically, making them hard to pin down. Often found guarding specific locations or ruins.
Drops: Corresponding elemental Magic Rod (Fire Rod, Ice Rod, Lightning Rod) – sometimes upgraded versions.
Strategy: Exploit their elemental weakness: Fire melts Ice, Ice freezes Fire. A single arrow hit with the opposing element instantly defeats them. Otherwise, use multi-shot bows or try to hit them mid-teleport or during spell casting.
Variations: Fire, Ice, Electric.

Aerocuda (New)
Description: Large, pterodactyl-like flying creatures often seen carrying Bokoblins or resources in the Sky Islands and sometimes on the Surface.
Attacks: Dive-bombs Link, can carry and drop Bokoblins or explosive barrels. Can summon Keese swarms.
Behavior: Patrols the skies, often carrying items in their claws. Sometimes circles high above enemy camps acting as lookouts.
Drops: Aerocuda Wing, Aerocuda Eyeball (excellent long-range homing fuse material). Often drop the monster part or resource they were carrying.
Strategy: Primarily an aerial target. Use arrows – Keese Eyeballs fused to arrows are particularly effective. They have relatively low HP.
Like Like
Description: Stationary, slug-like tubular monsters that try to suck Link in to steal equipment (shields/bows). Have an elemental sac weak point revealed after attacking.
Attacks: Lunges forward, attempting to swallow Link (steals shield/bow). Spits projectiles (rocks, fireballs, ice, electric orbs depending on type).
Behavior: Disguises itself against walls or ceilings, ambushing prey. Exposes its vulnerable tongue core after being attacked sufficiently or after attempting to swallow Link.
Drops: Like Like Stone, elemental variants drop corresponding elemental stones (e.g., Fire Like Stone), Treasure Chest (often containing weapons, shields, or arrows).
Strategy: Bait its lunge, dodge, and attack its body. When the core is exposed, hit it hard. Arrows (especially Bomb Arrows) into the core are very effective. Recover any dropped gear quickly!
Variations: Standard (Rock), Fire, Ice, Electric, Shock (rare).

Gibdo (New Design)
Description: Moth-like, dessicated undead creatures found primarily in the Gerudo region. Highly resistant to physical attacks unless first struck by elemental damage.
Attacks: Slow shambling movement, swipes with claws, Moth Gibdo spits Gloom projectiles.
Behavior: Found in Gerudo Desert and Depths beneath it. Emerge from large hive-like structures (“Mushrooms”). Immune to most physical damage in their default state.
Drops: Gibdo Bone (high fuse attack power but brittle), Gibdo Guts, Gibdo Wing (Moth).
Strategy: MUST be struck with elemental damage (Fire/Lightning preferred, Ice works) or Riju’s ability first. This turns them white and brittle, making them vulnerable to all attacks for a short time. Destroy the “hives” to stop them from spawning.
Variations: Standard (ground), Moth Gibdo (flying).

Evermean (New)
Description: Trees that come alive and attack Link when he gets close.
Attacks: Shakes violently then lunges/swipes at Link.
Behavior: Disguised perfectly as regular trees until Link approaches or strikes them.
Drops: Wooden logs, sometimes Korok Fronds or other wood-related items.
Strategy: Very vulnerable to axes (deals massive damage) or fire. Easy to defeat once identified.

Pebblit
Description: Tiny versions of Taluses. Easy to defeat with bombs or heavy weapons. Sometimes disguise themselves as rocks.
Attacks: Slowly walks towards Link and bumps into him.
Behavior: Tiny versions of Taluses, sometimes disguised as small rocks. Often found near larger Taluses or ore deposits.
Drops: Flint, Amber, Opal (depending on type/location).
Strategy: A single hit from a heavy weapon (cobble crusher, etc.) or a bomb destroys them. Can be picked up and thrown.

Yiga Clan Members
Description: Sheikah warriors loyal to Master Kohga and Ganondorf. Often appear disguised as travelers. Attack with specific Yiga weapons.
Attacks: Footsoldiers use quick slashes with Eightfold Blades or shoot arrows with Duplex Bows. Blademasters charge up powerful Windcleaver energy slices or cause stone pillars to erupt from the ground. Both use teleportation dashes.
Behavior: Ambush Link disguised as travelers, researchers, or merchants. Also found in Yiga bases throughout Hyrule (Surface and Depths). Blademasters often guard key locations or appear after defeating Footsoldiers.
Drops: Rupees, Sundelions (sometimes), Bananas (often Mighty Bananas), occasional Yiga weapons or schematics (in bases). Specific encounters might drop Yiga fabric or armor pieces.
Strategy: Be wary of NPCs acting suspiciously. Listen for their distinct musical cue/poof. Parry/dodge their attacks for Flurry Rush opportunities. Multi-shot arrows are effective, especially against Blademasters during their casting animations.
Variations: Yiga Footsoldier, Yiga Blademaster.
Constructs (Zonai Technology)
These autonomous guardians were created by the ancient Zonai civilization. Primarily found on the Sky Islands and within Shrines, they represent remnants of lost technology and serve as protectors or combatants.

Soldier Construct
Description: Basic combat units. Wield various Zonai melee weapons or bows, often fused with basic materials.
Attacks: Swings with fused Zonai weapons (swords, spears, halberds), shoots arrows (sometimes fused with materials like fire fruit). Higher tiers are more aggressive and use spin attacks.
Behavior: Patrol specific areas on Sky Islands, in Shrines, or guarding Zonai ruins/devices. Activate when Link approaches.
Drops: Zonai Charge, Soldier Construct Horn (I-IV), various basic Zonai Fused weapons.
Strategy: Treat similarly to Bokoblins but often with slightly more sophisticated weapons. Parry/dodge is effective. Elemental weaknesses can be exploited depending on their fused weapon/environment.
Variations: I, II, III, IV (increasing strength and durability).

Captain Construct
Description: Stronger command units, often leading Soldier Constructs. Wield more powerful fused Zonai weapons.
Attacks: Uses stronger fused weapons, performs more complex combos (e.g., multi-hit spins, jump attacks), sometimes uses Zonai emitters (flame, frost).
Behavior: Lead Soldier Constructs, guard more important locations or chests. More resilient than Soldiers.
Drops: Large Zonai Charge, Captain Construct Horn (I-IV), stronger Zonai Fused weapons.
Strategy: Higher HP and damage output require more caution. Focus on dodging combos and attacking during openings. Destroying their weapon arm can disarm them temporarily.
Variations: I, II, III, IV.

Ranger Construct
Description: Small, hovering constructs usually equipped with cannons or other ranged devices.
Attacks: Fires projectiles from equipped Zonai devices (cannons, lasers, shock emitters).
Behavior: Small, mobile, often hovering. Provides ranged support for other Constructs or guards pathways.
Drops: Zonai Charge, Ranger Construct Horn (rarer), sometimes the Zonai device they were using.
Strategy: Relatively fragile. Shoot them down with arrows quickly before they can cause too much trouble, especially if equipped with cannons.

Flux Construct (Mini-Boss)
Description: Large bosses made of interconnected Zonai blocks with a distinct core block. Can change shape to attack (platform, cube, flying form).
Attacks: Ground slam (cube form), projectile shots (flying form), body slam (platform form), can launch individual blocks as projectiles.
Behavior: Patrols specific arenas in the Sky Islands (and one in the Depths). Composed of Zonai blocks held together by energy, with one distinct glowing core block.
Drops: Zonai Charge (Large x 5+), Flux Construct Core (I-III), several Zonai Capsules.
Strategy: Use Ultrahand to grab and pull out blocks (especially the core block). This destabilizes the construct and eventually causes it to collapse, exposing the core for direct attacks. Ascend can be used to reach its top in platform/cube form to attack the core directly. Shoot the core block with arrows when it’s exposed.
Variations: I, II, III (increasing size, HP, and complexity).
Mini-Bosses / Overworld Bosses
These are tougher, often gigantic enemies found in specific locations around Hyrule’s Surface, Sky, and Depths. They frequently guard valuable resources, shrines, or key passages, presenting a significant challenge compared to common foes.

Hinox
Description: Giant, sleeping cyclopes. Attack by stomping, throwing objects, or swatting. Weak point is their single eye.
Attacks: Ground pounds, body slams, swipes, picking up and throwing trees/rocks (or Link). Covers eye when targeted. Stalnox throws its own ribs/arms.
Behavior: Usually found sleeping in open fields, forests, or caves. Wears necklaces made of weapons Link can steal. Stalnox variant appears only at night and crumbles with sunrise if not defeated.
Drops: Hinox Toenail, Hinox Tooth, Hinox Guts (rarer). Drops the weapons it wore around its neck. Stalnox drops Hinox Tooth and a unique Stalnox Horn.
Strategy: Aim for the eye with arrows to stun it for significant damage opportunities. Sneak up while it sleeps for initial hits. For Stalnox, destroy its body first, then attack the bouncing eyeball separately before it can regenerate.
Variations: Red, Blue, Black, Stalnox.

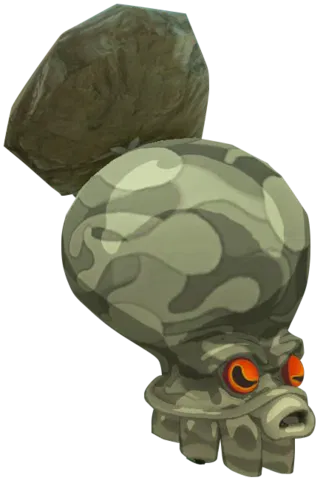
Talus
Description: Large golems made of rock or ore deposits. Have a weak point (usually an ore deposit on their back or shoulder) that must be climbed onto or hit with arrows/bombs.
Attacks: Slams fists into the ground (can launch Link), throws its arms as powerful projectiles, body slam. Igneo Talus burns Link on contact; Frost Talus freezes him. Battle Talus carries a Bokoblin fort.
Behavior: Disguised as large rock formations or ore deposits until approached. Battle Talus carries a Bokoblin platform. Patrols a small area once active.
Drops: Flint, Amber, Opal, Topaz, Ruby, Sapphire, Diamond (depending on Talus type and its weak point ore), Stone Talus Heart (powerful Fuse material for blunt weapons). Battle Talus drops monster parts from Bokoblins and a chest.
Strategy: Identify the weak point (glowing ore deposit). Climb onto its back (use Ascend if possible, or stun it by hitting the weak point) and strike the deposit with a mining weapon (hammer, Cobble Crusher fusion). For Igneo/Frost, use Ice/Fire attacks respectively to make them climbable. Shoot the weak point with arrows (especially Bomb Arrows) if climbing is difficult. Battle Talus requires clearing the platform first or targeting the Talus directly.
Variations: Stone Talus, Luminous Stone Talus, Igneo Talus, Frost Talus, Battle Talus.

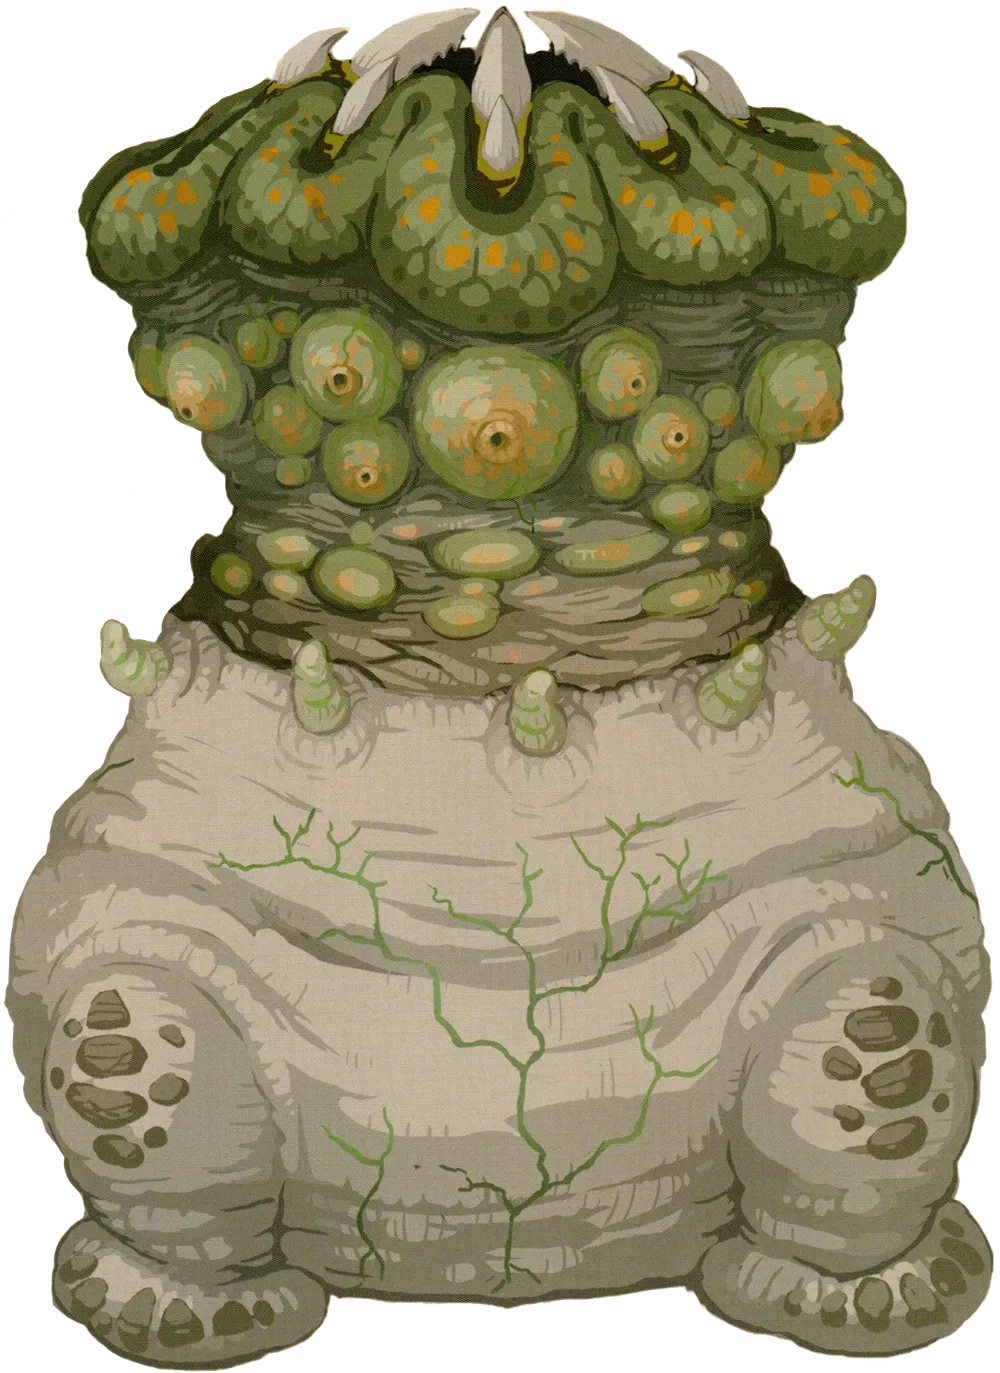
Frox (New)
Description: Giant, frog-like monsters found in the Depths. Try to inhale Link. Weaknesses include hitting their eye or feeding them Bomb Flowers, then attacking the ore deposits on their back when stunned.
Attacks: Large jump causing shockwaves, attempts to inhale Link (deals heavy damage), charges.
Behavior: Found exclusively in the Depths. Very large, camouflages slightly with the dark environment. Hops around its territory.
Drops: Frox Fang, Frox Fingernail, Frox Guts (rarer), Zonaite, Large Zonaite. Drops numerous ore deposits from its back upon defeat.
Strategy: Shoot its single eye with an arrow to stun it temporarily. While stunned, or if it prepares its inhale attack, throw/shoot a Bomb Flower into its mouth. This will cause it to collapse, exposing the ore deposits on its back for attack (use heavy, blunt weapons). Repeat until defeated.
Variations: Frox (standard), Obsidian Frox, Blue-White Frox (increasing HP and aggression).

Gleeok (New Design)
Description: Massive, three-headed dragons found in specific locations on the Surface and Sky Islands. Each head wields powerful elemental attacks (fire, ice, or lightning).
Attacks: Each head breathes powerful elemental beams, summons elemental storms/projectiles, intense wing gusts. When low on health, flies extremely high and launches a massive elemental bombardment. King Gleeok uses all three elements.
Behavior: Guards major landmarks like bridges or large arenas on the Surface and Sky Islands. Highly aggressive and territorial.
Drops: Gleeok Wing, Gleeok Flame/Frost/Thunder Horn (element depends on type, very high Fuse power), Gleeok Guts (very rare). King Gleeok drops all three horn types.
Strategy: Extremely challenging. Use arrows (ideally multi-shot bow with Keese Eyeballs fused) to hit all three eyes in quick succession. This stuns the Gleeok, causing it to fall and allowing direct attacks on the heads. Use elemental resistance armor/elixirs. When it flies high for its ultimate attack, ride updrafts created by its storm to get high enough to shoot the eyes again, cancelling the attack. King Gleeok requires managing all three elements.
Variations: Flame, Frost, Thunder, King Gleeok.

Lynel
Description: Powerful, centaur-like warriors known for their incredible speed, strength, and ferocity. Master users of Sword/Shield, Crushers, and Spears, as well as powerful bows that fire multiple arrows.
Attacks: Extremely varied and dangerous: charging slashes, multi-hit combos, leaping slams, large AoE roar/explosion, devastating archery (including raining arrows from above), fire breath. Adapts behavior based on Link’s actions.
Behavior: Patrol specific territories (often open fields, plateaus, or in the Depths). Highly aggressive and will relentlessly pursue Link once engaged. Armored variants exist in the Depths, requiring shattering their armor first.
Drops: Lynel Mace Horn / Saber Horn (scales with tier), Lynel Hoof, Lynel Guts (rare, highly valuable), powerful Lynel Bows (3-shot or 5-shot), Lynel Shields, and Lynel melee weapons. Armored variants in the Depths also drop Zonaite.
Strategy: Demands mastery of combat mechanics. Perfect Dodge (Flurry Rush) and Perfect Parry are crucial. Headshots with arrows can temporarily stun them, creating openings (especially useful to mount them for free hits on their back). Use powerful fused weapons and attack-boosting meals/armor. Learn their attack patterns for each weapon type. For armored ones, use heavy, blunt (hammer-type) attacks to break the armor first.
Variations: Red-Maned, Blue-Maned, White-Maned, Silver (increasing HP, damage, weapon/bow quality). Armored Gloom-infested versions appear in the Depths.

Gloom Spawn / Gloom Hands (New)
Description: Terrifying clusters of grasping hands made of Gloom that emerge from pools on the Surface and in the Depths. They attempt to grab and drain Link’s hearts (permanently reducing max hearts until healed).
Attacks: Grasps Link, rapidly draining hearts and inflicting Gloom (reducing max hearts temporarily). Moves surprisingly fast despite appearance.
Behavior: Emerge from Gloom puddles, often unexpectedly. Five individual hands move semi-independently to surround and grab Link. Disappears if Link reaches high ground they cannot climb.
Drops: Dark Clump (if Phantom Ganon doesn’t spawn).
Strategy: Do NOT let them grab you. Use area-of-effect attacks: Bomb Flowers, Dazzlefruits, elemental AoE attacks (sapphire/ruby/topaz rod, fused weapons). A multi-shot bow firing Bomb Flowers is highly effective. Defeat all hands quickly before they can respawn individually. Prepare for Phantom Ganon immediately after.

Phantom Ganon (New Version)
Description: Often appears immediately after defeating Gloom Spawn. A spectral version of Ganon wielding Gloom-infused weapons (Sword, Club, or Spear). Fast and powerful, capable of spreading Gloom.
Attacks: Fast swipes and combos with Gloom Sword/Club/Spear, charged attacks, can teleport short distances, spreads Gloom puddles on the ground with some attacks.
Behavior: Aggressive melee combatant. Sometimes appears independently or guards specific locations (like beneath Deku Tree, Hyrule Castle). Can appear in groups late-game.
Drops: Gloom Sword / Gloom Club / Gloom Spear (high attack, drains user’s health), Dark Clump, Demon King’s Bow (rarely, powerful bow scaling with max hearts).
Strategy: Treat like a challenging Lynel or Blademaster fight. Focus on Perfect Dodges for Flurry Rushes and Perfect Parries to create openings. Avoid the Gloom puddles. Health drain from Gloom weapons makes sustained melee risky without healing.
Variations: Sword, Club, Spear versions.
Special Enemy Categories

Stal Enemies (Undead)
Includes: Stal-Bokoblin, Stal-Moblin, Stal-Lizalfos, Stalnox.
Behavior: Appear primarily at night or in the Depths. Their bodies collapse when their HP reaches zero, but they regenerate unless their detached skull is destroyed. Stalnox follows similar rules but its eye must be destroyed. They crumble instantly in sunlight.
Strategy: Defeat the body as normal, then quickly locate and destroy the bouncing skull before it regenerates. Throwing the skull or Fusing it can prevent regeneration temporarily.

Gloom-Infested Enemies
Includes: Gloom Bokoblin, Gloom Moblin, Gloom Lizalfos, Gloom Keese, Gloom Spawn/Phantom Ganon, Gloom Lynels.
Behavior: Found exclusively in the Depths (except for Gloom Spawn/Phantom Ganon which can appear on the Surface). Inflict Gloom damage on contact, reducing Link’s maximum hearts until he returns to the Surface, stands under a Lightroot, or eats specific food (Sundelion recipes). Often slightly tougher than their standard counterparts. Gloom Keese attack in large swarms.
Strategy: Avoid direct hits. Use ranged attacks or precise dodging/parrying. Keep Sunny meals/elixirs handy to restore Gloom-damaged hearts. Lightroots in the Depths provide safe zones.
Enemy Interactions and Environment
Fusion: Many enemies, especially Bokoblins and Moblins, now utilize Fuse! They’ll attach rocks, bones, or other materials to their basic weapons, increasing damage and durability.
Environmental Combat: Enemies interact more with the environment. They can pick up and throw objects, use explosive barrels, and elemental enemies affect their surroundings. Link can use the environment against them too (rolling boulders, using Zonai devices, triggering elemental chain reactions).
Camps and Forts: Monster camps are more dynamic, often featuring watchtowers, fortifications made with Zonai devices, and designated leaders (Boss Bokoblins). Clearing camps often yields valuable rewards stored in ornate monster chests.
Group Behavior: Enemies exhibit improved group tactics. Bokoblins follow Boss Bokoblin commands, Lizalfos may flank Link, and Constructs work together. Alerting one enemy often alerts the entire nearby group.
Stealth: The element of surprise is highly effective. Sneaking up on camps allows for powerful Sneakstrikes. Use stealth-enhancing gear or elixirs, especially at night.
Enemy Scaling and World Progression
Scaling Difficulty
Like its predecessor, Tears of the Kingdom features a hidden scaling system. As Link defeats more enemies and progresses, stronger versions (Red → Blue → Black → Silver) of common foes and mini-bosses like Lynels will appear more frequently, offering greater challenge and better rewards.

Farming Tips for Valuable Materials
Specific enemy parts are crucial for upgrading armor. Here are quick tips:

Lizalfos Tails (Elemental)
Hunt specific elemental Lizalfos in Gerudo (Electric), Eldin (Fire), Hebra (Ice). Higher tiers improve rare tail drop rates.

Hinox Guts
Defeat Hinox (Blue/Black preferred) found consistently across Hyrule. Mark locations on your map and revisit after Blood Moons.

Gleeok Parts
Endgame challenge. Prepare thoroughly with strong gear and resistances. Revisit fixed Gleeok arenas after Blood Moons.

Lynel Parts
Master combat (parry/dodge/headshot). Find them in specific territories (Akkala, Faron, Depths). Silver Lynels yield best rewards.

Zonaite & Construct Parts
Farm Zonaite/Constructs in the Depths (enemies near mines, Frox, Talus) and Sky Islands/Shrines.

Gibdo Bones & Guts
Farm in Gerudo Desert/Depths. Use Riju or Fire/Lightning to make them vulnerable. Destroy hives.
The Hyrule Compendium
Remember to use Link’s Purah Pad Camera to take pictures of enemies! This adds them to the Hyrule Compendium, providing valuable info on common locations and recoverable materials. You can even set the Sensor+ to track specific enemies for farming.
Lore and Origins (Brief Notes)
Many foes like Bokoblins, Moblins, Lizalfos, Like Likes, and Keese are recurring threats in the Zelda series, often serving Ganon. Gibdos and Gleeoks return from classic titles with significant redesigns. Constructs are entirely new, representing the legacy of the Zonai. The Yiga Clan’s story continues directly from Breath of the Wild.
Advanced Combat Strategies Summary
Success against tough foes often involves:
- Mastering Fuse: Use monster horns for high attack power, elemental parts for effects, and utility items (Bombs, Dazzle, Puff, Muddle) on arrows.
- Exploiting Elements: Fire melts Ice, Ice freezes Fire/Wet, Lightning disarms in water.
- Aiming for Headshots: Critical for stunning many enemies. Use Keese/Aerocuda eyeballs for homing arrows.
- Utilizing Stealth: Sneakstrikes deal massive damage. Puffshrooms create openings.
- Leveraging Zonai Devices: Attach emitters, cannons, rockets, fans etc. to weapons, shields, or vehicles.
- Integrating Sage Abilities: Use Tulin (gust), Yunobo (fire/blast), Sidon (shield), Riju (lightning), and Mineru (mech) tactically.
Conclusion
The enemies of The Legend of Zelda: Tears of the Kingdom offer a diverse and often perilous challenge, reflecting the changed state of Hyrule. Understanding their behaviors, mastering Link’s new abilities, and using the environment strategically are key to survival and restoring peace to the kingdom.
For detailed strategies on the ultimate challenges, be sure to check out our dedicated guides for the main Boss Strategies of Tears of the Kingdom! Stay safe out there, hero!