


Table of Contents
- Prologue: Escape from Hyrule Castle: Step-by-step guide to escaping the castle, introducing basic mechanics.
- Chapter 1: Suthorn Forest & The Mysterious Rifts: Navigating Suthorn Village and completing the Suthorn Ruins dungeon.
- Chapter 2: Gerudo Desert: Guidance on completing quests and dungeons in the Gerudo Desert region.
- Chapter 3: Jabul Waters: Strategies for tackling quests and dungeons in the Jabul Waters region.
- Chapter 4: Return to Hyrule Castle: Progressing the main storyline upon returning to the castle.
- Overview
- Castle Town Under Siege – Returning to Hyrule Castle
- Infiltrating the Rift to Hyrule Castle Courtyard
- Exploring Hyrule Castle Dungeon (1F and Basement)
- Left Path – Underwater Passage & Spectral Guard Challenge
- Right Path – Mini-Boss Showdown and Big Key Treasure
- Boss Fight – Phantom Ganon (Echo of Ganon)
- Chapter Conclusion – Story Cutscenes and Next Steps
- Chapter 5: Eldin Volcano: Strategies for navigating the Eldin Volcano region and its challenges.
- Chapter 6: Faron Wetlands: Guidance on completing quests and dungeons in the Faron Wetlands.
- Chapter 7: Hebra Mountains: Navigating the Hebra Mountains region and overcoming its challenges.
- Chapter 8: The Eternal Forest & Endgame: Preparation and strategies for the final challenges and boss encounters.
Overview
After conquering the first three dungeons, Princess Zelda returns to Hyrule Castle to rescue her father (the King) from the Still World rift and clear her name. This chapter involves sneaking back into the castle town under siege, infiltrating the castle’s dungeon, solving intricate puzzles with the Tri Rod, and facing a major boss battle. Below is a step-by-step walkthrough covering all objectives, puzzles, hidden items, story scenes, and strategies – from the moment you arrive at Hyrule Castle Town to the climactic battle with a phantom Ganon.
Primary Objectives:
Reach Hyrule Castle Town: Travel back to the castle area after completing the prior dungeons (Gerudo, Zora, etc.) and witness the cutscenes of the rift expanding and monsters attacking.
Infiltrate the Castle Dungeon: Find a way inside Hyrule Castle via a hidden route. Avoid or defeat the Blighted Guards patrolling the halls and navigate through the castle’s secret passages.
Solve Castle Puzzles: Use Princess Zelda’s new echo abilities (via the Tri Rod and companion Tri) to overcome puzzles – including stealth challenges, an underwater maze, and an echo-powered braziers puzzle – to obtain the keys needed for the boss.
Defeat the Boss (Phantom Ganon): Face a surprise mid-game boss – an echo of Ganon – in a multi-phase battle. Use effective combat tactics and Echo abilities to prevail.
Collect Hidden Items: Pick up valuable collectibles along the way, such as rupee chests, a Dungeon Map, a Frog Ring (accessory), a Golden Egg, a Heart Container, Might Crystals, and more.
Advance the Story: Save the King of Hyrule and expose the impostors, clearing Zelda’s name. A cutscene will set up the next quests (new rifts opening in Eldin, Hebra, and Faron regions) once this chapter is complete.
Below, each section will guide you through these steps with detailed instructions, puzzle solutions, and combat tips for both newcomers and veteran players.
Castle Town Under Siege – Returning to Hyrule Castle
Regroup with Allies (Optional): If any NPC allies or characters were rescued in earlier chapters, they may appear in Castle Town to help. For example, you might visit Lueburry’s House or a safe spot in town where allies gather to plan the infiltration. This isn’t a full quest on its own, but talking to them can provide hints or trigger the next scene. Ensure you have full health and stock up on any potions (or Smoothies, the game’s primary healing items) before proceeding.
Objective – Investigate the Rift: Head toward the castle gates. As you move through town, you’ll encounter minor enemies (Bokoblins or Chuchus) introduced by the chaos. These foes are straightforward – dispatch them with Zelda’s sword attacks or small echoes if needed. Focus on reaching the north side of town near the castle entrance. A waypoint will likely mark the general direction of the objective. Keep an eye out for any townsfolk in need of help or quick side quests (some may reward you with rupees or healing items for saving them from monsters).
Monsters Invade: When you approach the castle’s main gates, a cutscene or scripted event will play: the rift suddenly expands, and more monsters swarm into Castle Town. Zelda realizes a direct approach to the castle is impossible—the front gates are either sealed by dark magic or destroyed in the chaos. Tri (your fairy companion) will prompt you to find another way inside.
Finding the Hidden Entry: Instead of the main gate, you’ll need to use an alternate route into Hyrule Castle:
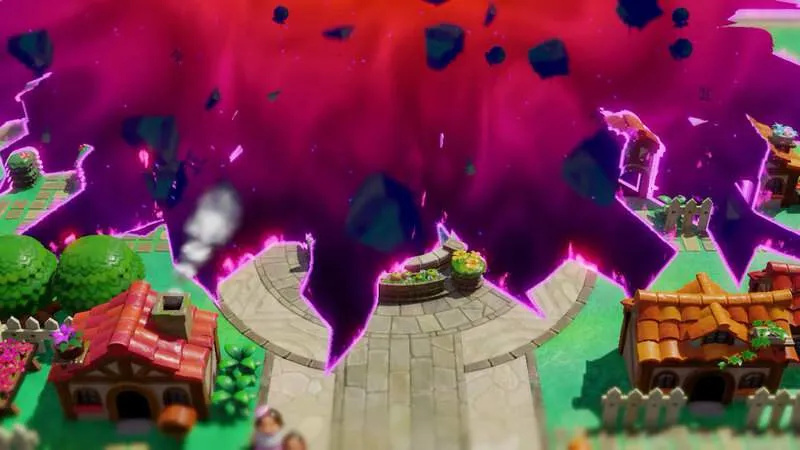
 The Old Well Entrance: Head to the northwest corner of Castle Town (upper-left on your mini-map) where you’ll find an old stone well on a fragment of land at the edge of the rift (see image above). This well was previously inaccessible, but now the ground around it has crumbled, revealing it as a viable entry. Walk up to the well and jump down into it. Zelda will drop into the darkness, initiating the next phase of the chapter.
- Tip: Before jumping in, break any nearby pots or crates and look for a hidden chest among the ruins of the town. In this corner, there’s often a buried treasure chest that can be pulled out using the Tri Rod’s Bind ability. Stand over any patch of ground that sparkles or looks suspicious and press the Bind command (ZR) to yank the chest up. It typically contains Rupees (free money for stocking up later). Grab it now, since you won’t return here until the town is safe.
Infiltrating the Rift to Hyrule Castle Courtyard
Once you drop into the well, Zelda enters a distorted space between Hyrule and the Still World – essentially inside the rift leading to the castle. This area acts as a transitional mini-dungeon linking Castle Town to Hyrule Castle’s interior.
Rift Passage: The path forward is linear but treacherous. You’ll find yourself on chunks of Castle Town’s ruins floating in a purple void. Jump across small gaps between floating platforms carefully – falling will respawn you at the last solid ground. The atmosphere here is eerie, with pieces of buildings and streets suspended in mid-air.
Enemies – Darknuts in the Rift: As you navigate through the ruined town chunks, Darknuts (heavy armored knights) will block your path. Darknuts are tough melee enemies known for their large swords and high defense. Fighting them head-on can be challenging this early, but you have a clever tool: Bind.
- Combat Strategy: Use Tri’s Bind ability to grab or stun a Darknut, then drag it off the edge of a platform. Aim the Bind tether (a green magical rope) at a Darknut and pull – this can yank the enemy forward. With some positioning, you can literally pull a Darknut into the void, instantly defeating it. This tactic avoids a lengthy swordfight. If you prefer combat, wait for the Darknut to attack, dodge to its side, and strike its back (their armor is weakest in the rear). A few charged hits or well-placed arrows will do the trick, but using the environment to your advantage is much easier.
Navigating to the Courtyard: Keep moving east and then north through the rift. You’ll hop between broken sections of Castle Town walls and streets. Look for a path that leads upward: fragments of a staircase or ladder might be sticking out of the ruins. Climb if needed to progress. Eventually, you’ll reach the outer Castle Courtyard area – recognizable by bits of garden or courtyard flooring. There is a shimmering purple barrier at the edges, indicating you’re still partly in the rift dimension.
- Waypoint & Checkpoint: Just before fully entering the castle, you should encounter a Waypoint (a glowing symbol or pedestal that serves as a checkpoint/save point). Use it! Saving here will allow you to restart at the courtyard if you fall or get defeated inside the castle. It’s also a good time to check your gear (equip any stronger weapons you’ve found, ensure you have healing items on a shortcut button, etc.).
- Hidden Treasure in Courtyard: Near the waypoint, there’s a partially buried treasure chest in the ground. Use Bind to pull the chest out of the dirt. Inside, you’ll find a handful of Rupees (every bit helps) or a minor collectible. Collect it before moving on.
Entering Hyrule Castle: The entrance to the castle dungeon is unusual – you won’t simply walk through the front door. From the courtyard ruins, Zelda must swim through a flooded moat and climb into the castle’s lower level. Move to the area with water (likely part of the castle moat or a cistern exposed by the rift). Jump in and swim forward.
- Using Water Echoes: If the ledge to the castle entrance is too high to reach by jumping from the water, use Water Block echoes to help. Equip an echo of Water (Tri likely learned to create solid water blocks in a previous water dungeon). Press Y to place a water block in the moat, which will float and act as a platform. Stack or climb on the water block to boost Zelda up and grab the ledge. Pull yourself into the opening in the castle wall. Now you’ve officially entered Hyrule Castle Dungeon (the interior).
- Note: At this point, the game may display “Hyrule Castle Dungeon” on-screen, marking the start of the dungeon proper. Expect a shift in music and atmosphere – you’re now in the depths of the castle where Zelda was once held prisoner in Chapter 1.
Exploring Hyrule Castle Dungeon (1F and Basement)
Inside, you’ll initially find yourself in a familiar part of the castle – it could be the ground floor hallway or even the Throne Room. This area is relatively quiet and serves as a brief calm before the storm of puzzles and enemies to come.
Finding the Secret Passage
Throne Room Puzzle: Walk forward and you’ll likely enter the castle’s throne room (or a grand hall with the throne). There’s no obvious path forward here – the doors may be locked or blocked by debris. However, Tri will chime in with a hint about something being “off” with the throne. Approach the King’s throne at the end of the hall and use the Bind ability on it. You can grab the throne and pull it away from the wall! Zelda uses her echo powers to slide the heavy chair aside, revealing a hidden ladder or staircase descending into the castle depths.
- This secret passage is the same one Zelda used to escape during the prologue (Chapter 1), which is why the game is making you do “another round of stealth” here. It leads down to the dungeons beneath the castle.
Descend into the Dungeon: Climb down the newly revealed ladder. You’ll enter Basement Level 1 (B1) of Hyrule Castle. The environment becomes dimly lit, with stone walls, cell doors, and torches – clearly the castle’s dungeon/prison area. This is where Zelda was imprisoned earlier, and now it’s filled with new dangers corrupted by Null’s magic.
Stealth in the Castle Dungeons – Sneaking Past Blighted Guards
Once on B1, stealth gameplay resumes. Blighted versions of Hyrule Castle guards patrol these corridors. These ghostly or possessed guards have a limited field of vision but will capture Zelda on sight, so you must move carefully just like during the initial escape in Chapter 1.
Patrol Patterns: Take a moment to observe each guard’s movement. They usually walk a set path or stand turning at intervals. They carry lanterns or have a cone of vision in front of them (indicated by a light or their gaze direction). Your goal is to slip by without being noticed.
Staying Hidden: Do not engage the guards in combat. These Blighted Guards are essentially invulnerable or endless; if they spot you, you can’t defeat them normally (and in some cases, being seen triggers an alarm or fight sequence you’d rather avoid). So, use the environment and your echoes to hide:
- Use Cover: There are walls, pillars, and large objects in the halls. Potted plants and statues can be perfect cover. If an object isn’t ideally placed, use Bind to move it. For example, you can Bind and slide a potted tree to block a guard’s line of sight before you sneak by. Likewise, if a guard is looking in a direction you need to go, try moving a big crate or barrel (via Bind or by creating an echo of one if you have it) into their vision path – they’ll stare at the object instead of you, effectively creating a blind spot.
- Crouch and Walk Quietly: If the game has a sneak button or if you lightly tilt the stick to walk, do so to minimize noise. Avoid running near guards.
- Old Bed Echo bridges: One clever trick is using Old Bed echoes as makeshift platforms. Zelda can create echoes of an old bed (learned in a prior dungeon) and place them across gaps or even stack them to climb. In one hallway, you might find an upper ledge or a series of pillars that you can only reach by stacking beds or crates. Doing so lets Zelda climb above the guards’ patrol routes. It’s often safer to travel over the guards rather than right past them on the floor.
Stealth Room Strategy
Early in B1, you’ll encounter a large rectangular chamber patrolled by multiple guards. Here’s a strategy to get through it:
Stay High: Immediately climb a ladder or stack objects to get to the rafters/upper ledges of the room. On the right side of this room, there is a ladder leading up to a balcony. Go up.
Distraction and Blockage: While on the high route, use Bind to reposition hanging tapestries or drop an echo crate to block a guard’s path below if needed. The goal is to ensure no guard is looking up at you or towards the ladder you need to descend later.
Bridge to the Switch: On the far right side, you’ll see a glowing switch (floor button) on top of a pillar that’s out of reach from the ground. Use Old Bed echoes to form a bridge from your ledge to that pillar. Essentially, create a chain of beds so you can walk over to the pillar with the switch.
Press the Switch: Step on the switch. This will trigger a mechanism – a treasure chest appears on the floor in the center of the room (the area that looked like a gated cell or inaccessible spot now has a chest). This chest contains a Small Key, which you must obtain. However, it’s right under the noses of the guards!
Retrieve the Small Key Unseen: Don’t jump down immediately. Instead, use more Old Bed echoes (you can create up to a certain number at once based on Tri’s current level) to build a bridge directly above the newly spawned chest. Position the last bed so that it is hovering over the chest. Now, carefully drop down from the bed onto the chest. This way, you essentially “fall” onto the chest from above, loot it instantly, and quickly roll away into a safe zone before the guards can react. If done correctly, you’ll grab the Small Key without ever being spotted.
Escape the Room: With the small key in hand, make your way to the exit (a door on the north side of the chamber). If you’re still undetected, just quietly leave. If a guard catches a glimpse of you at the last second, quickly dash through the door – even if they see you, entering the next area will prevent an alarm. (If you do get caught earlier and teleported into a combat arena, you’ll have to defeat a wave of monsters to be allowed back into the stealth room and try again. Use area echoes or spin attacks to clear those monsters fast, then repeat the stealth process.)
Bottom Line for Stealth: Take it slow and use your echoes creatively. Block their vision, don’t fight them directly, and use vertical space to your advantage. The echoes system allows for creative solutions – for example, you can even summon an Echo of an object behind a guard to distract them momentarily. Patience is key for beginners. More advanced players can experiment with riskier shortcuts (like sprinting behind a guard as soon as they turn), but be ready to handle the consequences if you’re spotted.
The Braziers Puzzle (Lighting the Torches)
Once you’ve navigated the stealth sections, you’ll reach a new area of the dungeon that focuses on puzzle-solving. You should now be on Basement Level 2 (B2) of the castle dungeon, closer to where the boss door is located. The next challenge involves lighting a series of braziers (torches) to open the way forward.
Puzzle Setup: You enter a chamber with several unlit braziers scattered around and a large locked door to the north (this is the door to the boss, which requires the Big Key). The braziers are mounted on pedestals or behind obstacles at different heights. There are four braziers total in this area that need to be lit.
Igniting the Flames: To light these, you’ll use the Ignizol – a magical flame echo. If you haven’t already, you will learn the Ignizol echo in this dungeon (likely from a small glowing flame enemy or by absorbing fire from a torch). Essentially, Ignizol serves as a portable fire source that you can summon with the Tri Rod.
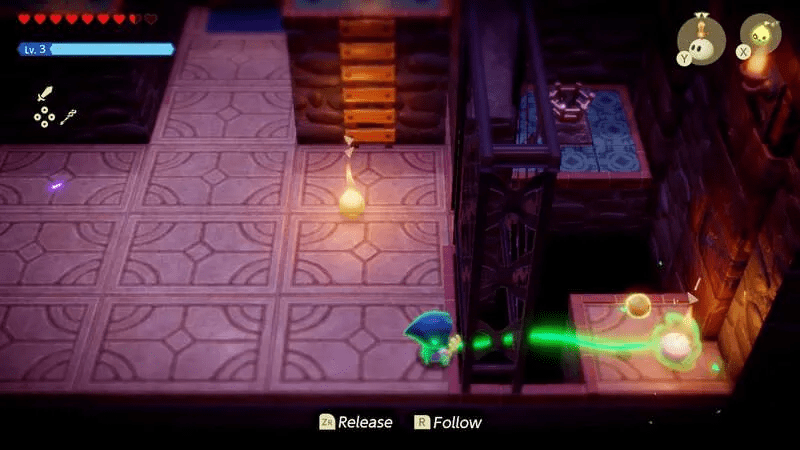
Castle Dungeon Puzzle: Inside the puzzle chamber, you’ll need to leverage Zelda’s echo abilities to light all four braziers. For example, one brazier is behind a metal grate, out of reach – here Zelda uses the Tri Rod’s Bind power to manipulate an Ignizol (a summoned flame orb) through the bars and into the brazier. Solving this requires a combination of careful positioning and clever use of echoes.
Brazier Locations & Tactics:
- Brazier Behind Bars: One brazier is visible behind a fence or set of bars on the right side. Stand as close as you can to the bars and hold Ⓨ to summon an Ignizol on the other side of the bars. The flame appears on the far side, near the brazier. Now use Bind (ZR) to grab that Ignizol echo and drag it into the unlit brazier to ignite it. You’ll see the torch burst into flame. (If you can’t summon through the bars initially, you might need to climb up a ladder to get line-of-sight or use a gap in the bars to shoot an arrow through carrying fire.)
- Braziers Across Gaps: Two braziers might be on ledges separated by gaps or pits. For one on the left side, you can either create a bridge using echoes (like the Old Beds) to cross the gap, or simply hold the summon button longer to cast the Ignizol further away, directly onto the brazier’s platform. Once the flame is near, use Bind to nudge it onto the brazier. For the one on the right on a small isolated platform, do a similar long-range summon or use a nearby ladder to get height, then Bind it into place.
- High Brazier (Ladder Climb): One brazier (#3 in some guides) is up a ladder to the right of the exit door. Simply climb up to it and summon an Ignizol directly at its bowl to light it. This one’s straightforward as long as you notice it up there.
You can light the braziers in any order, but all four need to be lit to solve the puzzle. When each brazier ignites, you’ll often hear a chime. After the final brazier is lit, you’ll hear a louder confirmation (or see the camera focus on the large north door unlocking). Lighting all four braziers unlocks the door to the next area.
Door Opens: Once the braziers are lit, head through the north door that just unlocked. Make sure you haven’t missed any collectibles in the braziers room; double-check corners for pots to smash (hearts or rupees) or any shiny spots on the ground that could indicate a hidden item.
Gaining a New Echo – The Gustmaster
Beyond the brazier puzzle door, the dungeon continues with more combat-oriented challenges. Immediately in the next hallway or chamber, you’ll encounter an enemy that provides a new echo ability.
Gustmaster Enemy: Up ahead, you’ll see a strange enemy that generates powerful gusts of wind – let’s call it a Gustmaster (this could be a creature like a floating wind wraith or a device like a big fan). It periodically blasts air that can push Zelda back or across gaps. To progress, you actually need to use this enemy’s power.
- Defeat and Learn the Echo: Enter Swordfighter Mode (Zelda’s combat stance with her sword and shield) and shoot the gust-blowing enemy with an arrow or hit it with a ranged echo when it’s safe. Once you defeat it, Tri will absorb its power, and you learn the “Gustmaster” echo. Now you can create your own small tornado or updraft on command.
Using the Gustmaster: The Gustmaster echo creates a column of swirling wind. When Zelda places a Gustmaster (via the Tri Rod), it behaves like a fan that can lift objects (and people!) upward. In this room, stand on a solid surface and press Ⓨ to summon a Gustmaster on the ground. Step onto the Gustmaster’s wind – Zelda will be lifted up, hovering as long as she stays above the fan. You can then glide or move laterally to cross large gaps. Essentially, this echo functions similar to using a tornado or an updraft to carry you over obstacles.
- Crossing the Wind Gap: There is a wide gap or broken bridge you couldn’t cross before where the Gustmaster is needed. Place the Gustmaster in a position where its wind reaches a high ledge or across a pit. Stand on the wind and let it buoy Zelda up, then tilt the analog stick to float across the gap. Be careful not to drift too far off-course, or you’ll fall once you move out of the updraft. You might have to place multiple Gustmasters in succession if the gap is extremely large – land on an intermediate platform, summon another gust, and continue.
Optional Dungeon Map: After using the Gustmaster to get across one major gap, look for a side door to the right (east). In a side chamber, you’ll find piles of sand on the floor. This looks suspicious – a buried treasure perhaps? Place a Gustmaster in the center of the sand piles and activate it. The strong wind will blow away the sand, revealing a hidden spot to use Bind. Use Bind to pull up the buried treasure chestand open it to obtain the Dungeon Map. This is a very useful collectible – checking your map will show the layout of the castle dungeon floors, including unopened chests (great for completionists) and key locations. If you miss this, you can still proceed, but having the map makes navigation easier.
Proceed to the Boss Door: Continue northward after acquiring the Gustmaster and map. You’ll likely use another Gustmaster to float over one last gap. Eventually, you’ll arrive at a grand door adorned with a lock – this is the Boss Door, and it requires the Big Key to open. You won’t have the Big Key yet; that’s the final goal of the next sections. A checkpoint statue or waypoint might be near the boss door – activate it to save your progress.
Now, from the Boss Door room, there are two paths available: one to the left and one to the right, each leading to challenges that ultimately allow you to retrieve the Big Key. We’ll tackle the left path first.
Left Path – Underwater Passage & Spectral Guard Challenge
To the left of the Boss Door, enter the doorway that leads into the castle’s left wing. This side of the dungeon features an underwater section followed by another stealthy treasure grab.
Dive into the Underwater Maze:
Immediately, Zelda finds herself in a large flooded chamber. It’s dark, and visibility is low (almost like a mini water maze). Here’s how to get through it:
- Equip a Light Source: If you obtained the Tangler echo (likely from a previous dungeon, possibly the Zora dungeon), now is the time to use it. The Tangler might be a bioluminescent plant or creature echo that glows underwater, lighting your way. Activate it to illuminate the surroundings. If you don’t have Tangler, you can still navigate by carefully following the walls, but it’s much harder to see. There may also be intermittent lightning flashes or glowing fish to give brief light – use those cues to orient yourself.
- Swimming Mechanics: Zelda has an oxygen meter (depicted by bubbles or a meter on screen) that depletes while underwater. You’ll need to find air pockets or bubbles to replenish it as you swim. Look for columns of bubbles rising from the floor – swim through these to refill your oxygen. Plan your route from bubble to bubble.
- Navigate the Maze: The underwater area is essentially a maze with walls and pillars. Using the map (if you got it) will help since it shows the room layout, even if you can’t see visually. Your goal is to reach the upper-left corner of this underwater room, where the exit is. Hug the left wall, then snake upward, or follow any glow signals if present. Be mindful of spikes or enemies in the water (there could be a few Water Tektites or Bloobers lurking). If any underwater enemies attack, either avoid them or use a quick spin attack (if Zelda can swing underwater) to fend them off.
- Optional Treasure (100 Rupees): In the bottom-left corner of the underwater area, there’s a sunken chest tucked in a nook. With Tangler’s light, you might spot its silhouette. Dive down to it (watch your oxygen!) and open it to collect 100 Rupees. A nice reward for explorers. If you’re low on air, grab a bubble right after looting this, then proceed.
- Surface at the Exit: Once you reach the far upper-left side, you’ll find a spot where Zelda can surface and climb out of the water. There should be a ledge or staircase leading into the next room.
Second Stealth Challenge – Spectral Guards:
Now you’re in another large room, and this one is crawling with spectral guards (ghostly knights). It’s similar to the previous stealth section but with a twist: these are apparitions, possibly even tougher to sneak by.
Stealth or Combat? In this room, if a spectral guard catches you, something different happens: you will be teleported into a combat arena in the Still World. In that arena, you must defeat a group of monsters (like Stalfos or Gibdos summoned by the rift) as a penalty. Only after beating them will you be returned to the stealth room to try again. This means mistakes are not instant-fail, but they do cost you health and time. Try to avoid being seen to skip these extra fights.
The Goal – Treasure Chest: Your target is a treasure chest on the far side of the room containing the Small Key (needed for the right path). However, initially this chest is invisible or not present. You need to hit a switch to make it appear, very much like the earlier stealth room.
Room Layout: The room likely has multiple levels with ladders, and several ghost guards moving in set patterns. You’ll enter from the lower part. The chest will spawn on a platform or at ground level somewhere in the middle-right. The switch that spawns it is located on a tall pillar at the far right side of the room.
Plan: Immediately climb the ladder on the right-hand wall to get up to a higher walkway. From there, create a bridge of Old Beds or other platform echoes extending toward the pillar with the switch (similar to what you did earlier). The idea is to reach that pillar without dropping down among the guards.
Press the Button: Once you’ve extended your makeshift bridge, cross over to the pillar and step on the floor switch. You should hear the chest appear with a flourish, likely on a platform in the center of the room below.
Get the Small Key: Now from the pillar, look toward the newly appeared chest. You can use echoes to reach it just like before:
- Place a series of Old Bed echoes forming a path above the chest.
- Walk out over the chest and then drop straight down onto it from above, bypassing the guards entirely.
- Open the chest to obtain the Small Key. This key will unlock the door on the right path of the Boss Door room.
- As soon as you have the key, an alarm might sound or guards might notice the sudden appearance of an intruder (you!). Quickly make your way back to the door you entered from, or continue through a back exit if one opens. Typically, you can return the way you came; since you’re done here, even if a guard spots you now, you can just dash out.
Exit: Go back down into the water (or through a connecting corridor if provided) and return to the Boss Door hall. Now that you have both a Small Key and the knowledge of the path, you’re ready to tackle the right path.
(Beginner Tip: If the stealth here is proving too difficult, remember you can purposely let a guard see you, defeat the arena monsters, and during the fight use that opportunity to eliminate some guards if the game allows it (for instance, sometimes defeating them in the Still World makes their specters vanish in the real world). However, in most cases, stealth is easier than fighting multiple extra battles. Save your health for the boss!)
Right Path – Mini-Boss Showdown and Big Key Treasure
Back in the Boss Door antechamber, use the Small Key you just obtained to unlock the door on the right side of the room. Push the door open and proceed into Hyrule Castle’s right wing. This path is more combat-heavy and will reward you with the Big Key and some useful items.
Sand Traps and Wall-Crawling:
The first area on the right side has a floor of loose sand. As you step in, a group of enemies (possibly Sand Leevers or other burrowing foes) might spawn. Defeat or avoid them – they’re not too dangerous alone, but don’t get swarmed. Head south across the sand and you’ll find a locked gate which your Small Key opens (you just used it, so the door should now be unlocked).
- If there’s a tricky gap or you fall into a lower area, note that you can use echoes like Spintula or Crawltula (spider-like echoes) to climb back up walls. For example, if you slip off a ledge, summon a Spintula on the wall and use it as a ladder to return to the main path. This ensures you don’t have to backtrack too far if you make a misstep.
- Continue through a short corridor or platforming section (possibly with more wind gusts to use Gustmaster on, or some falling rubble to dodge). You’ll then enter a sealed room – a combat arena for a mini-boss fight.
Mini-Boss: Ball-and-Chain Trooper:
Prepare for a duel with a classic Zelda foe – the Ball-and-Chain Trooper (a Darknut-like knight wielding a huge ball-and-chain flail). This heavy armored enemy has strong swings and can take a lot of hits. The room will lock, forcing you to fight.
Trooper Tactics: The Ball-and-Chain Trooper has two main attacks: a swinging chain whirl (he spins the ball around him in a circle) and a direct throw (he hurls the ball forward like a projectile and then reels it back). Both can do significant damage and knock Zelda around. Keep your shield up (if in Swordfighter form) or be ready to dodge when he begins an attack animation.
- When he spins in place, give him a wide berth – don’t try to hit him from the sides as the ball will circle 360°. Instead, back away or use that time to maybe summon an echo to help (for instance, summon a Decoy Echo like a monster or object to draw his attention).
- When he throws the ball, sidestep quickly. After the throw, there’s a delay before he pulls the ball back – this is your chance to strike. Close in fast and land a few sword hits or a powerful echo attack (like dropping a heavy Boulder echo on him or striking with a Bombflower echo if you have one).
- You can also try using Bind on the chain. Sometimes, using Bind when the ball is thrown can tug the Trooper off balance, opening him up for a free hit or two.
Advanced Strategy: If you’ve collected any strong enemy echoes (for example, an echo of a Moblin or a Lynel from earlier in the game), you can summon an echo ally to fight alongside you. This can distract the Trooper, letting you hit him from behind. Just be mindful of the ball swinging, as it will damage your echo summon too.
Defeat and Reward: After a series of hits (and possibly breaking pieces of his armor), the Ball-and-Chain Trooper will fall. Upon defeat, he drops a new Echo for you to learn. This is likely the Ball-and-Chain Echo itself or something thematically related, granting Zelda the ability to summon a heavy flail or a similar weapon as an echo. (Check Tri’s menu for a new echo entry; this could be useful for dealing heavy damage or smashing obstacles.)
- Heal Up: A chest or heart pickups may appear after the fight. Make sure to heal if needed (smash any pots in the room; they often contain hearts). You want to be in good shape for the boss soon.
The Treasure Room – Big Key and Goodies:
With the mini-boss defeated, a door opens leading to a treasure room. This is the cache of Hyrule Castle, and it has multiple chests as your reward:
After the mini-boss, Zelda discovers a trove of treasures, including the all-important Big Key. In the center lies a giant chest which holds the Big Key for the boss door. Flanking it are two smaller chests containing rare items – one holds the Frog Ring, and the other a Golden Egg.
Open the Big Chest: Approach the large ornate chest and open it. You’ll receive the Big Key (sometimes called the Boss Key) for Hyrule Castle Dungeon. This key is necessary to unlock the boss door back in the central chamber.
Frog Ring (Left Chest): Open the chest on the left to obtain the Frog Ring. This is a special accessory that doubles Zelda’s jump height! Once equipped, Zelda can jump much higher than before, which might allow access to previously unreachable ledges or shortcuts. (The game will automatically equip it if you have a free accessory slot, or you can equip it in the menu.) This will be very handy not only in the boss fight (for extra mobility) but also for exploring older areas – keep it in mind for backtracking secrets later.
Golden Egg (Right Chest): The right chest contains a Golden Egg. The Golden Egg is a valuable collectible – it could be a quest item or something you can trade later. (In many games, golden eggs are used in trading sequences or can be sold for a high price.) For now, just note you have it. If there’s an NPC (like a cucco farmer or a merchant) looking for rare items, remember this find.
Optional Rupee Chest: Before leaving the treasure room, do a quick sweep. In the sandy area just before the mini-boss room, there was mention of a cracked wall on the back-right side. If you did not get it earlier: Return briefly to the sand area (or if it’s accessible from this side) and look for a suspicious cracked section of wall. Use a Bombfish echo (an explosive fish creature you might have encountered; if you have its echo, summon it) or any bomb to blow open the crack. Behind it lies an optional chest with 50 Rupees. This is just extra loot if you want it. If you already did this earlier from the other side, then you’re all set.
Once you’ve collected everything, head back to the central Boss Door. You can now unlock it with the Big Key. It’s wise to save at the waypoint near the boss door and ensure you’re prepared before going in. Equip your Frog Ring (for higher jumps), stock healing items to your quick-use slots, and assign any useful combat echoes to your D-pad or shortcuts (for example, a Boulder echo to block attacks, a Monster echo to aid in battle, etc.).
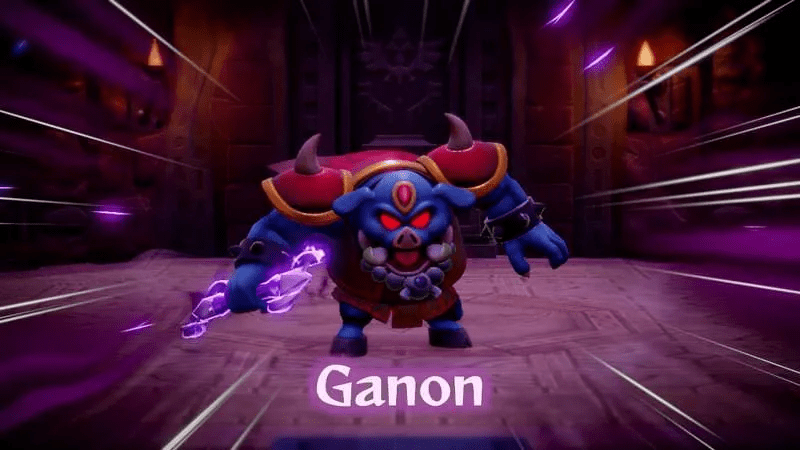
Boss Fight – Phantom Ganon (Echo of Ganon)
Boss Arena: Unlock the door and step inside – a cutscene triggers. Zelda enters a grand, dimly lit chamber deep within the castle. To her surprise (and likely the player’s), Ganon himself appears, roaring and ready to fight! But something’s off – this isn’t the final battle of the game, and Zelda senses that this Ganon is just an illusion or copy. Indeed, this is Echo Ganon, a phantom created by the evil Null. The real Ganon is still sealed away, but this echo is no less dangerous.
The fight is challenging, spanning three phases. This is the toughest boss you’ve faced so far, so get ready.
Phase 1 – Spear Swipes and Fireballs
In Phase 1, Echo Ganon wields a spear (staff) and uses a combination of melee swipes and fire-based attacks reminiscent of the prologue fight (when Link fought Ganon). His attacks include:
Spinning Spear Shield: Ganon twirls his spear in front of him at high speed, creating a makeshift shield and flinging off fireballs in all directions. While he’s spinning, it’s risky to attack from the front – the spinning spear will block most of your hits and the fireballs can hit you. Instead:
- Dodge and Flank: Move to Ganon’s side or back. The guide from Game8 suggests always dodging towards Ganon’s left side (your right when facing him), because he swings with his right arm, leaving a blind spot on his left. Use this advice: whenever he lunges or swings, dodge roll to your right (Ganon’s left) to evade and position for a counterattack.
- Attack Opportunity: When he finishes the spinning move, he has a brief recovery. Rush in and land a few sword strikes or a quick combo with your weapon. If you have the Swordfighter Form available (Zelda can temporarily take on Link’s sword-fighting stance with enhanced damage), use it now to get extra hits in.
- Fireball Defense: If you’re uncomfortable getting in during the spin, play it safe: keep your distance and place a Boulder echo or raise your shield to block the fireballs. Summoning a large Boulder between you and Ganon can absorb the fire hits, letting you avoid damage until the attack ends.
Spear Thrust/Lunge: Ganon occasionally lunges forward with his trident in a straight line. It’s a quick stab that covers a lot of ground. Side-step this lunge (again, dodge to the side, preferably to his left) and then counter with a few hits while he recovers from the miss.
General Strategy Phase 1: Keep moving and don’t get greedy with attacks. Hit Ganon 2-3 times then backflip or dodge away to avoid his retaliation. Use fast Echoes to damage him safely: for example, you can summon an echo soldier (if you have one) to fight for you, or throw a Boomerang echo from afar. If you have any Smoothies (healing potions), keep one hotkeyed; if you take a big hit from a fireball, drink a smoothie to heal up. Continue this dance, and once you whittle his health down (about one third), a cutscene or roar will signal Phase 2.
Phase 2 – Dark Magic and Fierce Fire
Ganon roars and the fight enters Phase 2. He steps up his aggression, introducing new tricks while retaining some old ones:
Teleportation: At the start of Phase 2, Ganon laughs and teleports around the room. He may vanish and reappear behind you or across the arena. Stay alert and keep moving so you’re not caught off-guard by a surprise attack. When he reappears, be ready to dodge.
Massive Fireball (Orange Orb): Ganon brings back the classic giant fireball attack from the prologue. He gathers energy and hurls a huge orange fireball at Zelda. This attack is deadly if it hits, but you have two ways to counter:
- Reflect it: If you time it right, you can reflect the fireball back at Ganon using your sword (much like reflecting a boss’s magic in previous Zelda games). To do this, swap to Swordfighter Form and hit the fireball with your sword just before it hits you (or raise your shield if it has a reflection mechanic). This will stun Ganon briefly if done successfully.
- Dodge and Rush: If you’re not confident in reflecting, simply sprint or dodge to the side as the fireball comes, let it explode behind you, and then quickly rush Ganon while he’s ending that attack. He has a moment of vulnerability after throwing the fireball – use that to land some hits.
Melee Combo: Ganon’s melee might get quicker in this phase. He could chain a couple of swipes. Continue to dodge to the side, or even jump (the Frog Ring’s double jump might let you leap over a low swipe). After his combo, hit back.
Use Your Best Echoes: Now is the time to unleash heavy damage. Summon your strongest available echoes. For example, if you have an echo of a Lynel or a powerful monster, summon it to fight Ganon – it can occupy him or deal extra damage. If you learned the Ball-and-Chain echo from the mini-boss, try using it: summon the Ball-and-Chain and swing it or drop it on Ganon for big damage when he’s stationary. You can also set up a Bomb barrel echo as a trap and lure Ganon into it when he charges.
Phase 2 End: Continue the pattern of avoiding the big fireballs (reflect if possible for massive damage) and striking when you can. After depleting the second third of Ganon’s health, he roars louder and transitions to Phase 3.
Phase 3 – Desperate Assault
Now Ganon is enraged. Phase 3 is the final and most intense phase of the fight. He combines all previous moves with a new charging attack and is much faster:
Beastly Charge: Ganon lowers his head and charges straight at Zelda with alarming speed. This is reminiscent of Beast Ganon charges from older games but quicker. You must be on your toes:
- Dodge at the last second to one side (again, preferably to his left). If you dodge too early, Ganon might adjust or catch you; too late and you’ll be trampled. Time it as he’s almost upon you.
- Once he rushes past, he might slam into a wall, stunning himself briefly – seize that moment to attack hard.
- Alternatively, place an echo in his path (like a solid Boulder or even an echo of an enemy) right before he charges. Ganon might collide with it instead of you. This can stop the charge and leave him open, but it’s tricky to time.
Mix of All Moves: In this phase, Ganon doesn’t abandon his other attacks. He will still teleport, throw big fireballs, spin his spear with fire, etc., sometimes one after the other. This unpredictability means you need to read his tells:
- If you see him winding up the big fireball (he holds energy above his head), prepare to reflect or dodge.
- If he crouches slightly and snorts, that’s a tell for the charge – get ready to move.
- If he raises the spear for a spin, back off and block.
Survival and Patience: This phase can be long because Ganon has more health and you must play carefully. Keep your health up – use a Smoothie or fairy if you drop below half hearts, just in case. Avoid unnecessary risks; only go in for damage when you’re confident you won’t eat a counterattack. If you have ranged echoes (like a bow echo or magic spells), you can chip away from a distance between his attacks.
Swordfighter Form Burst: One effective tactic is to wait until Ganon commits to a move (say, the end of a charge or after a fireball), then quickly activate Swordfighter Form and unleash a flurry of sword slashes. Cancel and get out before he retaliates. This maximizes your damage in short windows.
Use the Frog Ring: Your new double jump can help in this chaotic phase. You can leap over shockwaves or even over Ganon himself if needed. For example, if cornered, double-jump to sail over Ganon and land behind him.
Finish Him: Continue whittling down his health. It might take a while, but every hit counts. Eventually, his life bar will empty. Watch for that final opening – often, Zelda games have the boss slump or show a clear weakness when one more strike will end it. Deliver the final blow!
Victory: Ganon lets out a ferocious roar and collapses. Congratulations – you’ve defeated the phantom Echo of Ganon! 🎉
Boss Defeated – Rewards
As a reward, a Heart Container drops into Zelda’s hands, permanently increasing your maximum hearts by one. Make sure to pick this up (it will auto-collect in the cutscene). Tri also gains a level, reaching Level 5, which means you can summon even more echoes at once or at a reduced energy cost. Additionally, you earn 5 × Might Crystals– these are special collectible items likely used for upgrades (they may be turned in later for enhancing the Tri Rod’s power or traded for rare gear; hang onto them). Finally, any remaining treasure chests in the room unlock (if there are any, sometimes a boss room has a chest with, say, a story item – in this case the story progression comes via cutscene rather than a physical item).
Boss Fight Tips (Beginner & Advanced):
Beginner: Focus on defense. Keep your shield up during unfamiliar attacks and only strike when Ganon clearly exposes himself. It’s okay if the fight takes longer. Use healing items generously – better to use them than to fall in battle. Also, don’t forget you can target-lock Ganon (if the game allows manual targeting) to keep him in view despite teleporting.
Advanced: Use your full arsenal of echoes. For instance, seasoned players found success by summoning large echoes to draw Ganon’s fire (e.g., create an echo of a monster or a dummy so Ganon attacks it instead of you briefly). Also, dodge toward Ganon’s left side with perfect timing on every charge or lunge to set up constant counterattacks. If you’re skilled at reflection, bounce every big fireball back at him for heavy damage. These pro moves can significantly speed up the fight.
After the battle, a cutscene will play resolving the chapter’s story and setting the stage for the next adventures.
Chapter Conclusion – Story Cutscenes and Next Steps
With Echo Ganon defeated, Zelda finally accomplishes what she came for… or so it seems:
Rescuing the King: The magical rifts within Hyrule Castle dissipate. In a heartfelt scene, Zelda finds her father, King Hyrule, trapped in a shimmering void and frees him. The impostors that had taken over (the fake king and advisors who framed Zelda) vanish with Null’s power weakening, thereby clearing Zelda’s name in the eyes of the people. The King embraces Zelda, grateful and apologetic that she had to face such danger. This reunion is a major narrative victory – the kingdom’s true ruler is back, and Zelda is vindicated.
The Truth Revealed: Tri likely explains that the “Ganon” they just fought was not the real Ganon at all, but an echo created by Null (the primordial evil behind the rifts). In the battle’s aftermath, there’s a dramatic moment: Link appears in the chamber, possibly freed from imprisonment when Ganon’s echo was destroyed. Zelda is overjoyed to see Link alive… but suddenly, a dark vortex opens. The evil entity Null manifests (perhaps as a disembodied voice or shadowy figure) and captures Link once again before their eyes! Null sneers, dragging Link into a new rift and vanishing. Zelda’s relief turns to despair as she realizes Link is not saved yet.
Next Quest Unlocked: Though the King is safe, Link remains a captive of Null, and Hyrule is not out of danger. The Golden Goddesses’ shrines (or new regions of Hyrule) start reacting. Zelda receives a new main quest: to close the remaining rifts across Hyrule and gather the power needed to defeat Null and rescue Link. Specifically, three new major rifts open up in distant regions: Eldin Volcano, Hebra Mountain, and Faron Wetlands. These correspond to new dungeons or areas (Fire, Ice, and Forest regions, respectively). The King, now aware of the threat, encourages Zelda to go forth and do what only she can – with the wisdom of the Triforce guiding her.
Hyrule Castle Town Restored: With the castle free of evil influence for now, Hyrule Castle Town starts to recover. In gameplay terms, when you return to the overworld, the giant rift that was consuming the town will be gone, and you can explore the town fully. NPCs return to their shops and homes. Zelda is hailed as a hero by the townsfolk. This is a great time to take care of any newly available side content around the castle:
- Visit the Market – new shops might open, selling better gear or potions now that the town is safe.
- Talk to NPCs – some will have new dialogue acknowledging Princess Zelda as their savior, and a few may give you gifts (e.g., a villager might give a Heart Piece or a unique item in gratitude).
- Dampé’s Side Quest: One notable side quest unlocked around now involves Dampé, the gravekeeper/engineer, who can help you build automaton allies if you bring him certain echoes. (For details, check out the Dampé quest guide, but in short, you can now find Dampé’s shack in Hyrule Field. He’ll let you undertake side missions to construct helpful robots, a fun diversion from the main quest.)
Explore with New Abilities: With the Frog Ring (double jump) and any new echoes (Ball-and-Chain, Gustmaster, etc.), consider backtracking to earlier areas. Advanced Tip: There may have been a high ledge or platform in a previous dungeon or in Castle Town that you couldn’t reach before – now you can. For instance, you might recall a cave in Hyrule Field that had a ledge with a chest just out of reach; using the Frog Ring, you can jump up there and claim a Piece of Heart or other collectible. It’s worth re-exploring a bit.
Finally, when you’re ready, set out toward Eldin Volcano or whichever region you choose next. The game likely lets you tackle the next three rift dungeons in any order (though there might be a recommended sequence). Check your map for the new markers. Chapter 3 concludes with Hyrule Castle secure and the promise of the final stretch of your journey ahead – three more sacred challenges to save Link and ultimately confront Null.
Next Main Quest: The Rift on Eldin Volcano – Armed with new wisdom and tools from the Hyrule Castle victory, venture into the volcanic heights of Eldin to close the next rift and continue the fight against Null’s chaos.
(Save your game now! Chapter 3 is complete. Take a moment to relish in your accomplishment – you’ve cleared one of the pivotal chapters in The Legend of Zelda: Echoes of Wisdom. The stakes will only rise from here, but so will Zelda’s power as you gather more echoes of wisdom on the journey.)