


Table of Contents
- Prologue: Escape from Hyrule Castle: Step-by-step guide to escaping the castle, introducing basic mechanics.
- Chapter 1: Suthorn Forest & The Mysterious Rifts: Navigating Suthorn Village and completing the Suthorn Ruins dungeon.
- Chapter 2: Gerudo Desert: Guidance on completing quests and dungeons in the Gerudo Desert region.
- Overview
- Suthorn Village & Prairie – Heading to Gerudo Desert
- Gerudo Oasis & Desert Outskirts
- Gerudo Town – Side Quests and Meeting the Chief
- Three Small Rifts in the Desert (Proving Zelda’s Worth)
- Cryptic Cavern – Unlocking the Gerudo Sanctum
- Gerudo Sanctum – Dungeon Walkthrough
- Boss Fight: Mogryph – The Sand Colossus
- Chapter Conclusion and Next Steps
- Chapter 3: Jabul Waters: Strategies for tackling quests and dungeons in the Jabul Waters region.
- Chapter 4: Return to Hyrule Castle: Progressing the main storyline upon returning to the castle.
- Chapter 5: Eldin Volcano: Strategies for navigating the Eldin Volcano region and its challenges.
- Chapter 6: Faron Wetlands: Guidance on completing quests and dungeons in the Faron Wetlands.
- Chapter 7: Hebra Mountains: Navigating the Hebra Mountains region and overcoming its challenges.
- Chapter 8: The Eternal Forest & Endgame: Preparation and strategies for the final challenges and boss encounters.
Overview
Welcome to Chapter 2 of The Legend of Zelda: Echoes of Wisdom, set in the scorching Gerudo Desert. In this chapter, Princess Zelda travels west to aid the Gerudo, mend several smaller rifts, and conquer the Gerudo Sanctum dungeon. This comprehensive guide will walk you through every step – from initial objectives in Suthorn Village to the climactic boss battle – highlighting puzzles, combat strategies, hidden collectibles, and story cutscenes along the way.
Main Objectives: Reunite with allies in Suthorn Village, journey to Gerudo Desert, assist the Gerudo with minor rifts, complete the Gerudo Sanctum dungeon, and defeat the boss Mogryph to seal the desert rift.
Key Items & Collectibles: You’ll obtain the Survey Scope and Gerudo Sandals (accessories), the Golden Fan (quest item), the Bow of Might (new weapon from a mini-boss), Heart Pieces #5–#8, Stamps #1–#4, and many Might Crystals and rupee treasures. Tri (your companion) will also level up, unlocking new abilities. Follow the step-by-step guide below to ensure you don’t miss a thing!
Suthorn Village & Prairie – Heading to Gerudo Desert
After completing Chapter 1, Zelda starts outside the Suthorn Ruins in Suthorn Forest.
Meet Lefte & Lueburry (Cutscene): As you exit the ruins, Minister Lefte greets Zelda and leads her to a safe house in Suthorn Village. Inside, meet Lueburry (Impa’s older brother), who provides lore about Link and the Sword of Might. Lueburry explains that to empower Link’s sword and Zelda’s energy, you’ll need Might Crystals, and he shows you a machine used for upgrades (you currently lack enough crystals to upgrade). After the briefing, Tri marks the locations of major rifts on your map – your next mission is to mend those rifts to rescue those trapped inside. (Tip: Check Lueburry’s diary downstairs for extra backstory on Link and the rifts.) When ready, exit the house.
Suthorn Village Side Quest – “Finding the Flying Plant”: Before leaving the village, talk to the old man in the southwest corner. He gives the side quest Finding the Flying Plant, asking to see a mysterious flying flower. Show him a Peahat Echo (if you collected one in Chapter 1) to complete the quest. Reward: a Might Crystal (your count should be 6/150). Every bit helps, so it’s worth doing. Now head out of the village to the north toward Suthorn Prairie.
Explore Suthorn Prairie for Upgrades:
- As soon as you enter the prairie, you’ll be attacked by Octoroks and crawling spiders. Defeat an Octorok and a Crawltula to learn their echoes (abilities you can summon with Tri). These enemy echoes can be useful in puzzles and combat.
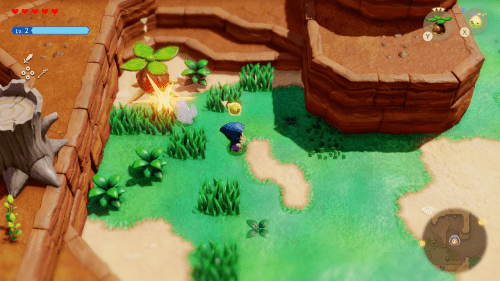
- Continue north to a pond surrounded by stone pillars. Heart Piece #5: Use Tri’s echo abilities to reach high places – for example, stack two Old Bed echoes (or any tall objects) near the tallest pillar and climb up. Jump across to the center pillar to grab Heart Piece #5, increasing your health (collecting 4 pieces grants a new heart). This early Heart Piece is easy to miss, so be sure to claim it.
- To the northeast, you’ll find some crumbling ruins and a character named Verley. Speak with him to start the side quest “Up a Wall.” Verley asks you to eliminate two Moblins causing trouble nearby. Track down the Moblins (use your map or listen for their grunts), then defeat both – they’re slow but hit hard, so dodge and strike from behind. Once both Moblins are down, return to Verley. Reward: 20 Rupees. (Advanced Tip: Moblins have a long reach; try using an echo like a ReDead to stun them, or simply circle around to backstab.)
- Before leaving the ruins, climb the high cliff east of Verley’s location. Use object echoes (like stacking Bed or Trampoline echoes) to scale the ledges. Follow the high ledge east to the end, where you’ll discover a buried treasure chest. Open it to obtain a Golden Egg (these can be sold or used in cooking). This is an easy-to-miss treasure tucked away at the far edge of the prairie.
- Now head back west and slightly north to find a cave tucked into the cliffs (northwest of the prairie). Inside the cave, clear out any Crawltulas. You’ll see a high platform in the north of the cave – stack a Decorative Shrub Echo, an Old Bed Echo, and a Trampoline Echo (or any similar tall objects)to create a makeshift staircase. Climb up to the high ledge. You’ll find some loose rupees on the ground (grab them), and a chest. Open the chest to get 50 Rupees. Drop back down and exit the cave.
- Return to the prairie’s pond. Dive underwater (stand in the shallow water and press the action to dive) and perform a spinning attack among the aquatic plants. This cuts the underwater grass, revealing a hidden Might Crystal on the pond floor. Collect it – every crystal counts (now ~7/150). With the prairie thoroughly explored, it’s time to move on.
Clearing “The Blocked Path” (Side Quest): On the south side of Suthorn Prairie, near the exit to the desert canyon, you’ll encounter a man frustrated by debris blocking the path. This triggers the side quest The Blocked Path. Simply destroy the wooden crates and push the boulders out of the way to clear the passage. Once the route is open, talk to the man again to complete the quest. Reward: 20 Rupees. More importantly, you’ve opened a shortcut. Just a few steps north of here, activate the Waypoint shrine that appears– this waypoint connects to central Hyrule Field, which will be useful for fast travel later. Before leaving this area, check a small ruined structure by a tiny pond to the northwest: there’s a chest accessible by stacking an Old Bed echo. Open it for 10× Rock Salt(an ingredient for cooking).
Exiting Suthorn Prairie – Last Collectibles: Now head west toward the mouth of a canyon (this leads into Gerudo Desert). As you approach the canyon entrance:
- New Echo – Crow: A flock of black Crows will swoop down and try to steal your rupees. Defeat a few of these pesky birds to learn the Crow Echo. The Crow Echo can be summoned later to scout or hit switches from afar.
- Might Crystals #8 & #9: In the same area, look for dead trees with rocks on top of them. One dead tree stump stands in the grass; lift the small rock sitting on it to uncover a Might Crystal (8/150). Nearby, use echoes to climb up the high cliff to the north. Walk east along the ridge and then south; you’ll spot another lone rock on a ledge. Pick it up to find another Might Crystal (9/150).
- 50 Rupees Chest: From that high ledge, you can see a chest perched atop a dead tree to the south. Use your echoes (stack Beds or use a Trampoline) to reach the chest. Open it to snag 50 Rupees.
With the path clear and all goodies in hand, proceed west into the canyon that leads to Gerudo Desert.
Eastern Gerudo Desert – Canyon Entrance: You emerge in the Eastern Gerudo Desert, a canyon pass with high red-rock walls and patches of sand. Activate the Waypoint right at the desert entrance so you can return here easily later. As you move forward, sand Octoroks (Aruroda) pop up – defeat an Aruroda to gain the Aruroda Echo, a sand-spewing creature echo. Continue southward through the canyon until you spot a trio of Gerudo soldiers resting under some palm trees. (There’s no action needed with them yet, but remember this spot.) Just north of these soldiers, half-buried in sand, you’ll find a treasure chest – use Bind (Tri’s telekinetic ability) on the chest to yank it out of the sand, and open it for 20 Rupees.
Desert Cave – Caromadillo Echo: Before heading to the oasis, take a detour for another echo and loot. On the east side of the canyon (north of the palm trees), use echoes to climb up a high cliff. You’ll find the entrance to a small cave. Inside, defeat the two armadillo-like monsters rolling around – these are Caromadillos. After defeating them, you’ll learn the Caromadillo Lv.2 Echo (a stronger bouncing projectile echo). A chest will also appear; open it to obtain 10× Chilly Cactus, a cooling ingredient useful for desert recipes. With that done, exit the cave.Now you should see the shimmering heat of an oasis ahead. It’s time to visit the Gerudo Oasis.
Gerudo Oasis & Desert Outskirts
Upon arriving at the Gerudo Oasis, you get a brief respite from the harsh desert. There’s a small Gerudo encampment here with a pool of water, palm trees, and a few important characters to meet. This area serves as a hub for a couple of side quests and will be referenced often, so activate the Waypoint here as well.
Meet the Business Scrub – “Recipes, Please!”: On the west side of the oasis, you’ll find a friendly Business Scrub merchant running a little Smoothie Shop (a Deku Scrub wearing a merchant cap). Talk to him and he’ll excitedly give you a side quest called “Recipes, Please!”. He challenges you to mix 10 different smoothie recipes using various fruits and ingredients. This is an ongoing quest – you likely won’t have 10 recipes yet. However, if you do manage it (perhaps by combining ingredients you’ve gathered so far), speak to him and he’ll reward you with the Survey Scope accessory. The Survey Scope is a useful tool that lets you zoom in and survey faraway terrain – handy for spotting distant chests or pathfinding. (Beginner Tip: You can return later after finding more ingredients; the quest can be completed anytime. The first reward is at 10 recipes for the Scope, and he’ll then up the challenge to 20 recipes for a further reward.) Even if you can’t finish it now, open the wooden chest next to the Scrub to grab 5× Chilly Cactus for free.
Side Quest – “The Flying Tile”: Nearby, a Gerudo named Tormali is pacing around the oasis. Speak to Tormali to receive the quest The Flying Tile. She mentions strange flying tiles in the desert and asks you to bring proof of one. (We’ll complete this later once we obtain the needed echo.) For now, accept the quest so it’s logged.
Tough Mango Plant Lab (Mini-Game for Golden Fan): At the north end of the oasis, enter the tent labeled “Tough Mango Plant Lab.” Inside, use the Tri Rod on the bed to learn the Soft Bed Echo (this echo creates a cushy bed you can use for stacking or a quick heal). Speak with the Gerudo researcher to play the Mango Rush mini-game – it costs 10 Rupees per attempt. In this game, ripe Tough Mangoes pop out of the ground; you must quickly cut down as many as possible within the time limit (use your spin attack to hit multiple mangoes at once). There are two difficulty levels: Standard Seeds (easy) and Vibrant Seeds (medium).
- Standard Challenge: Harvest at least 40 mangoes to win a prize of 3 Tough Mangoes (50 mangoes yields 5).
- Vibrant Challenge: Harvest at least 50 mangoes to earn special rewards. On your first success, you’ll receive the Golden Fan (a valuable quest item), and for an even higher score (60+ mangoes) you get 3 Might Crystals. It may take a few tries – avoid the thorny mangoes that can slow you down. Tip (Advanced): The trick is to stand near the mango sprouts and use continuous spin attacks; each successful clear nets more fruit quickly.
Continue playing until you’ve obtained the Golden Fan (you need this item for a story quest later) and the extra Might Crystals (bringing your total to around 12/150).
Rewards Recap: Tough Mangoes (for smoothies) each round, plus one-time prizes: Golden Fan and +3 Might Crystals on first medium-level wins. Note: Tough Mango smoothies sell for a high price – a great rupee farming tip is to blend and sell them if you need cash. When finished, exit the tent.
Leave the Oasis (Westward): Make sure you’ve activated the oasis waypoint and finished any shopping or saving. Now head out of the oasis to the south. Our next destination is the Southern Oasis Ruins, visible just beyond the oasis pool.
Southern Oasis Ruins – Echo Hunting and Stamp Rally
Directly south of the oasis is a ruined structure half-buried in sand, with remnants of stone walls and an underground chamber. There’s also a cave entrance here – this area is the Southern Oasis Ruins.
Enter the Ruins Cave: Go into the cave at the Southern Oasis Ruins. Inside, you’ll immediately feel a strong wind blowing from vents (wind cannons) that can push Zelda back. Summon a Boulder Echo in front of you to block the wind as you advance. In the first chamber, use the Tri Rod on the green ceramic Gerudo Pot to learn the Gerudo Pot Echo(this echo creates a large pot, useful for weight switches or stacking). In the northeast corner, use the Tri Rod on the strange blower device to learn the Wind Cannon Echo (an echo that generates a gust of wind). With these new object echoes acquired, proceed east into the next room.
Wind Cannon Puzzle: In the next room of the ruins, the floor is covered in sand drifts. Use your new Wind Cannon Echo to blast away the sand piles, revealing pressure switches and paths. Step on the floor switch in the north end of the room to open a door. Move into the north chamber: two mini-tornado enemies spawn here! Defeat both swirling Tornado creatures to learn the Tornado Echo (now you can summon small whirlwinds). When the tornado enemies are gone, a chest spawns – open it to obtain 3× Rocktatoes (a hearty vegetable for recipes).Continue south, then east to another chamber. Open the chest here for 2 Might Crystals (now ~14/150). With the cave fully explored, exit back outside.
Surface Loot & Stamp #1: Back on the surface ruins, there are a couple of buried chests around the area. Use Magnesis/Bind on any half-submerged chests you spot. Two notable ones: one yields 10× Chilly Cactus and the other 20 Rupees. Defeat any lurking enemies (like Leevers or Sand Piranhas) around the ruins – doing so teaches you the Sand Piranha Echo and ReDead Echo if you haven’t learned them already.Before leaving, look for a strange engraved tile on the ground (a square plate with a symbol) – this is a Stamp Stand. Interact with it, and a friendly “Stamp Guy” parachutes down to greet you. He gives you your First Stamp Card and imprints Stamp #1 on it. (Stamp Stands are scattered around Hyrule; collect 5 stamps to fill a card and you can redeem it for a reward later.) This is the start of a fun stamp-collecting side activity, so don’t forget to check stamp stands as you explore.
Mysterious Cave Entrance (Blocked): In the far western corner of the ruins, you’ll find the entrance to another cave, guarded by a Gerudo soldier. Approach the cave door – a cutscene triggers, showing Zelda inspecting ancient Gerudo text on the ruins. The Gerudo guard stops you, explaining that this cave (the Gerudo Sanctum) is off-limits without the chief’s permission. Looks like we can’t enter yet. Suddenly, you hear a commotion east of the ruins: monsters have ambushed someone!
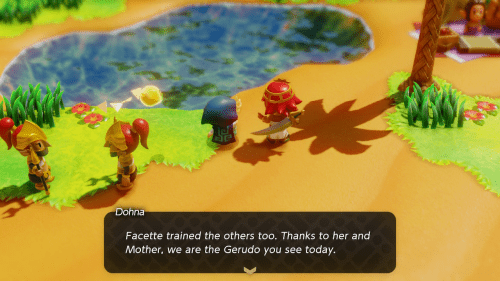
Rescue Captain Dohna: Head east from the blocked cave and you’ll come across a group of monsters attacking a lone Gerudo warrior. Jump into the fray and defeat all the monsters (a mix of Bokoblins or other desert fiends) to save the Gerudo fighter. After you clear them out, speak to the warrior – this is Captain Dohna of the Gerudo warriors. A brief cutscene plays where Dohna thanks Zelda for the rescue. Impressed by your skill, she asks you to meet her in Gerudo Town so she can introduce you to Chief Seera and discuss the “rift problem” plaguing the desert. Objective Update: Head to Gerudo Town for a meeting with the Gerudo leadership.Dohna departs toward Gerudo Town. You should do the same, but first return to the oasis to easily get there.
Travel to Gerudo Town: Open your map and warp (fast-travel) to Gerudo Oasis (or walk back north). From the oasis, head west across the dunes toward Gerudo Town. On the way, you’ll encounter another Stamp Stand just a few steps west of the oasis – check it to obtain Stamp #2. Continue due west; you’ll soon see the gates of Gerudo Town. (If you veer off, the area may loop – use the visible town walls as your guide.)
Gerudo Town – Side Quests and Meeting the Chief
Gerudo Town is the central settlement of the Gerudo Desert, located at the western edge. Upon arrival, activate the Waypoint statue near the town entrance for future convenience. Gerudo Town is bustling with activity and has a shop, a few quest-giving NPCs, and the palace where Chief Seera resides.
Note: Unlike some other Zelda games, Zelda is welcome in Gerudo Town without a disguise, as she’s here on a quest to help.
“Tornado Ghost?” Side Quest: Right inside the town gates, speak to the Gerudo woman standing to the right. She mentions a “ghostly tornado” and initiates the Tornado Ghost? side quest. To complete it, simply show her the Tornado Echo you obtained earlier at the Oasis Ruins. Open your Tri Notebook and summon a small tornado echo in front of her. This proves the phenomenon she saw. She thanks you and rewards you with 10 Fresh Milks (useful for cooking recipes that heal or grant buffs). This is an easy quest to finish immediately since you already have the Tornado Echo.
Gerudo Shop – Buy Gerudo Sandals: On the east side of town is the Gerudo Shop. Check out the wares:
- Gerudo Sandals – 400 Rupees
- Warm Peppers – (price not fully shown, likely a few rupees each)
- Chilly Cactus – (price similarly a few rupees each)
- Red Potion – 30 Rupees
- Blue Potion – 30 Rupees
It’s highly recommended to purchase the Gerudo Sandals if you have enough rupees. These special sandals make traversing the deep desert sands much easier (preventing you from sinking and improving movement speed on sand). Equip them as your active accessory. If you’re short on rupees, consider selling some excess materials (like that Golden Egg or spare ingredients) to afford the 400 rupee price – moving around the desert is noticeably safer with these on. Grab any ingredients you might want as well.
“Gerudo Tag Training” Side Quest: Head to the northwest part of town. You’ll find a Gerudo woman standing on a carpet in an open area. Talk to her, and she’ll invite you to a game of Gerudo Tag (triggering the Gerudo Tag Training side quest). In this mini-game, the Gerudo will run around town quickly, and you have to catch her. Objective: Chase her down and press A to tag her. This can be tricky as she’s swift:
- Beginner Tip: Use Zelda’s Spin Attack to get brief bursts of speed when you’re close. Cut corners and anticipate her route to close the gap.
- Advanced Tip: You can place object echoes like Sea Urchin Echoes (spiky obstacles, if you have them) or other items in her path to slow her down. However, it’s often easier to just sprint and roll.
After a bit of parkour across the rooftops and streets, tag the Gerudo to stop the game. Reward: 6× Chilly Cactus. These chilly cacti can be blended into cooling drinks or cooked. Congrats on winning the desert version of tag!
“Elusive Tumbleweeds” Side Quest: Near the same area (after finishing tag), talk to another Gerudo NPC wandering in town. She mentions seeing big tumbleweeds rolling around outside and asks if you can bring her one – this starts Elusive Tumbleweeds. To do this, leave Gerudo Town through the main gate and step into the desert. Look around for a dry tumbleweed rolling across the sands nearby. Once you spot one, use Tri’s Bind ability to grab it (target it and press the Bind button) and carefully carry it back into Gerudo Town. Be careful not to let it hit walls or obstacles, or it will break – you need to deliver it intact. Walk it back to the quest-giver. Upon presenting the tumbleweed, she’ll happily reward you with 2 Might Crystals (bringing you to ~17/150). Another stamp on your upgrade progress!
Climb to the Palace Roof (Heart Piece #6): Before meeting the chief, there’s one more collectible to snag in town. In the northeast of Gerudo Town, find some stacked crates or use echoes to get onto the roof of a house. From there, stack a couple of Old Bed Echoes to reach the roof of the Gerudo Palace (the large building at the north end of town). Once on the palace roof, head to the back (north side) and climb up a ladder to an even higher ledge behind the palace. In this hidden back area, drop down into a lower section where you’ll find some plant-like bouncy creatures called Platbooms.
- Defeat one Platboom with your sword to learn the Platboom Echo
(this echo creates a springy plant that can launch you upward or smash objects). - Use another live Platboom as a trampoline: jump on it to bounce to the higher platform on the east side. Up here you’ll see some wooden crates blocking a small alcove. Use the Platboom Echo you just learned – summon a Platboom and let it explode or bounce into the crates to smash them.
- Behind the crates is a large boulder. Bind the boulder and carry it back to the Platboom you summoned. Ride the Platboom’s bounce with the boulder in hand to reach the high platform again, then set the boulder down on the pressure switch there (if there is one) or simply use it to climb even higher. This clears the way to a small ledge on the east.
- Heart Piece #6: Just to the east, on that now-accessible ledge, you can collect Heart Piece #6. This will boost your health (or get you closer to the next full heart container). With that, drop back down and exit the palace roof area.
Enter the Palace – Meeting Chief Seera (Story Cutscene): Now it’s time to meet the Gerudo leadership. Head to the Gerudo Palace at the north end of town and go through the main doors. A cutscene will play: Zelda meets with Chief Seera, the young leader of the Gerudo, along with her advisor Facette and Captain Dohna. During the meeting, Zelda explains her mission to close the rifts. Facette is skeptical of an outsider’s ability, and Chief Seera appears hesitant to trust Zelda despite Dohna vouching for her. The conversation becomes heated – Seera is concerned for her people’s safety and is reluctant to let Zelda interfere. Story Summary: Chief Seera ultimately decides she cannot allow Zelda into the sealed Gerudo Sanctum (the cave you found earlier) until Zelda proves she can truly eliminate the rift threat. Just then, a guard bursts in and reports that the rift in the Eastern Desert has suddenly expanded and become even more dangerous. This urgent news convinces Seera to give Zelda a chance. She asks Zelda (and Tri) to first eliminate three smaller rifts that have appeared around the desert, as proof of her abilities. If Zelda succeeds, the Gerudo will permit her to enter the Sanctum and tackle the main rift.As the meeting concludes, Zelda regains control. Outside the palace, a guard mentions that Dohna will meet you near the oasis to brief you on the rift locations. Objective: Close the three small rifts in Gerudo Desert. Warp back to Gerudo Oasis to save some travel time.
Three Small Rifts in the Desert (Proving Zelda’s Worth)
Dohna is waiting at the oasis as promised. Approach her for a cutscene/dialogue where she details the plan. Three minor rift zones have opened:
- One at the Southern Oasis Ruins (where you just were),
- One in the Southern Gerudo Desert (south of Gerudo Town),
- One in the Ancestor’s Cave of Rest (north of Gerudo Town).
Zelda must close all three. These will mostly be short combat or puzzle challenges. Let’s tackle them one by one, in an efficient order.
Captain Dohna meets Zelda at the Gerudo Oasis to explain the plan. She points out three rift sites in the desert that must be dealt with. Zelda’s next tasks will involve combat in the sands, helping thirsty Gerudo soldiers, and solving an underground puzzle – all to prove to Chief Seera that she can handle the big rift.
Rift 1: Southern Oasis Ruins (Battle at the Ruins)
Use the oasis waypoint to warp to Southern Oasis Ruins (or simply walk southeast back to the ruins). You’ll find two injured Gerudo soldiers resting just outside the ruin entrance. As you arrive, shadowy monsters spawn from the rift nearby and attack in waves. This encounter is similar to a mini survival battle:
- Fight off the monsters: A mix of Bokoblins and Stalfos (skeleton) might appear. Use your swordfighter form to cut through them efficiently. Your Energy Gauge will refill slightly with each kill, so you can keep using powered-up attacks. If you have the Tornado or Platboom Echo, those can help crowd-control, but it’s not strictly necessary.
- After defeating all waves of enemies, the rift here stabilizes (though Tri notes he cannot enter this small rift – it’s sealed by eliminating the monsters). The Gerudo soldiers thank you, though there isn’t a major reward aside from clearing the objective.
This rift is now resolved; Zelda has proven herself in combat. Now onto the next.
(Beginner Tip: If you find yourself low on health after the battle, remember you can place a Soft Bed Echo and rest on it to restore hearts. You can also drink a Red Potion if you bought one.)
Rift 2: Southern Gerudo Desert (Thirsty Soldiers & Heart Piece)
Next, warp (or travel) to the Gerudo Town waypoint, since the second rift event is just south of Gerudo Town’s gates. From Gerudo Town’s entrance, head directly south into the open desert. After a short walk, you’ll come across three Gerudo soldiers collapsed in the sand, suffering from severe thirst. As you approach, Captain Dohna arrives here as well. Seeing the state of her soldiers, she gives Zelda 2 Chilly Cactus items and suggests making a refreshing drink to save them. Time for some quick cooking!
Make a Cactus Smoothie: Warp back to Gerudo Oasis (the Smoothie Shop) which is nearby. Talk to the Business Scrub again – this time use his smoothie crafting service. Mix the 2 Chilly Cactus together (or with any fruit if needed) to create a Cactus Smoothie. This chilled beverage is perfect for rehydrating the soldiers. Return to the group of three Gerudo in the Southern Gerudo Desert and give them the Cactus Smoothie. They recover, completing this rift-related mini quest. No combat required here – just some desert hospitality!
The grateful soldiers stand up, relieved. Quest complete. Now that they’re safe, Zelda can do a bit of exploring in this area before moving on:
- Heart Piece #7: From where the soldiers were, climb up the nearby cliff to the south. On this higher ground, in the far southwest corner of the mapped desert, you’ll find some sand piles. Use the Wind Cannon Echo or a handy leaf item to blow away the sand mounds, revealing Heart Piece #7 underneath! Grab it – only one more Heart Piece to complete another Heart Container.
- Stamp #3: While still on that high ledge, head north along the ridge. You’ll come across another Stamp Stand on the ledge. Check it to get Stamp #3 on your stamp card. Only two more stamps to fill the card – you’re making progress on the Stamp Rally.
- That’s all for the far southern reaches. You can now warp back to the oasis (or Gerudo Town) to prepare for the third rift.
Rift 3: Northern Gerudo Desert & Ancestor’s Cave of Rest
The final rift is at the Ancestor’s Cave of Rest, located in the northern Gerudo Desert. From Gerudo Oasis, head due north into the desert dunes. Be prepared: a swirling sandstorm obscures the northern area, making navigation tricky (keep an eye on your map and Link’s position indicator).
Boarblin Camp Ambush: As you wander north, you’ll eventually find a camp of Boarblins (pig-like bokoblins) and wooden fortifications – this is north of the oasis, within the sandstorm region. As part of the rift event, these monsters need clearing. Defeat all the Boarblins in the camp – there may be a mix of Club Boarblins and Boomerang Boarblins. Use dodges to avoid their swings and take them out one by one. Once the camp is clear, Zelda can pick up the dropped Club Boarblin Echo (if you hadn’t gotten it earlier). Also, open the chest in the camp to collect 7× Warm Peppers, useful for recipes that grant cold resistance (you might need those in a different region).
- Tip: The Boomerang Boarblin Echo you might have from earlier is great for ranged combat – toss it to damage foes from a distance. Also, if you defeat a Boarblin by cutting it down yourself, you can pick up a Boomerang Boarblin Echo here as well.
Heart Piece #8: Continue further north past the Boarblin camp. The sandstorm may thin out as you reach some high rocky areas. Look for a series of ledges or a tall pillar of rock. Stack a few Old Bed Echoes (or use a Platboom bounce) to create a tower you can climb, and from the top, leap over to a high ledge in the northern desert. Sitting on that ledge is Heart Piece #8– pick it up!. Congratulations, if you’ve collected #5 through #8, that’s four pieces, completing a Heart Container and increasing your maximum health by one. This will be very useful in the upcoming dungeon and boss fight.
Might Crystals Galore: The northern Gerudo Desert is a treasure trove of Might Crystals:
- From the Heart Piece ledge, climb further up to the highest cliff on the eastern side. There’s a lone rock on an elevated platform. Lift it to reveal a Might Crystal (18/150).
- Return to where you found Heart Piece #8. Stack Old Bed Echoes again to reach another high cliff, this time to the northwest. There’s a chest up here – open it to obtain a Might Crystal (19/150).
- Now climb to the northernmost high ground of this area (near the edge of the map). In the middle of a flat elevated platform, lift a rock to uncover yet another Might Crystal (20/150). By now, you should have significantly increased your Might Crystal count – you’re well on your way to future weapon and energy upgrades.
Beetle Mound Echo: Descend slightly to find a ladder going down into a pit or lower area (if you haven’t already while exploring the cliffs). At the base of this ladder, you’ll notice strange little dirt mounds with bugs. Use the Tri Rod on a beetle mound to learn the Beetle Mound Echo – this allows you to spawn those mounds. Then defeat the swarm of Beetles that emerges; once defeated, you’ll also gain the Beetle Echo, which can summon a helpful beetle (often used to crawl into small holes or activate distant triggers). With the desert surface thoroughly scoured, it’s time to enter the Ancestor’s Cave.
Ancestor’s Cave of Rest (Puzzle): Look for the entrance to a cave along the northern cliffside – likely near where you found the last crystal (if you see a Gerudo guard outside a cave, that’s it). Activate the Waypoint outside this cave for convenience. Talk to the guard by the door; he laments that he can’t reach the other side of the cave due to rift debris blocking the way. Time for Zelda and Tri to shine:
- Enter the Ancestor’s Cave of Rest. Inside the first chamber, you’ll see a big boulder to the west and what looks like a dead-end wall. Use Bind to pull the large boulder – it might be covering a hidden doorway. Indeed, moving the boulder reveals a path. Proceed into the next room.
- Two burrowing mole-like creatures called Holmills attack. Defeat both to learn the Holmill Echo. The Holmill echo lets you summon a creature that digs into soft ground.
- In the same room, there’s another boulder. Bind and pull this second boulder, revealing a ladder leading down. Climb down the ladder to a lower level of the cave.
- You’re now in a sandy basement chamber. The floor is suspiciously soft sand. Summon the Holmill Echo you just got – the little mole will burrow into the sand and create a hole that Zelda can drop through! Fall through to an even lower area.
- At the bottom, you’ll find a treasure chest in the bottom-left corner. Open it to obtain a Golden Egg (another valuable item). There are also some rupees scattered around on the ground here – collect them as a bonus.
- Climb the ladder on the east side to go back up one level (the room with soft sand).
- Here you see two unlit torches on either side of the room. Equip any fire ability (if you have a Fire Rod echo or a torch, use it) – if not, you can set something on fire by shooting an arrow through a lit torch from elsewhere or using a flame weapon. Light both torches. Once both are ignited, the rift in this cave is mended – the blockage dissipates and the guard from outside can now enter. You’ve effectively closed the third small rift! Zelda has proven she can solve puzzles, not just fight.
- A brief scene shows Dohna entering the cave after you light the torches. She’s impressed and tells you to meet back at the palace for an update with Chief Seera.
Leave the cave (climb back up and out). Now all three minor rifts are resolved.
Extra Exploration – Northern Wastes (Optional): On your way back toward Gerudo Town (if you haven’t already), there’s a bit more northwestern desert you can check:
- Heading west from the cave, you’ll hit another Boarblin mini-camp. Take out these enemies to learn the Boomerang Boarblin Echo if you haven’t (and possibly Club Boarblin Lv.2 Echo from a stronger red boarblin). One of the western camps has a chest containing 5× Warm Peppers as well.
- On a high east cliff near that area, dig with a Holmill Echo on a small suspicious sand patch to unearth a Might Crystal (21/150).
- In the far northwest, you might encounter two tougher red Boarblins (one with a club and one with a boomerang). Defeat them using your Boomerang echoes or other strong attacks. Doing so grants you Club Boarblin Lv.2 Echo and Boomerang Boarblin Lv.2 Echo (upgraded forms). Open the chest they were guarding to obtain the Energy Glove accessory. The Energy Glove reduces stamina cost for certain actions – a nice bonus for combat endurance.
- You can also find another Stamp Stand on a northeast cliff in this region (Stamp #4, which we’ll get momentarily).
If you miss any of these optional bits, don’t worry; you can return after the upcoming dungeon. For now, with the rift quests done, it’s time to report back.
Complete “The Flying Tile” Quest: Before heading to Chief Seera, let’s quickly finish Tormali’s quest from earlier. By now, you should have encountered the flying tiles and learned the Flying Tiles Echo in the northern desert (if you followed the above exploration). If not: One of the caves you entered (the optional one on a north cliff accessible after getting the Energy Glove) had glowing floor tiles – examining one gave the Flying Tile Echo. Assuming you have it, warp back to Gerudo Oasis. Talk to Tormali and show her a Flying Tile Echo (summon a flying tile). She will be delighted that you found evidence of the flying tiles, completing The Flying Tile side quest. Reward: 50 Rupees. Easy money!
Return to Gerudo Town – Gaining Permission: Now warp to Gerudo Town and head into the palace for the follow-up meeting. In a cutscene, Zelda, Dohna, Facette, and Chief Seera reconvene. Having seen Zelda’s success, Chief Seera and the other Gerudo finally believe in Zelda’s ability to close the great rift. Seera agrees to grant Zelda permission to enter the Gerudo Sanctum (the sacred cave) to eliminate the main rift. However, Facette mentions one more problem: the Sanctum’s entrance is flooded with dangerous quicksand. It’s decided that Zelda needs to drain the quicksand from the Sanctum before entering. Tri points out that the large plug you noticed earlier might be the key. Chief Seera instructs Zelda to solve this issue in the nearby Cryptic Cavern, which connects to the Sanctum’s sand reservoir. Dohna thanks you again and wishes you luck.With full access granted, it’s time for the major dungeon of this chapter!
Cryptic Cavern – Unlocking the Gerudo Sanctum
The Cryptic Cavern is actually the cave at the Southern Oasis Ruins that was previously guarded. Now that you have the chief’s permission, the guard is gone and you can enter freely. Warp to Southern Oasis Ruins one more time and head into that cave which was blocked before.
Dungeon Preparation: Make sure you have a couple of Heart Potions or healing items ready, and your new echoes like Platboom, Holmill, and Wind Cannon at the ready. Equip the Energy Glove if you want extra stamina in combat. The upcoming dungeon has puzzles that involve creating and using echoes creatively.
Inside Cryptic Cavern
Entrance Room (Switch & Small Key): As you step in, notice a high switch on the western wall and unreachable ledges. Summon an Old Bed Echo (or stack two) to create a tall platform. Jump from the bed and strike the crystal switch on the west wall with your sword. This opens the door to the north. Go through to the next room.
Windy Corridor: A gusting wind blows through this corridor from turbines, similar to the ruins earlier. Use your Boulder Echoes as movable barricades – summon a Boulder and carry it in front of you as you walk, to block the wind blasts. Proceed east to the next area.
Enemy Ambush: In the next chamber, the door locks and you must defeat all enemies to continue. You’ll face a mix of Gibdos (mummies) and perhaps Keese. Take them out with your sword or echoes (Tornado echoes work well on lighter enemies). Once all are defeated, the north door opens – head up to the next room.
Gibdo and Key Puzzle: In this room, a lone Gibdo (mummy) lurks. Gibdos are slow but tough; keep your distance when it flails. Defeat the Gibdo, and you’ll learn the Gibdo Echo if you haven’t already (its scream can immobilize nearby foes). Now, stack two Old Bed Echoes under the switch in the northwest corner. Climb up and hit the switch with your sword. A chest materializes in the center of the room – open it to obtain a Small Key.
Locked Door: Backtrack to the previous room and use the Small Key on the locked door in the northwest corner. Push it open and go through.
Spike Trap (Pathblade) and Chest: Descend the ladder in this new room. Watch out – a spiked rotating blade trap (called a Pathblade) patrols the floor here. It’s basically a spinning blade on a path. You can’t hurt it with normal attacks safely. Instead, summon a Platboom Echo near it; the Platboom’s explosion will destroy the trap. Once the Pathblade is gone, you’ll automatically learn the Pathblade Echo, allowing you to summon a stationary spike trap (interesting for puzzles or damaging foes). In the lower area, stack a Platboom and a Bed echo to reach a small ledge with a chest. Open it to collect 20 Rupees. Every bit helps, so grab them.
East Wing: Climb the ladder up and head to the room on the right (east). Go up another ladder. This upper room has a Black Gibdo (a stronger mummy) and perhaps some Keese. Defeat the black Gibdo to gain the Gibdo Lv.2 Echo. This upgraded echo can unleash a more powerful immobilizing scream – handy against tougher enemies. Step on the floor switch on the left side of this room to create a shortcut (probably opening a barred door leading back to an earlier area).
Sand Drain Mechanism: Proceed through the next couple of rooms to the right (east) until you find a large plug embedded in the ground/sand. This is likely the plug Chief Seera mentioned. Stand near it, use Bind, and pull the large stone plug out. A rumbling will occur – you’ve drained the quicksand from Gerudo Sanctum! The Sanctum is now accessible. With the sand gone, Tri confirms the rift’s entrance can now be reached. This completes the Cryptic Cavern’s purpose. Exit the cavern (either backtrack or use the Oasis warp and walk to the Sanctum entrance).(If you hit the switch for the shortcut, you can quickly backtrack to the entrance. Alternatively, save and reload to appear at the cavern entrance since it’s now “cleared.”)
Now, enter the Gerudo Sanctum through the cave door at the ruins that was previously blocked (just west of Cryptic Cavern). A cutscene plays as Zelda stands at the entrance: Tri uses his power to create a portal into the rift inside the Sanctum. Jump into the rift… it’s dungeon time!
Gerudo Sanctum – Dungeon Walkthrough
Welcome to the Gerudo Sanctum, the main dungeon of Chapter 2. This ancient underground complex is now frozen in a “stilled” state by the rift’s magic. You’ll encounter windy corridors, moving floor tiles, and statue puzzles. The goal is to navigate to the boss Mogryph’s lair, collecting the Bow of Might and the Big Key along the way, and solve the rift’s curse.
Dungeon Overview: Gerudo Sanctum features wind-based puzzles (like in the Cryptic Cavern), several new Object Echoes (four animal statues), and a mirror match with a familiar foe (Link’s Echo) as a mini-boss. You’ll ultimately need to find two special statue echoes (Elephant and Hawk) to open the boss room. Keep an eye out for chests containing a Dungeon Map and other goodies. Activate any Waypoints you find in here – they allow warping within the dungeon and back outside, which is crucial for a mid-dungeon sequence. If you ever need to leave to restock, you can return via those waypoints.
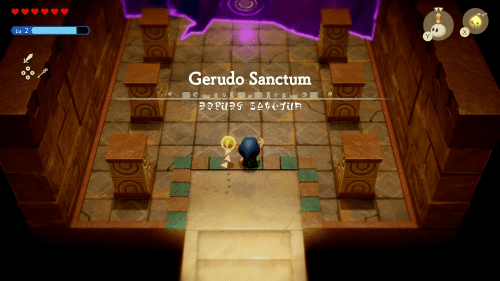
Entering the Gerudo Sanctum – Zelda and Tri step into the rift within the sacred Gerudo cave. The dungeon’s title card appears as you cross the threshold, signaling the challenges ahead. Be prepared for puzzles involving wind gusts and ancient statues.
Entry Hall & Wind Puzzles
Entry Chamber: Upon entering, Zelda immediately encounters a familiar figure – a phantom-like Link Echo dashes ahead, disappearing up a ladder. This is likely a remnant of Link guiding you. Follow Link’s Echo by climbing the ladder in front of you. This leads to a sub-level filled with embedded wind cannons on the walls.
Sub-level Wind Cannon Puzzle: In this narrow windy hall, powerful gusts blow from multiple directions. Start on the right side:
- Summon a Boulder Echo and place it to the right to block the first wind cannon blasting from the wall(you can see the wind streams; block the one nearest you first).
- Climb up the ledges on the far right wall that are now safe behind the boulder.
- From the top ledge, drop down to the left, landing above a second wind cannon. There’s a movable real boulder here; push this boulder to the left so that it rolls in front of the third wind cannon.
- By blocking these vents in sequence, you neutralize the winds. Now you can climb the ladder on the left side out of this sub-level.
Activate Waypoint: You emerge in a room with tall pillars and gentle light. There is a glowing Waypoint here – activate it (this is the Gerudo Sanctum waypoint). This will allow quick return if you leave or warp out to heal.
Flying Tiles Trap: Head west (left) from the waypoint room into the next chamber. As you enter, the floor comes alive with Flying Tiles – enchanted tiles that lift up and fly at you! Quickly summon a Boulder Echo (or use your shield if needed) to block the flying tiles. Take cover behind the boulder as the tiles smash into it. After a barrage of tiles, they will cease. Once all attacking tiles are destroyed, a chest appears. Open it to obtain 20 Rupees. With the trap cleared, return to the previous room (the waypoint room).(If you didn’t earlier, examining a flying tile here teaches you the Flying Tile Echo, which you likely already got outside. In case you didn’t, this room is where you can learn it.)
Timed Switch Gate: Now go to the east side of the waypoint room. There’s a lever on the wall to the right. Grab the lever and pull it down as far as it goes. This opens a blue gate to the east, but it’s on a timer – the gate will begin to close once you let go. Immediately run through the gate to the next area before it shuts.
Stone Door Puzzle: In this next chamber, you’ll find a massive stone door blocking the path north. Use Bind on the large stone door and pull it open towards you. It will slide away, revealing a new passage. Proceed into the room beyond. (This might resemble a stone slab or a giant face door – but pulling it does the trick.)
Small Key Chest: In the newly opened north room, there’s an awaiting treasure chest on a pedestal. Open it to obtain another Small Key. This will unlock a door in the first room. We’ve hit a dead-end going forward for now, so it’s time to backtrack to the very first chamber.
- Go back south to the waypoint room, then down the ladder to the wind sub-level, and drop into the entry hall (or simply warp to the Sanctum waypoint and exit to entrance if faster). In the entry hall, use the Small Key to unlock the northern door that was locked when you first came in. Now you can progress deeper into the Sanctum.
Echoes of the Four Statues
Passing through the now-unlocked north door, you enter a series of rooms themed around animal statues. Tri’s abilities will let you copy these statues as echoes, which is critical for solving the dungeon’s main puzzle.
Snake Statue Echo: In the first room past the locked door, you’ll see a statue of a coiled Snake. Use the Tri Rod on this statue to obtain the Snake Statue Echo. This is one of four animal statue echoes here. No puzzle yet – just grab the echo. Climb the stairs and head north to the next room.
Mothula Battle (Mothula Echo): Entering the next chamber, two giant moth-like monsters called Mothulas attack from the ceiling. They shoot projectiles and flutter around. Immediately summon a swarm of Keese Echoes or use Boomerang Boarblin echoes to hit the Mothulas at range. Two well-aimed ranged attacks will knock them down. Finish them with your sword. Collect the dropped Mothula Echo (a new enemy echo). The Mothula Echo can summon a small moth that might distract enemies (not huge, but it’s progress for completion).
Conveyor Belt Puzzle: Continue west into the next room, then south. Here you encounter moving conveyor belts on the floor, carrying Zelda towards hazards or away from where you need to go. Step carefully onto the conveyor, moving against its direction. Quickly stack an Old Bed Echo or two on the conveyor so you can jump over to the stable platform on the other side. Essentially, you want to avoid being carried into spikes or back to the start:
- Ride the first conveyor, then hop off before the end.
- In the middle area, do the same for a second conveyor if present – use a quick jump (the Trampoline Echo could also help as a springboard). With precise timing, you’ll reach the far side. Climb down the ladder into the next area.
Hidden Chest (Holmill Echo and Golden Egg): In this lower room, you’ll see a chest on an isolated eastern ledge. There’s soft ground here. Summon a Holmill Echo to dig and create a hole/tunnel that lets you reach that chest (or use the Holmill to push up the chest). Open it to obtain another Golden Egg. Then drop down. Climb the ladder on the left side of this room to get back up to the previous floor.
Central Chamber – Waypoint & Statue Puzzle Hint: You arrive in a central chamber with an important stone tablet. First, activate the Waypoint here and note its location (this is deeper in the dungeon). This chamber has a sealed door to the north with two empty pedestals flanking it. Examine the stone tablet: it gives a clue about two “desired tributes” needed to open the door. In other words, you must find two specific statue echoes and place them on those pedestals. The clue on the tablet might be a riddle or symbols indicating which statues. (We’ll decipher it soon – likely referencing two particular animals.) At this point, Zelda doesn’t have all necessary statue echoes yet, so we need to explore further.There’s a large stone door on the right (east) side of this room as well. Bind and pull that door opento reveal an eastern passage. Go through to continue exploring.
Sand & Wind Room (Blue Elephant Clue): In the next room, you’ll see more sand piles and wind cannons. Use the Wind Cannon Echo to blast away the sand mounds. Underneath one, you’ll find a chest – open it for 10× Rock Salt. There’s also another stone tablet here. Read it to get another clue, this one explicitly mentioning a “blue elephant”. This likely means one of the tributes needed is an Elephant Statue (and perhaps colored blue in the inscription). So Elephant statue is one key; keep that in mind.This room otherwise seems complete. Head west back through two rooms to the central chamber, then further west past it (effectively going to rooms on the left side of the dungeon).
Poe Battle & Dungeon Map: Go west two rooms from the central chamber. You’ll enter a dark room where a ghostly Poe appears. The Poe floats and throws flames. Lock on and strike it quickly, or use the Bow of Light if you had one (Zelda currently doesn’t, but magic attacks work too). After defeating the Poe, you’ll gain the Poe Echo for summoning your own Poe ally. A large chest materializes. Open it to obtain the Dungeon Map. Now you can see the layout of Gerudo Sanctum, which may reveal unopened treasure chests and unexplored rooms – useful for tracking progress.Having cleared this section, backtrack south to the central chamber (where the two statue pedestals and waypoint are). We’ve hit most accessible areas except one: above. The only way up appears to be via an outside route.
Exit to Sanctum Roof: In the central chamber with the locked north door, there is a doorway leading outside (south). Step out, and you’ll find yourself back outside the Sanctum, on a ledge that was previously unreachable from the ground. This is effectively the roof of the Gerudo Sanctum structure.Outside, take a moment to breathe the fresh air (and perhaps save your game). Now, explore the Sanctum exterior for collectibles:
Look immediately to your right upon exiting: there’s a high doorway on an upper ledge that was hard to reach from outside. Now from this interior ledge, stack Old Bed Echoes to climb into that door on the right. It leads to a small hidden room with some pots and rupees. Collect the green and blue rupees inside and hop back out.
Follow the path on the Sanctum roof to the southwest. In a sandy patch, you’ll find a buried chest. Dig it up or reveal it and open it to get 20 Rupees.
Move north along the roof. There’s a tall stone pillar mechanism here. Use Bind on the pillar and pull/rotate it until a ladder attached to it lines up with the lower ledge. Once aligned, climb up the ladder to reach the top of the pillar. There’s a chest up here containing 50 Rupees.
From this vantage, head east across the roof to another section of the Sanctum’s roof. Activate the Waypoint found here (it should be a second one on the roof)for convenience. Clear away the sand piles with a Wind Cannon Echo. Open the chest that was buried in the south of this roof section to obtain a Monster Stone(an item possibly used for side quests/upgrades).
On the eastern edge of this roof, there’s another climbable wall. Climb down the wall on the east to a small ledge, then use echoes to reach a higher platform to the northeast. (You might use a Platboom bounce or stack objects to get up there.) At the end of this path, you’ll find another stone pillar with a ladder. Bind and pull this pillar until its ladder aligns with the lower level. Climb up. Here you will see another animal statue: use the Tri Rod on the hawk-like statue to acquire the Hawk Statue Echo. This is the second “tribute” statue we need (remember the clue of a blue hawk on the tablet? Actually the clue said blue elephant, hawk was perhaps indicated elsewhere – either way, Hawk statue is clearly one of them we need to open the door).
Having obtained the Hawk Statue Echo, drop back down and make your way back to the Sanctum interior. The easiest way is to head south and re-enter the dungeon through the entrance you originally came in, or warp to one of the interior waypoints (e.g., central chamber waypoint) now that you’ve unlocked them.
Return to Central Chamber (Statue Door Puzzle):
Back inside the Sanctum, you should have by now:
- Snake Statue Echo (snake),
- Hawk Statue Echo (hawk),
- We saw clues for Elephant, but we haven’t gotten Elephant Statue Echo yet,
- Cat and potentially one more statue remain inside.
From the central chamber, now go north by opening the door with the two tributes (we might still need the Elephant though). Actually, we can’t open it until we have placed Elephant and Hawk, per clue:
- The stone tablet clues likely pointed to Elephant and Hawk as the required tributes (blue elephant clue, and maybe the first tablet hinted at hawk? If not, our exploration indicated the needed ones). So we still need the Elephant Statue Echo, which likely lies deeper inside.
Let’s resume inside where we left off: we came back in after getting Hawk. Now head to the earlier interior waypoint (the one after Link’s Echo fight which we haven’t done yet actually – correct, we haven’t faced the mini-boss). Actually, we have not encountered the Bow of Might mini-boss yet, which likely lies beyond another path.
Remember that locked blue gate we passed with a lever? We did that. The only area left unexplored inside is likely north of the central chamber which is locked by the statue puzzle, and possibly upper floors accessible from the Sanctum main hall now that sand is drained (which might have allowed Link’s Echo to appear? Wait, we saw Link’s Echo at entrance and followed, then did puzzles, but we haven’t explicitly fought it yet, so likely mini-boss is still to come).
Perhaps now that we have Hawk statue, we can progress another way: Actually, recall in the entry after draining sand, they said “enter Gerudo Sanctum” and then: We might have missed a branch: The entry hall had an upper path which we did, and a right path to lever which we did, then we backtracked after small key. Alternatively, maybe we were meant to continue deeper (north) after unlocking that door with tributes. Possibly Link’s Echo mini-boss is behind that north door.
It appears we need to return inside and progress to get Cat statue and fight Link Echo. Possibly now that we have Hawk, we can open that locked door? But we still need Elephant presumably to place with Hawk.
Re-entering Sanctum & Upper Level
Re-entry after Roof (Lever & Cat Statue):
Back in the dungeon interior, perhaps on an upper floor (the one we re-entered via ladder aligning), you find another lever mechanism controlling a heavy door to the north. Pull the lever and sprint through the door before it closes.
In the next room, clear out any sand piles with Wind Cannon and defeat all the enemies that appear (likely more Gibdos or beetles). With the room safe, use the Tri Rod on the feline statue present here to obtain the Cat Statue Echo. This is the third animal statue echo (Snake, Hawk, Cat, and presumably Elephant to go).
A door opens to the north; activate the Waypoint in the following room (if any).
Mini-Boss – Link’s Echo (Bow of Might):
Proceed north to trigger the mini-boss fight. Zelda encounters Link’s Echo (Bow form) in a spacious chamber. This shadowy duplicate of Link wields a bow and tries to keep distance.
Strategy:
- Link’s Echo will fire arrows from afar and dodge away if you approach. To hit him, use ranged attacks. Summon Keese Echoes or Boomerang Boarblin Echoes to harass him from a distance. This will interrupt his shooting and deal damage.
- When you manage to get close, switch to Swordfighter Form (melee stance) and land a combo on him.
- At about half health, Link’s Echo glows purple and splits into three illusionary copies, all firing multiple arrows at once in volleys. Keep moving to avoid these arrow barrages (run in circles or use sidesteps). The copies are decoys; focus attacks on the real Link’s Echo (watch the one that takes actual damage numbers or use area attacks to hit all).
- Continue using ranged echoes and closing in for melee strikes when possible. With patience, the Link Echo will fall.
- Reward: Upon defeat, the phantom drops the Bow of Might! This powerful bow becomes a new weapon for Zelda when in Swordfighter Form. Now Zelda can shoot arrows (with Might energy) just like Link – great for hitting switches or exploiting enemy weaknesses from afar. The Bow of Might can also be upgraded later.
After the fight, a chest might appear or Zelda automatically gains the item. Tri and Zelda celebrate this victory as Tri’s help was crucial. The path forward is now clear.
Gaining the Elephant Statue & Boss Key
With the mini-boss defeated, proceed through the door that opens. We have one statue echo left to obtain (Elephant) and the Big Key to find.
Upper Sanctum – Elephant Statue Echo: Climb the ladder at the north end of the mini-boss arena. In the next small room, you’ll see writhing rift goo blocking part of the area. Destroy the purple rift goo with your sword (or an echo). Continue upward and climb another ladder to reach a higher chamber. Activate the Waypoint here (likely the top floor waypoint). This room has flames shooting across the path. Summon Boulder Echoes and hold them up as moving shields to protect yourself from the flame jets as you pass. Move carefully to avoid taking fire damage. On the north side of the flames, you’ll find the last statue: use the Tri Rod on the large Elephant Statue to gain the Elephant Statue Echo. Now you have all four statue echoes (Snake, Hawk, Cat, Elephant). A chest here contains a Small Key – pick it up.
Lighting the Torches (Hawk Clue): Use the Sanctum roof waypoint to warp back outside, then enter via the southeast entrance (or if there’s a locked door inside you needed the key for, likely in some hallway near). Actually, the guide says: After Elephant statue: “Warp back to the roof of the Sanctum and reenter through the entrance in the southeast. Unlock door, head east, pull stone door north, head north, stack bed and light 3 torches, read tablet clue (Hawk)”. Let’s parse that:
- They warp to roof and enter via a different door (maybe lower southeast door that required key).
- Use Small Key to unlock a door on right side we haven’t opened yet (the text [12†L620-L623] mentions unlocking a door).
- Then in that east area, bind and pull a stone door north to open path.
- Then a room with three unlit torches: stack bed echoes to reach and light all 3 torches. Lighting them makes a stone tablet appear (or become readable) with the clue “Hawk”. This clue confirms the Hawk Statue’s importance (which we already got).
- After reading tablet, warp back to roof, dig a small sand spot near roof waypoint with Holmill to get a chest of 50 Rupees (optional loot).
We will streamline: We already deduced Elephant & Hawk are needed; we have both. So we can solve the statue puzzle now.
Solve Statue Pedestal Puzzle: Return to the central chamber with the two pedestals (the one that had the sealed north door). Now that we have Elephant Statue Echo and Hawk Statue Echo, stand on the marked spots and place an Elephant statue on the left pedestal and a Hawk statue on the right pedestal. (The tablet clue mentioned “blue elephant” for left and the other clue likely pointed to hawk for the right; placing them incorrectly does nothing, but placing correctly triggers the mechanism.) The door between them unlocks with a rumble. You have now opened the path to the inner sanctum and boss.
Draining the Last Sand & Revealing the Big Key: Go through the door you just opened. In this next area, there is a giant pile of sand in the center with a large plug similar to the one in Cryptic Cavern. Use Bind to pull out the plug, draining the remaining sand from this chamber. As the sand drains, it reveals a mechanism – twist/rotate the central platform (interact with it or push it). Doing so causes a giant ornate chest to rise from the floor. This is the Big Key Chest. Open it to obtain the Big Key (Boss Key)for Gerudo Sanctum. This massive key will open the door to Mogryph’s lair.
Enter the Boss Door: Climb the stairs (or go up a newly accessible ladder) to reach the boss door on an upper level. Use the Big Key to unlock the boss door. Heal up at the nearby waypoint or fairies if any (there might be pots with hearts in the room). When you’re ready, head north through the boss door. A green warp portal is on the floor – stepping on it will take you into the boss arena. Prepare for a tough fight and step into the portal when ready.
Boss Fight: Mogryph – The Sand Colossus
The boss of Gerudo Sanctum is Mogryph, a massive sand-dwelling creature resembling a giant flying mole with draconic features. The battle takes place in an arena filled with sand and a few sturdy stone statues scattered about (these statues can provide cover). Mogryph has two phases:
Phase 1: Burrower of the Sands
Mogryph circles underground, its fin/spines visible in the sand as it moves around you. It will periodically emerge to attack:
Sand Swipe: Mogryph surfaces partway and swipes its claw, creating a wide sand wave attack. If this connects, it hurts. Dodge to the side or take cover behind a stone statue to avoid the sand wave.
Charging Dash: Sometimes Mogryph fully emerges and charges straight toward Zelda. This is quick but telegraphed by the line it burrows before the charge. Avoid standing directly in its path. The key opportunity is here: when Mogryph does a charging dash, quickly place any large Animal Statue Echo (like the Elephant or Snake Statue) right in its path. Mogryph will crash into the statue, stunning itself!The impact leaves it vulnerable.
Attack when stunned: The moment Mogryph is dazed (stars circling its head or slumped over), run up and unleash Swordfighter Form combos on its body or face. Use your most powerful attacks (if you have full energy, a spinning slash or charged attack works great). You’ll get a few seconds of free hits.
Repeat this process: stay safe until it charges, bait it into hitting a statue you summon, then punish it. After about two successful stuns and combos, Mogryph will roar and transition to Phase 2.
Phase 2: Ruler of the Sandstorm
Mogryph grows a pair of wings and takes to the air, altering its attack pattern:
Sandstorms: While flying, Mogryph conjures swirling sand tornadoes around the arena that move outward. Keep moving to dodge these sandstorms, as they can corner you. Use the gaps between them to avoid damage.
Quicksand Pits: Mogryph’s magic creates patches of quicksand on the arena floor. Avoid stepping in the darker, swirling sand areas – they will slow you down or trap you momentarily. Stay on solid ground.
Shadow Dive Attack: Watch Mogryph’s shadow when it flies up high. It may attempt a drop attack from above. When you see Mogryph’s shadow stop above you, quickly run out of the way to avoid it crashing down.
Mogryph will then burrow under the sand again despite its wings (it mixes flying and burrowing). Essentially, when it’s not airborne, it repeats Phase 1 attacks.
Use Phase 1 Tactics Again: When Mogryph submerges and charges in Phase 2, you should repeat the Phase 1 strategy– lure it into smashing into a statue (summon one in front of its path) to stun it. The wings do not protect it from being dazed by a collision.
Each time it gets stunned, hit it hard. You may need to do this a couple more times. Watch out for the new hazards while executing the plan; use statues as cover for sandstorms if needed.
Advanced Tip: During Phase 2, you can also use your new Bow of Might to shoot Mogryph when it’s flying. Aim for its body when it hovers to score some damage between stuns. This can slightly speed up the fight, but the main way to damage remains stunning it.
After roughly two more statue collisions and subsequent beatdowns, Mogryph should weaken and finally collapse. Congratulations – the giant sand monster is defeated!
Defeating Mogryph triggers the rift’s closure. In a cutscene, Tri’s tiny friend creatures (the ones you rescued earlier in the Eastern Desert Rift) appear and help to mend the gigantic rift that was engulfing Gerudo Desert. The dark energy clears, and sunlight returns to the skies. Zelda has saved the Gerudo region!
Boss Rewards:
Heart Container: Mogryph leaves behind a full Heart Container. Don’t forget to pick it up before you go. This permanently increases Zelda’s maximum hearts by one, giving you more survivability.
Tri’s Power Upgrade: With the rift closed, Tri absorbs the energy and levels up to Level 3. This grants Zelda a new ability: you can now create echoes from a distance by holding down the Y button longer before releasing. Essentially, your echo placement range is greatly increased, which will be very useful in later puzzles and combat (you won’t always need to stand right next to where you want an echo).
Might Crystals: Tri also hands Zelda 5 Might Crystals as a token of gratitude (your count should be around 28/150 now). You’ve gathered quite a few this chapter, so consider returning to Lueburry in Suthorn Village soon to upgrade your Sword of Might and energy gauge.
A green warp portal appears, which will take you out of the dungeon. Step on it when you’re ready to leave.
Chapter Conclusion and Next Steps
Back outside, Zelda reunites with Chief Seera, Dohna, and Facette in Gerudo Town (or at the Sanctum entrance). The Gerudo are grateful for lifting the curse on their desert. A short cutscene might play with Seera apologizing for doubting you and thanking you for saving her people. Facette, now impressed, acknowledges Zelda’s wisdom and courage. They mention that with the Gerudo Desert rift sealed, Zelda should continue her quest to close the other rifts across Hyrule to ultimately rescue Link and restore balance.
Tri cheerfully notes his new power, and suggests the next big rift to tackle is marked on your map: the Jabul Waters
You have permission to leave Gerudo Desert and pursue the next objective.
Before moving on, ensure you’ve collected all remaining pickups in Gerudo Desert:
- If you missed any Heart Pieces or Stamps, you can grab them now (you should have Heart Containers from pieces #5–#8, and Stamp Card with at least 3–4 stamps).
- You now have the Survey Scope and Bow of Might, which can help in finding secrets (scope) and solving puzzles/shooting switches (bow) in previous areas. Feel free to backtrack to earlier regions (using waypoints) to collect things you couldn’t before.
- Talk to the Stamp Guy if you filled your first Stamp Card (5 stamps) – he’ll give you a reward (likely a Piece of Heart or a wallet upgrade).
- Visit Lueburry in Suthorn Village to use those Might Crystals for upgrades: by now you can probably afford to upgrade the Sword of Might once (10 crystals) and maybe your energy gauge (5 crystals), which will make future combat easier.
- Gerudo Town’s shop now might sell new items after the chapter, or you can stock up on potions for the next area. Also, consider playing the Mango mini-game more if you want rupees – with Tri’s Level 3 power, making echoes at range can improve your efficiency in such mini-games.
Finally, when you’re ready, set out for Chapter 3: Jabul Waters, where new aquatic challenges and the next rift await. Use your map and Tri’s guidance to head to the water region east of Hyrule Field. Good luck!
Chapter 2 Complete – Gerudo Desert is now peaceful. You’ve mastered the desert’s echoes and earned the Gerudo’s respect. With new gear and Tri’s enhanced powers, you’re well-prepared for the adventures ahead. Enjoy a brief respite, then continue your quest to mend the remaining rifts in Hyrule!