Animal Companions and Spring
Maku Tree Update: Return to Horon Village and talk to the Maku Tree again.
Meeting an Animal Friend: The path you take now determines which Animal Companion you get semi-permanently (unless you find the other Flutes later).
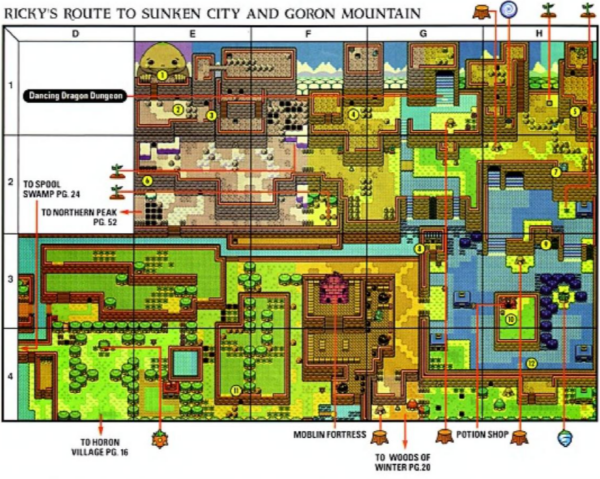
- Ricky (Kangaroo): Head east from Horon Village, then north towards the region called Holodrum Plain/North Horon Plain. If you enter this area without having acquired Dimitri’s or Moosh’s Flute first (see below), you’ll find Ricky being bullied by Blaino. Beat Blaino (boxing match – dodge and punch). Ricky gives you Ricky’s Flute and helps you jump up cliffs and punch things.
- Dimitri (Dodongo): Head towards Spool Swamp (south of Horon Village, then east). If you go to Sunken City first (before meeting Ricky or Moosh) and buy Dimitri’s Flute from the trio of kids playing near the water for 80 Rupees, Dimitri will appear later when needed. He can swim up waterfalls and eat enemies.
- Moosh (Flying Bear): Head towards Spool Swamp. If you happen to get Moosh’s Flute first (usually by winning it from the Horon Village Shop’s special basement game after buying certain items, or sometimes found elsewhere depending on game secrets), Moosh will appear near Spool Swamp. He can fly/hover for short distances and ground pound.
- Default: If you don’t go out of your way to get Dimitri’s or Moosh’s Flute, you will almost certainly meet Ricky first when heading towards the next required area. This walkthrough will assume you get Ricky by default unless you actively sought out another flute.
Path to Spool Swamp (with Ricky): From Horon Village, go east, then north onto the plains. Find Ricky. After rescuing him, hop in his pouch. He can jump up the cliff nearby. Head generally east, punching through bushes and hopping small cliffs. Follow the path towards the swampy area to the southeast.
Spool Swamp: Navigate the swamp. You need to find the Floodgate Key. It’s usually held by a Ghini (ghost) in the central/eastern part of the swamp. Defeat the Ghini.
Floodgate Control: Find the floodgate mechanism (looks like a keyhole on a device) in the southwest part of the swamp. Use the Floodgate Key. This drains some water, allowing access to new areas.
Spring Power: Find the portal to Subrosia within Spool Swamp (usually accessible after draining the water). Enter Subrosia. Navigate to the Temple of Seasons again. Go to the top-left room (Spring) and get the Power of Spring.
Return and Use Spring: Exit Subrosia via the vortex. Go back to the tree stump near the entrance to Snake’s Remains (where you used Winter before). Stand on it and use the Rod of Seasons to change the season to Spring.
Access Dungeon 3: Go south from the stump, then east. The flowers have bloomed due to Spring, allowing you to hop across the pit. Enter the Poison Moth’s Lair.
Dungeon 3: Poison Moth’s Lair

Entrance: Go north. Defeat the Moldorms. Go north again.
Key & Roc’s Feather: Go west. Defeat the enemies. Step on the button to make a bridge appear. Cross it. Go up the stairs. Navigate the side-scrolling area (avoid the Thwomps). Climb down the ladder. Open the chest to get the Roc’s Feather (L-1)! You can now jump one tile. Jump across the gap to the east and get the Small Key from the chest.
Compass Room: Jump back west. Go back up the ladder, through the side-scrolling area, down the stairs, and east twice (back to the second room). Go east. Defeat the Gels. Jump over the pit using Roc’s Feather. Open the chest for the Compass. Go north.
Locked Door: Use the Small Key on the locked door. Go north.
Dark Room & Map: This room is dark. Defeat the Keese (listen for them). A chest appears with the Dungeon Map. Go west.
Trampoline Puzzle: Push the bottom trampoline (“?”) block three times left, once up. Push the top trampoline block once left. Jump onto the bottom trampoline. It launches you over the barrier. Go north.
Miniboss: Omuai: You face three Omuai (giant shelled slugs). They shoot fireballs. Hit their soft bodies when exposed. Defeating them reveals a warp point and drops a fairy. Go east.
Key & Feather Jumps: Defeat the Moldorms. Jump across the moving platform using Roc’s Feather. Open the chest for a Small Key. Jump back. Go east.
Trampoline & Locked Door: Push the trampoline block three times up, four times right. Jump on it to cross the gap. Use the Small Key on the locked door. Go north.
Final Key: Defeat the Pols Voices and Gels. Push the bottom-left block left. A Small Key appears. Grab it. Go west.
Boss Key Room: Use the Small Key on the locked block. Jump onto the moving green platform. Ride it up. Open the chest for the Boss Key. Ride the platform back down. Go east, then north through the boss door.
Boss: Mothula: This giant moth flies around, shoots fireballs, and spawns baby moths. Jump to avoid its swooping attacks and the fire. Hit Mothula with your sword or Ember Seeds when you can. Focus on the main moth.
Reward: Grab the Heart Container. Go north and take the Essence of Nature – Bright Sun.