What’s up, Zelda fans! If you’re diving into Link’s Awakening (specifically the DX or Switch versions), you gotta check out the totally optional, but super fun, photo sidequest. A quirky photographer mouse pops up all over Koholint Island, ready to capture key moments (and some totally random ones) of Link’s adventure. These pics get stored in a photo album you can check out at his shop in Mabe Village.
There are 12 spots in the album, but 14 potential photos because the first one is a choice, and one involves… *ahem*, *borrowing*… from the shop. Some are missable, so pay attention if you’re aiming for 100%! Let’s break down how to score each shot:
Photo Guide Contents
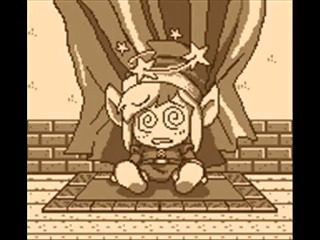
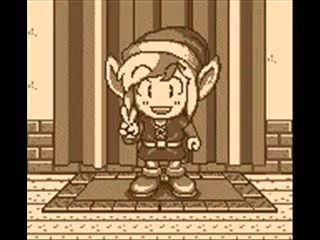
- The First Impression (Choice: “Here Stands A Brave Man” / “Game Over”)
- Link and Marin’s Seaside Stroll
- Heads Up!
- Say “Mushroom!” (Tarin’s Photobomb)
- Link Discovers Ulrira’s Secret!
- Link Plays With BowWow!
- Are You Proud of Yourself? (Theft Photo)
- Be More Careful Next Time!
- I Found Zora!
- I’ve Just Decided to Wait at Home
- I Was Very Afraid
- Close Call
1. The First Impression (Choose Wisely!)
Location: Camera Shop (South of Mabe Village)
How to Trigger: The first time you wander into the Photographer’s shop, he’ll offer to take your picture.
The Photos:
- “Here Stands A Brave Man”: Just say “Yes!” when he asks. You’ll get a nice shot of Link looking heroic (or trying to, anyway).
- “Game Over”: Feeling cheeky? Tell him “No.” He’ll snap a pic of Link looking totally bamboozled.
Heads Up: You can only grab ONE of these per playthrough, so pick the vibe you want for your album!


2. Link and Marin’s Seaside Stroll (…or “That’s Our Spot!”)
Location: Toronbo Shores (Southeast Cliff)
How to Trigger: After Tarin gets turned into a raccoon and you talk to Marin about the Walrus blocking the desert path, she’ll start following you. Instead of heading straight for the Walrus, take a detour with her down to the southeast corner of Toronbo Shores. Walk to the edge of the small cliff overlooking the ocean.
The Scene: Marin will comment on your walk, call it your “secret place,” and BAM! The photographer appears out of nowhere for the shot.
Heads Up: This is MISSABLE! You must do this before Marin sings to the Walrus. Once she leaves your side after that, you can’t trigger this photo op.

3. Heads Up! (Well, That Was Awkward)
Location: Mabe Village (Bottom of the Well)
How to Trigger: While Marin is still following you (same conditions as photo #2), jump down the well near the entrance to the Mysterious Woods.
The Scene: The photographer is somehow already down there waiting! Marin lands right on top of Link, and *click*, photo captured.
Heads Up: Also MISSABLE! Gotta do it while Marin is your partner-in-crime.

4. Say “Mushroom!” (Tarin’s Photobomb)
Location: Mabe Village (Near the Weathercock)
How to Trigger: Yep, still need Marin following you! Go stand together in front of the big Flying Rooster weathercock in the center of town.
The Scene: Just as you’re posing, Tarin runs in and squeezes between you for the photo. Classic Tarin.
Heads Up: You guessed it – MISSABLE! Do this before Marin stops following Link.

5. Link Discovers Ulrira’s Secret! (Peeping Link?)
Location: Mabe Village (Outside Old Man Ulrira’s House)
How to Trigger: Anytime you want, just walk up to the window on the right side of Old Man Ulrira’s house (the guy who only talks on the phone).
The Scene: Link peers inside, and the Photographer snaps a pic of Ulrira mid-call. Wonder what vital info he’s sharing? Probably how to use the save feature…
Heads Up: Not missable! Sneak a peek whenever.

6. Link Plays With BowWow! (Maybe Too Close…)
Location: Mabe Village (Outside Madam MeowMeow’s House)
How to Trigger: Go near the chain chomp, BowWow, chained outside Madam MeowMeow’s place. The Photographer is already there.
The Scene: He’ll ask you to get closer… and closer… BowWow gets progressively angrier until he lunges right as the flash goes off! Worth it for the shot? You decide.
Heads Up: Not missable, just requires a bit of bravery (or foolishness).

7. Are You Proud of Yourself? (The Five-Finger Discount)
Location: Town Tool Shop (Mabe Village)
How to Trigger: Steal an item from the shop. You gotta pick it up, walk around behind the shopkeeper, and dash out the door before he turns around.
The Scene: The Photographer catches you red-handed (or maybe just screenshot-handed) right after your daring escape.
Heads Up: This photo comes with consequences! You’ll be forever labeled THIEF by everyone in town, and if you ever go back into the shop, the Shopkeeper will zap you dead instantly. Choose wisely if you want this infamous pic. (This photo technically replaces the “Here Stands A Brave Man” / “Game Over” photo in the album if you get it *before* meeting the photographer, but usually, people get it later).

8. Be More Careful Next Time! (Fishing Folly)
Location: Martha’s Bay (Under the Bridge)
How to Trigger: You need the Fishing Hook (part of the trading sequence). Return it to the Fisherman under the bridge in Martha’s Bay. After giving it back, talk to him again.
The Scene: The Photographer shows up *swimming* under the bridge (don’t ask how). The Fisherman tries to make a cast, accidentally hooks the Photographer, asks for a picture of the moment, and Link bumps the poor mouse into the water! Chaos captured.
Heads Up: Requires progressing the trading sequence to get the hook back to the fisherman.

9. I Found Zora! (Secret Sightseeing)
Location: Animal Village (Northeast House)
How to Trigger: You absolutely need the Magnifying Lens (the final item from the trading sequence) for this one. Head to the house in the top-right corner of Animal Village.
The Scene: With the lens, you can see a Zora chilling in the pool inside the seemingly empty house. The Photographer pops in to document your discovery. The Zora will also give you a hint about another secret!
Heads Up: Requires completing the trading sequence.

10. I’ve Just Decided to Wait at Home (Princely Procrastination)
Location: Kanalet Castle Gate (Outside)
How to Trigger: This happens while you’re collecting the 5 Golden Leaves to get into Kanalet Castle proper. Walk up to the closed front gate of Kanalet Castle.
The Scene: The Photographer is hanging out there. Richard (the prince living in the villa with all the frogs) shows up, asks how the leaf hunt is going, and suggests a photo together. He then hilariously admits he’s just going to wait at home instead of being brave.
Heads Up: MISSABLE! You must trigger this photo before you open the Kanalet Castle gate using the switch inside the castle grounds. Once that gate is open, Richard won’t appear here anymore.

11. I Was Very Afraid (Ghostly Goodbye)
Location: Koholint Prairie (The Ghost’s Grave)
How to Trigger: First, you need to encounter the Ghost (usually follows you out of the Catfish’s Maw dungeon), take it to its house near Toronbo Shores, and then lead it to its grave (located near the Witch’s Hut, accessible via Roc’s Feather). After the ghost is peacefully at rest, return to the gravestone.
The Scene: Visit the grave again, and the Photographer will appear to take a picture, commemorating your spectral friend’s final resting place.
Heads Up: You need to complete the Ghost’s mini-quest first.

12. Close Call (Bridge Blunder)
Location: Tal Tal Mountain Range (Wooden Bridge)
How to Trigger: Simply walk across the long wooden bridge high up in the Tal Tal Mountain Range (the one leading towards the west side, near some caves).
The Scene: The Photographer tries to get a dramatic shot of Link crossing the rickety bridge, but he backs up too far, tumbles off the cliff, and snaps the picture while falling! Don’t worry, he’s fine… probably. He always lands on his feet (or lens).
Heads Up: Just gotta cross the bridge!

And there you have it – your complete guide to becoming Koholint’s most photographed hero! It adds a fun little collectible hunt to your quest to wake the Wind Fish. Go fill up that photo album! Good luck!


