


Throughout your adventures across the Great Sea in Phantom Hourglass, you’ll stumble upon mysterious, shimmering Courage Gems. These aren’t just shiny trinkets; they hold the key to restoring the lost power of your fairy companion, Ciela. Finding these gems requires keen observation, puzzle-solving skills, and sometimes revisiting familiar shores with newfound abilities.
Your ultimate goal is Spirit Island, a hidden sanctuary located just south of Molida Island. Once you’ve gathered 10 Courage Gems, make your way to the spring on this island. Offering the gems there will partially restore Ciela’s strength, a significant boost for your journey.
But the true challenge lies in finding all 20 Courage Gems. Bring the complete set back to the spring on Spirit Island, and you’ll witness Ciela’s power fully awaken, unlocking her ultimate potential!
Table of Contents
- Gem #1: Spirit Island’s Welcome Gift
- Gem #2: Beedle’s Secret Stash
- Gem #3: Gusty Discovery
- Gem #4: Riding the Wind Currents
- Gem #5: Courageous Cracking
- Gem #6: Mercay’s Boomerang Trick
- Gem #7: Phantom’s Path
- Gem #8: Pirate Repellent
- Gem #9: Dee Ess Island’s Secret Spot
- Gem #10: Eye Brute Challenge
- Gem #11: A Goron’s Gratitude (By Mail!)
- Gem #12: Goron Island Grapple
- Gem #13: Ember Isle Excursion
- Gem #14: Molida’s Tightrope Walk
- Gem #15: Bannan Island Bonus
- Gem #16: Uncharted Cave Revisited
- Gem #17: Ocean King’s Eye Switch
- Gem #18: Maze Runner’s Reward
- Gem #19: Drained Ruins Discovery
- Gem #20: Mutoh’s Hidden Corner
Here’s a guide to tracking down every last Courage Gem, listed roughly in the order you might encounter them:
1. Spirit Island’s Welcome Gift
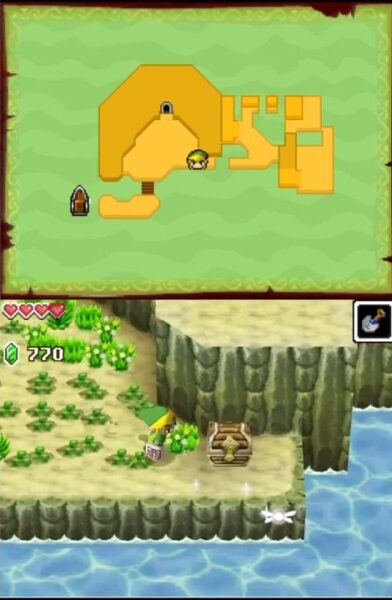
Location: Spirit Island
Requirement: Obtain the Cannon for your ship.
Details: Fittingly, the first gem is found right where you need to bring them. Upon your initial arrival at Spirit Island (after getting the cannon), look near the dock. An easy-to-spot treasure chest holds your first Courage Gem.
2. Beedle’s Secret Stash

Location: Masked Beedle’s Ship Shop (Roaming the Seas)
Requirement: 500 Rupees and specific timing.
Details: This one requires planning. The elusive Masked Beedle’s Ship Shop only appears under specific conditions based on your DS’s internal clock:
- Weekdays (Mon-Fri): Between 10:00 PM and Midnight.
- Weekends (Sat-Sun): Between 10:00 AM and Noon.
Find his distinctively masked ship during these hours, board it, and Beedle will offer you a Courage Gem for a hefty 500 Rupees.
3. Gusty Discovery
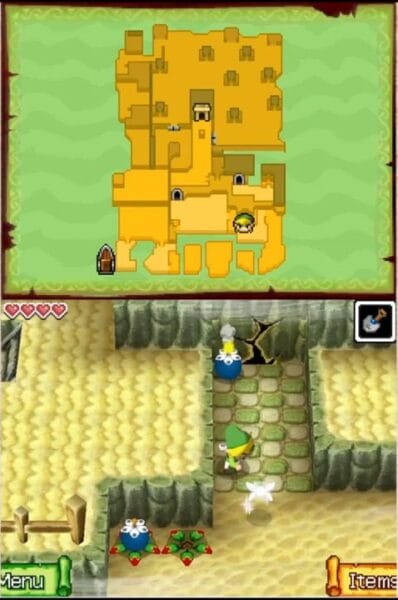
Location: Isle of Gust
Requirement: Reach the Isle of Gust.
Details: As you navigate the wind-swept eastern side of the Isle of Gust, you’ll see a sign warning of strong winds. Before braving that path, look for some steps leading down nearby. Spot a cracked wall close by? Use the adjacent Bomb Flower to blast it open and claim the Courage Gem waiting inside the hidden alcove.
4. Riding the Wind Currents
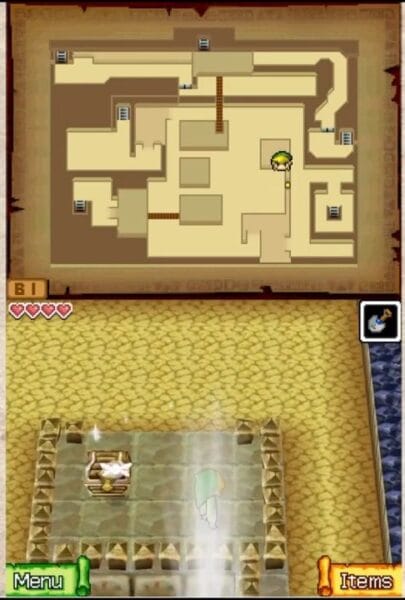
Location: Temple of Wind (Floor B1)
Requirement: Reach the Temple of Wind.
Details: Deep within the Temple of Wind, on floor B1, you’ll find a room with a vertical series of four wind gusts along its southern edge. Skillfully ride these currents across the gap to reach a ledge holding a treasure chest. Your reward is another Courage Gem.
5. Courageous Cracking

Location: Temple of Courage
Requirement: Reach the end of the Temple of Courage.
Details: In the final chamber of the Temple of Courage, right before the steps leading up to the boss encounter, hold your ascent. Circle around behind the main staircase. You’ll discover a suspicious cracked wall. A well-placed Bomb reveals a secret room containing a chest with a Courage Gem.
6. Mercay’s Boomerang Trick

Location: Mercay Island (Bomb Cavern)
Requirement: Acquire the Bow and Arrow (though the Boomerang is used here).
Details: On Mercay Island, explore the optional Bomb Caverns that eventually lead to Freedle’s place in the northeast. In the second cavern, as you cross the long wooden bridge spanning a chasm, equip your Boomerang. Aim it southwards, off the edge of the screen. There’s a hidden crystal switch out there! Hitting it will make a treasure chest appear back on the bridge, holding your gem.
7. Phantom’s Path

Location: Temple of the Ocean King (Floor B8)
Requirement: Complete the Ghost Ship segment.
Details: Upon reaching Floor B8 in the Temple of the Ocean King, you’ll find pedestals for the Triangle and Circle Crystals in the northern section (Circle west of the chasm, Triangle east). Place both crystals correctly, and a chest materializes seemingly in mid-air over the abyss. Wait for the nearby patrolling Phantom to move eastwards, then make a daring dash! There’s an invisible pathway leading directly to the chest. Snag the Courage Gem quickly!
8. Pirate Repellent

Location: On Linebeck’s Ship (Southeast Quadrant)
Requirement: Reach the Southeast Quadrant of the World Map.
Details: Once you gain access to the Southeast Quadrant, you’ll start encountering larger, more aggressive Pirate Ships. Sail right up to one and brace for an ambush! Defeat all the Miniblins that swarm onto Linebeck’s deck. As thanks for fending off the attackers, Linebeck himself will reward you with a Courage Gem.
9. Dee Ess Island’s Secret Spot

Location: Dee Ess Island
Requirement: Reach the Southeast Quadrant, possess the Shovel.
Details: This clever puzzle plays on the name and shape of the island, resembling a Nintendo DS. On the west side, strike a small statue. It cryptically mentions something buried “under the lower screen’s Menu button.” Think about your DS console – the Menu button (often interchangeable with Start/Select functionality depending on context) is typically at the bottom-left of the lower screen area. Drop into the southern pit on the island and dig in the very bottom-left square of dirt. Unearth a Courage Gem!
10. Eye Brute Challenge
Location: Dee Ess Island
Requirement: Reach the Southeast Quadrant, possess the Bow and Arrow.
Details: Explore the northern end of Dee Ess Island and drop into the pit there. You’ll be confronted by two tough Eye Brutes. The trick is to shoot their single eye with an arrow to stun them, then rush in for sword strikes. Defeat both formidable foes, and a treasure chest containing a Courage Gem will appear as your reward.
11. A Goron’s Gratitude (By Mail!)

Location: Delivered via Postman
Requirement: Complete the Goron Temple.
Details: Sometime after conquering the Goron Temple, check your mailbox. You might need to save, quit, and restart your game for the mail to trigger. You’ll receive a letter from Gongoron, mentioning a new part-time job. Tucked inside the letter as a thank-you gift is a Courage Gem!
12. Goron Island Grapple

Location: Goron Island
Requirement: Acquire the Grappling Hook.
Details: Return to Goron Island. Remember the Goron near the south-central bridge who was terrified of a Yellow Chuchu on a cliff? Head north from the bridge along the path to find him again. From his position, use your new Grappling Hook to latch onto the rock pillar across the gap. This allows you to reach a previously inaccessible platform where a chest holds a Courage Gem.
13. Ember Isle Excursion

Location: Isle of Ember
Requirement: Acquire the Grappling Hook.
Details: Sail back to the volcanic Isle of Ember. Make your way to the northwestern part of the island. You’ll spot a small, separate islet with a treasure chest perched on it. Use your Grappling Hook on the sturdy post to swing across and claim the Courage Gem inside.
14. Molida’s Tightrope Walk

Location: Molida Island
Requirement: Acquire the Grappling Hook.
Details: On Molida Island, head just west of the entrance to the Temple of Courage. You’ll see a wooden peg here and another on a small island nearby. Use the Grappling Hook to create a tightrope between them. Carefully walk across the rope to reach the island and open the chest for your gem.
15. Bannan Island Bonus

Location: Bannan Island
Requirement: Acquire the Grappling Hook.
Details: Venture to the northeastern section of Bannan Island (the Wayfarer’s island). Use the Grappling Hook on the available posts to create a tightrope leading to the larger central landmass. Here you’ll find two chests; one contains a Big Green Rupee, and the other holds the coveted Courage Gem.
16. Uncharted Cave Revisited

Location: Uncharted Island
Requirement: Acquire the Grappling Hook.
Details: Return to the Uncharted Island where you first met the Golden Chief Cylos. Enter his cave again. On the eastern side of this cavern, you’ll notice two wooden pegs perfectly positioned for your Grappling Hook. Create a tightrope, cross it, and open the waiting treasure chest for another gem.
17. Ocean King’s Eye Switch

Location: Temple of the Ocean King (Floor B1)
Requirement: Acquire the Grappling Hook and Bow & Arrow.
Details: Head back to the Temple of the Ocean King, specifically Floor B1 (the first basement level you explore with Ciela). Immediately to the left of the entrance staircase, spot two wooden pegs. Use the Grappling Hook to create a tightrope. Walk onto the rope. While balancing, pull out your Bow and shoot the eye switch on the northern wall. This triggers a chest to appear briefly in the southeast corner. Quickly dismount and dash over there, mindful of the Red Phantom’s patrol route, to grab the Courage Gem before the chest vanishes!
18. Maze Runner’s Reward

Location: Isle of the Dead
Requirement: Reach the Northeast Quadrant.
Details: Upon reaching the spooky Isle of the Dead, enter the first cave. Look for a bombable wall on the west side. Blast it open to reveal a tricky maze filled with hazardous Rupoors (which drain your Rupees!). Navigate this maze carefully. One of the treasure chests hidden within contains a Courage Gem.
19. Drained Ruins Discovery

Location: Isle of Ruins
Requirement: Acquire the Regal Necklace (and subsequently drain the water).
Details: After you’ve progressed far enough to drain the water covering the eastern side of the Isle of Ruins (following the acquisition of the Regal Necklace), return to the northwest section near Bremeur’s Temple. Cross the bridge that Bremeur previously extended for you. Make your way east across the now-dry upper level. Southwest of Doylan’s pyramid structure, you’ll find a treasure chest that was previously submerged. Open it to find a Courage Gem.
20. Mutoh’s Hidden Corner

Location: Mutoh’s Temple (Floor B2)
Requirement: Acquire the Hammer.
Details: While exploring Mutoh’s Temple, you’ll reach Floor B2. After using your new Hammer to activate a series of floor switches, you’ll gain access to the southwest portion of the room. Before proceeding further, make sure to thoroughly check the very southwest corner of this area. Tucked away is a final treasure chest holding the 20th Courage Gem!
With all 20 Courage Gems in hand, make your final pilgrimage to Spirit Island. Approach the spring, offer the complete set, and witness Ciela regain her full, radiant power! Good luck hunting down these valuable treasures!