


A Link to the Past 100% Completion Walkthrough
- Princess Zelda Rescue : Infiltrate Hyrule Castle to rescue Zelda and kickstart Link’s epic quest.
- Eastern Palace : Solve Armos Knights’ traps in your first dungeon to claim the Pendant of Courage.
- Desert Palace: Navigate shifting sands and defeat Lanmolas to earn the Pendant of Power.
- Tower of Hera: Climb Death Mountain’s Tower to obtain the Moon Pearl and final pendant.
- The Master Sword & Hyrule Castle: Claim the Master Sword, confront Agahnim, and set your destiny in motion.
- Dark Palace: Explore the Dark World’s Palace and free the first Maiden from darkness.
- Light World Exploration: Unlock warps, collect hearts, and prepare for deeper Dark World dungeons.
- Swamp Palace: Use Cane of Somaria blocks to navigate the toxic swamp and rescue another Maiden.
- Skull Woods: Uncover hidden tunnels and puzzles among the skull trees to free a trapped Maiden.
- Gargoyle’s Domain: Enter via pitchfork statue, secure the Titan’s Mitt, and beat Blind the Thief.
- Ice Palace: Traverse icy floors, gain Blue Mail, and defeat a freezing foe.
- Misery Mire: Master Cane of Byrna and Ether Medallion to rescue another Maiden in the mire.
- Turtle Rock: Face volcano hazards and rescue the last Maiden within this volcanic fortress.
- Ganon’s Tower : Climb the tower’s gauntlet of traps and minibosses to battle Agahnim.
- Pyramid of Power: The Ultimate Showdown with Ganon.
Table of Contents
Draining the Swamp (Light World Prerequisite for Dungeon Entry)
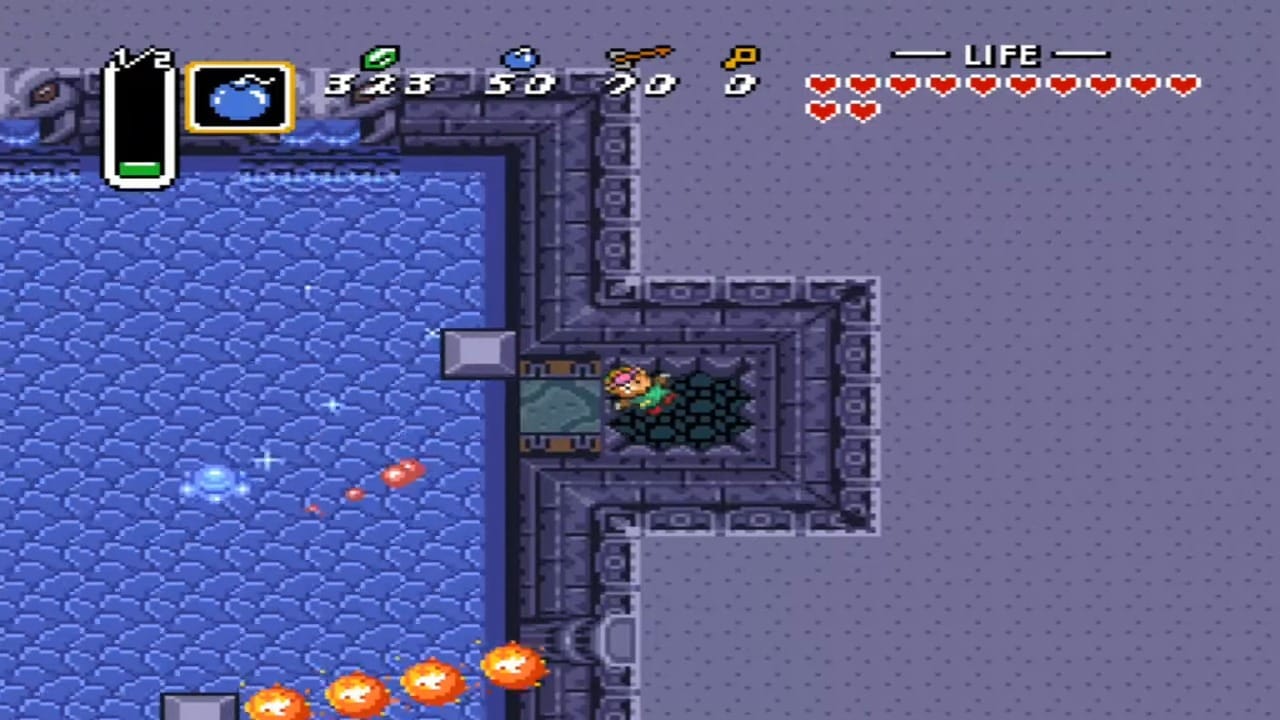
Swamp Palace in the Dark World lies south of the Bomb Shop (the Dark World equivalent of Link’s House). Before you can enter this water-themed dungeon, you must first alter the water flow in its Light World counterpart. Make sure you have Zora’s Flippers at this point – this is the first dungeon that requires the ability to swim.
Return to the Light World in the same area (the Great Swamp). You’ll find an old building here known as the Swamp Ruins, which houses a water control mechanism. Enter the building. In the first room, push the central block up, then push one of the side blocks aside to clear a path. Go through the now-unblocked doorway to the next chamber. Here you’ll see two lever switches on the far wall. Ignore the left lever (pulling it will trigger a trap, unleashing a swarm of enemies into the room). Instead, grab the right lever and pull it until it locks into place. You’ll hear the rush of water as the floodgate opens, draining water out of the Great Swamp and into the ruins. Exit the building – outside, the once-flooded area will now be shallow or dry. (If you haven’t already collected it, a Piece of Heart appears on the ground to the left of the Swamp Ruins as a result of draining the water.)


With the water drained in the Light World, the water level in the Dark World’s swamp is also affected. Use the Magic Mirror’s warp tile (or simply walk back to the portal you came through) to return to the Dark World. The entrance of the Dark World Swamp Palace is now accessible, and enough water has flowed into its first room to let you proceed inside. Ensure you have some magic and arrows (for upcoming puzzles and enemies), then step through the skull-adorned facade into the Swamp Palace.
Key #1
Inside the Swamp Palace, you find yourself in a dim, flooded antechamber. Shallow water covers much of the floor, and a strong odor of stagnant swamp hangs in the air. Wading forward, you immediately encounter a few enemies in the water. Watch for two Water Tektites (bug-like creatures skittering across the water’s surface) and a bouncing Kyameron (a bubble-like amoeba that will leap out of the shallow water unexpectedly). There’s also a metal Blade Trap that zips along a track if you cross its path. Keep moving to avoid the Blade Trap and focus on defeating the creatures: the water tektites hop towards you, so fend them off with your sword or a well-timed swipe of the Hookshot (if you have it early, the Hookshot will stun or kill many foes instantly). The Kyameron will pop up and bounce around; try to sidestep its erratic movement or strike it quickly after it lands. (Tip: You can also freeze a Kyameron with the Ice Rod and then shatter it with the Magic Hammer for a quick kill, though this is optional.) Once you defeat all the water bugs in this flooded foyer, a treasure chest materializes on the shallow ledge in the northwest corner. Open it to obtain the first small key of the dungeon (Key #1).


Use the key to unlock the north door in this room. (If you consult the dungeon map, you’ll see two locked doors from the entrance chamber – one to the north and one to the west. We’re heading north first.) Pass through the now-unlocked door into the next area.

Dungeon Map
You step into a larger room patrolled by more swamp creatures. A stone Medusa head (Yomo Medusa) is mounted near the center, and it spits fireballs toward you whenever you swing your sword. Avoid unnecessary sword swings in its line of sight or use a projectile (like the Boomerang) to stun or circumvent it. The shallow water here hides a couple of Zols – blob-like monsters that lurk underground. As you move, they may pop up at your feet, so be ready to slash them quickly before they latch on.

Navigate to the northwest corner of this room, where you’ll find a cracked section of the northwestern wall. Clear out or avoid any nearby enemies, then place a Bomb to blow open the cracked wall. Step through the new opening into a hidden alcove. Inside, claim the Dungeon Map from the chest awaiting you there. (Be cautious of a couple of Zols that might ooze out of the ground as you walk to the chest.) With the map in hand, you can now view the Swamp Palace’s floor layout by pressing X, which will help in orienting yourself in this multi-room labyrinth.


Return to the previous room the way you came. Now that you have the map, your next goal is another small key.
Key #2
Back in the large room (with the Medusa head), look for four skull pots clustered roughly in the center. Under the southernmost skull pot you’ll discover a hidden small key. Lift that skull and grab the second small key (Key #2). This key opens the door on the west side of the same chamber. (Specifically, it’s the locked door on the left-hand wall, slightly south from where you entered this room.) Use Key #2 to unlock the western door and head through.


You emerge into a corridor that quickly opens into another shadowy chamber. Here you’re introduced to a new hazard in the middle of the room: a yellow-orange orb known as a Yomo Medusa (similar to the stone Medusa heads). It remains stationary but will fire a fireball at you every time you swing your sword. Additionally, a pair of skeletal Stalfos and some floating jellyfish-like Bari roam this area. Red Bari jellies are especially dangerous – they periodically charge with electricity and, if struck with your sword, tend to split into two smaller jolts called Biri. It’s best to either avoid the Red Bari until they discharge or use a safer method to kill them.

Proceed carefully: you can choose to fight the Stalfos and Bari (the Stalfos will hop away from your attacks and occasionally throw bones when at range; a good strategy is to toss a pot at them or hit them with arrows to destroy them quickly). If you fight, try not to slash your sword in the direct line of the Medusa orb’s gaze, or move between its fireballs. Dodge the Medusa’s shots as needed – they travel in a straight line and can be blocked with your shield if you’re facing them.
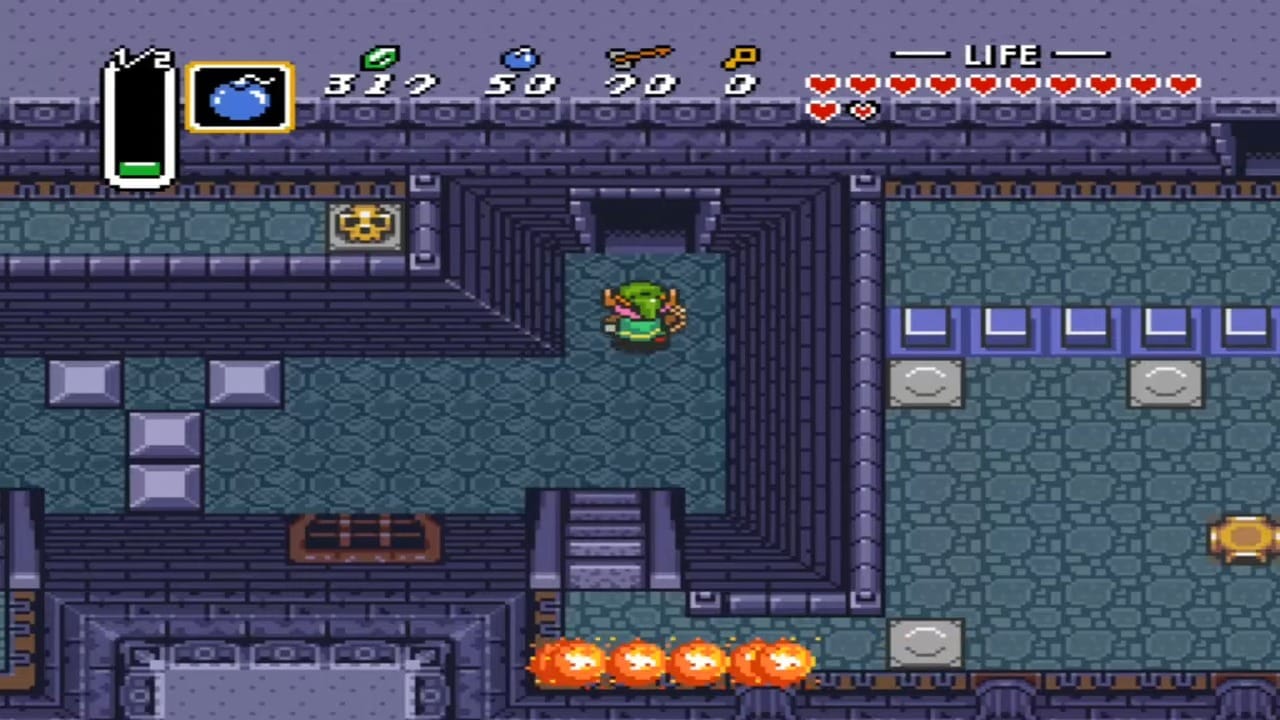
Make your way to the left (west) side of this room. There, you’ll find a staircase leading downward into an underground area. Descend these steps to Basement 1 (B1) of the Swamp Palace. At the base of the stairs, go through the door on the north wall into a small room.

In the center of the room sits a single skull pot. Lift it to reveal the third small key (Key #3). Collect your prize, then retrace your steps back south to the previous room on B1. There is a locked door on the north side, on an upper ledge. Climb the short staircase in the northeast corner of the room to reach this higher ledge (just above where the Medusa orb is). Use Key #3 to unlock the north door up here and go through.


Key #3
This leads you into a narrow chamber containing another large lever mechanism and a row of unraised blue and orange blocks. Take note of the colored crystal switch on the far side of the blocks: you can strike it with your sword or boomerang even through the barrier. For now, leave the switch alone – you’ll need the blocks lowered later, but not yet. First, deal with any immediate threats: a lurking Stalfos might drop from the ceiling here. Take it out quickly. You’ll also see a formation of Moles (small pegs sticking out of the floor) blocking access to the lever. Equip your Magic Hammer and pound down all the Moles to clear the path. With that done, position Link on the right side of the floor lever and push it left (Link will grab it and shove it along the track). You’ll hear a deep rumble as this activates another floodgate. Water begins to rush through pipes, altering the water level in yet another part of the dungeon.


Before leaving this room, notice the bombable wall on the west side. If you need supplies, you can bomb that wall to access a small closet containing a few items (a couple of jars with a red rupee and a bomb). It’s not essential, so skip it if you’re in good shape.


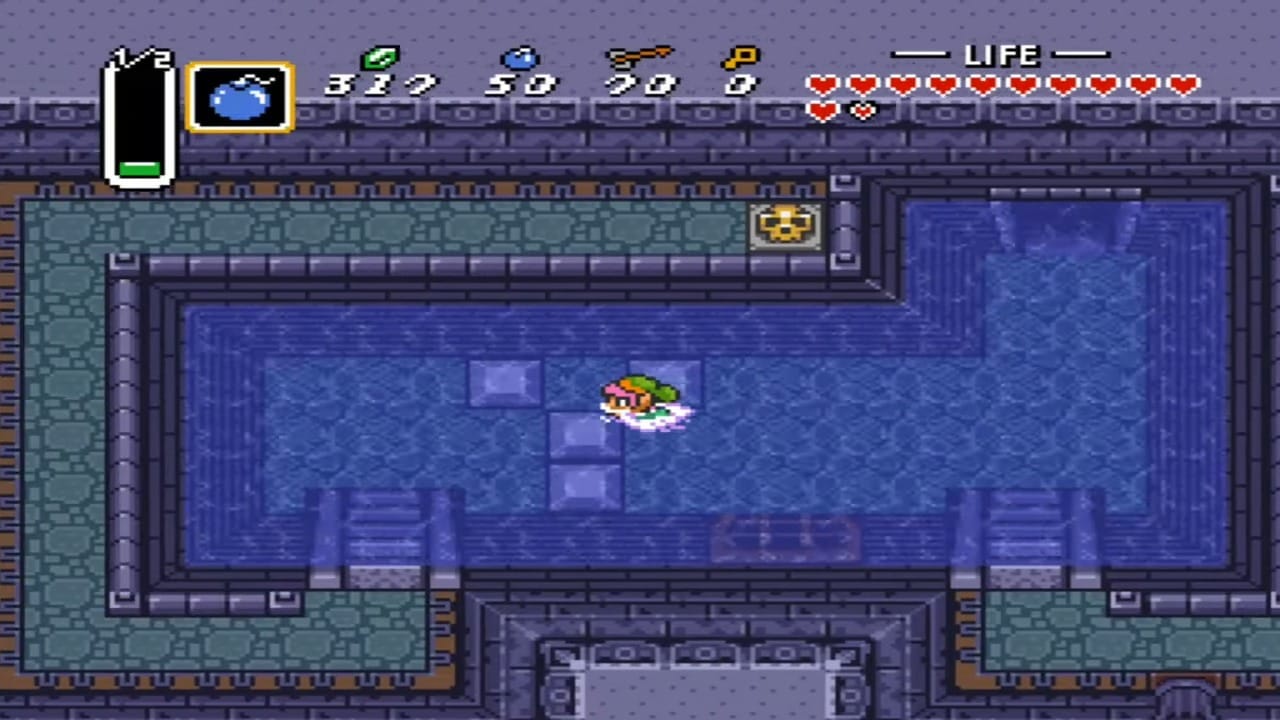
Now backtrack south to the previous room (the Medusa room). Thanks to the lever you pulled, water is now flowing into this area. The dry floor in the lower half of the room has become a pool, raising the water level. Jump into the water (it’s deep enough to swim in now) and swim to the west side, where you can climb a ladder onto a ledge you couldn’t fully reach before. From this ledge, head west through the doorway into the next major section of the dungeon.


Compass
You arrive in a large central chamber of the Swamp Palace. This multi-tiered room will serve as a hub for much of the dungeon. It’s a wide space with water flowing through canals and several doors branching off. The sound of rushing waterfalls echoes here – looking upward, you notice openings near the ceiling where water (and even fish) sometimes pour in. In fact, be on guard: occasionally a Pirogusu (a grotesque green fish-like enemy) will plop down from those holes and start swimming after you in the water. If a Pirogusu appears, either swim away to avoid it or quickly shoot it with an arrow or boomerang before it can ram into you.

From the entrance on the east side where you came in, wade into the shallow water and make your way to the middle of the south wall of this big chamber. You’ll see a doorway there. Go through this south door to an adjacent series of rooms where the Compass lies.

Beyond the south door, proceed east through a short corridor, then south through another door into a small water-filled room. Continue south and west, looping around into yet another chamber. This sequence essentially snakes you around to a room on the west side of the central hub. In this last room, you’ll find a few blocks in shallow water and a closed north door. There are no enemies here – just a puzzle: push the lowest block (the one closest to the bottom of the room) to the right. It slides over a floor switch hidden beneath the water, triggering a secret mechanism. With a rumble, a treasure chest appears in the center of the room! Open it to obtain the Compass of the Swamp Palace. Now you can see the location of the boss and any remaining chests on your dungeon map.


After grabbing the Compass, go through the north door back into the large central chamber.
Key #4
Standing again in the central chamber (now on the west side), you’re on a raised ledge with a staircase leading up even higher on your left. Take this southwest staircase up to the top ledge and go through the door there. You’ll enter a small room with a couple of enemies – likely a Blue Bari jelly and perhaps an Anti-Fairy (a spinning fireball sprite that drains magic and health if it touches you). If an Anti-Fairy is orbiting the room, you can sprinkle Magic Powder on it to turn it into a helpful fairy, or just avoid it. Dispatch or dodge the Blue Bari (they are less dangerous than red ones; a single sword hit will destroy a Blue Bari, or you can use the Hookshot to kill it instantly).


Proceed west and down the stairs in this room. You’ll find yourself in a tiny enclosed area with blocks on the left. (Those blocks can’t be moved, so don’t worry about them.) Go through the door on the north wall to enter a secret closet. Inside, you’ll see a lone skull pot. Lift the skull to reveal a small key underneath. This is Key #4. Take it, then backtrack: go south through the door to return to the previous room, then climb the stairs back up and exit through the door to the central chamber again.

Now you have another key in hand. Back in the big hub room, hop off the ledge (or climb down) to the main floor. Head to the northwest corner of the central chamber, where you’ll find another staircase leading up to a high ledge and a locked door on that north wall. Ascend the northwest stairs and use Key #4 to unlock the door on the north wall here. Get your weapons ready – beyond this door lies another mechanism room.

Big Key
Inside this room, you see a familiar setup: a floor lever and a crystal switch puzzle, much like the one earlier. Immediately to your left is a blue-orange crystal switch behind a low barrier. There are also blue blocks raised on the floor, blocking some paths, and orange blocks lowered (or vice versa depending on your earlier actions).
Hit the crystal switch once (use your sword or boomerang) so that the blue blocks go down and the orange blocks pop up. This clears your path to the lever. Walk to the large lever on the left side of the room. Like before, stand on its right side and push it left to crank it. Water will surge, flooding yet another part of the dungeon (you’ll later notice that a narrow waterway in the southwest part of the hub room is now filled). Before leaving, hit the crystal switch again to toggle it back – you want the blue blocks raised (blue up) and orange blocks lowered after this sequence. This configuration is crucial for accessing the Big Key shortly.


Double-check that the blue blocks are raised when you exit. Now backtrack: go back through the door to the east, returning to the large central chamber.
You should notice an immediate change: the shallow channel on the south side of this room (which was previously empty) is now flooded with water, thanks to the lever you pulled. This channel runs from the central platform to a doorway on the southwest side. It was too low to traverse before, but now Link can swim through it. Head back to the southwest edge of the central room and enter the door there, which leads into that narrow flooded passage. Jump into the water and swim west across the channel to the opposite side. Climb out on the far ledge and go through the door to the west.


You’re now in a tall room with a mix of shallow water and multiple levels. There may be a couple of enemies here (perhaps a Blue Bari or Zols appearing from the floor). Take note of the layout: directly ahead of you are three blocks clustered together, and a staircase is visible on a higher ledge to the upper-left.
In the shallow water, push the southernmost block to the left. It will move out of your way. Now push the center block (the one just above the one you moved) upward. This clears a path to the left side of the room. Walk west past where the blocks were, then go up the small staircase onto the left platform. From this platform, continue up through the doorway in the north wall to the next level.


You’ve ascended to 2F (second floor) of the Swamp Palace, into an attic-like chamber. The air is a bit drier here, and you immediately notice many enemies populating this space. A couple of Red Bari jellies bounce nearby, and an Anti-Fairy or two circle around the room. Keep your guard up.
Directly in front of you upon entering this room is a single moveable block. Push this block to the right to get it out of your way. Now, you need to reach a large square hole on the floor in the northeast part of the room (you likely see it near a group of skull pots and where some Anti-Fairies are floating). Watch out for the Anti-Fairies; try luring them away, or use Magic Powder if you want to convert one into a healing fairy.

At the northeast corner, you’ll find one block adjacent to the big hole. Push that block up or down – just shove it out of the way so that the hole is clear for you to drop into. Once it’s moved, jump into the hole from that corner. Link drops down back to the first floor, landing on a high ledge.

You’re now on a narrow platform in a small room back on 1F. Just ahead of you sits a big treasure chest – and since you fell from above, you’re on the correct side of those raised blue blocks we saw earlier. Congratulations, you can now open the chest to claim the Big Key! The Big Key is a critical item that opens the large locked doors and the big treasure chest of the dungeon.

With the Big Key in hand, return through the doorway to your west and drop down from the ledge to get back to the ground level. It’s time to snag the dungeon’s special treasure.

Hookshot Acquired
Return to the central chamber (use the door on the east side of the room you fell into, which leads back to the main hub). In the middle of the central room is a raised platform accessible by two small staircases. Climb up onto this central platform, where you’ll find the ornate Big Chest waiting. Use the Big Key to unlock the big chest and open it. Inside, you obtain the Hookshot!


Item: Hookshot
This legendary item is a long-chain grappling hook that can latch onto various objects. When it hooks onto wood (like chests, pots, or blocks) or certain surfaces, it will pull Link across gaps instantly. You can also use it to snatch distant items (like pulling a rupee or heart into your hands). Notably, the Hookshot is a fantastic weapon against many enemies: it stuns most monsters and will destroy weaker ones outright – for example, it can kill the annoying jellyfish Bari in one hit from a safe distance.
Take a moment to familiarize yourself with the Hookshot. You’ll immediately need it for the next keys and areas in the dungeon.
Key #5
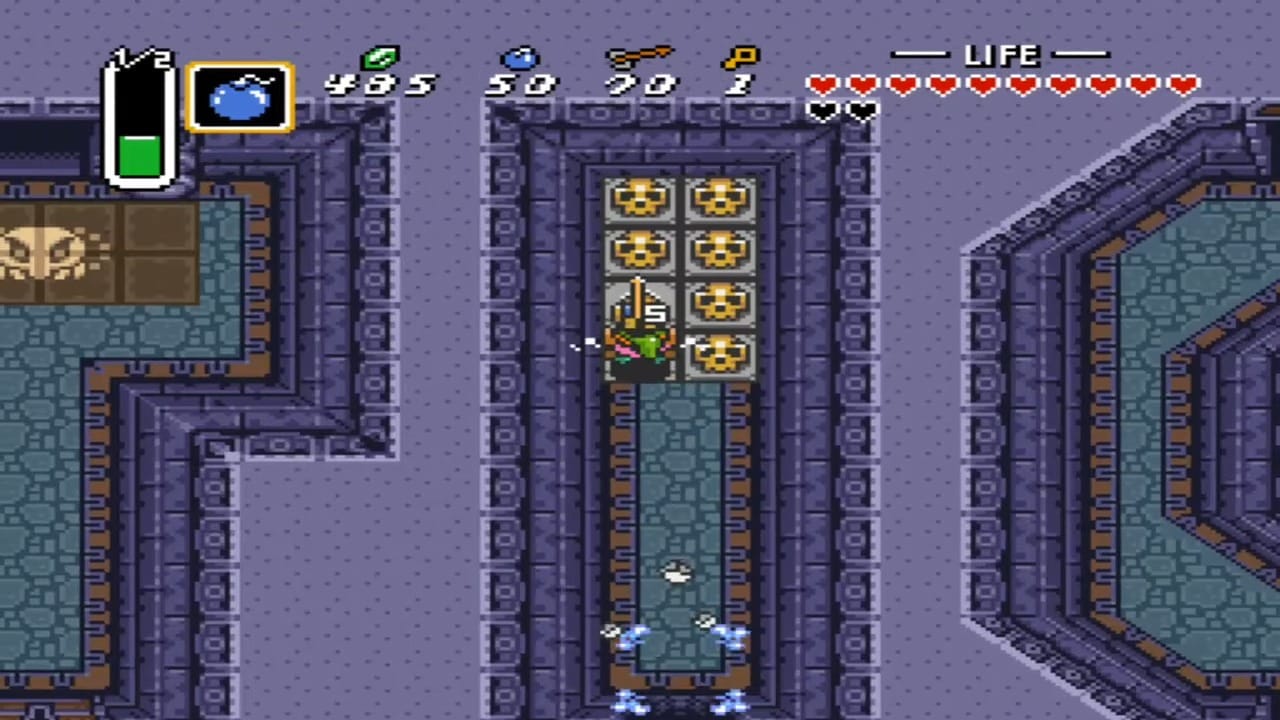
Still standing on the big chest’s platform, look toward the east side of the central chamber. You’ll spot a small isolated ledge with a skull pot sitting on it. This ledge is too far to jump to – but now it’s Hookshot time! Face east and fire the Hookshot at the skull pot. The Hookshot’s chain shoots out, grabs the skull, and pulls Link across the gap, depositing you safely on the ledge. The skull you latched onto is now on your side; lift it up to reveal a hidden small key underneath. Pick up this fifth small key (Key #5).


Having snagged the key, hop off the ledge into the water (or Hookshot back to the central platform if you prefer). We’re headed to the north side of the big chamber next. Climb back onto the central platform with the big chest (use the ladder if needed). From here, walk to the north edge of the platform, just above where the big chest was.

Look north: across the water, you’ll see a row of skull pots on a ledge, guarding the entrance to a locked door in the center of the north wall. Use the Hookshot again – aim for one of the skull pots on that northern ledge and fire. The Hookshot will grab the skull and yank you across the water onto the ledge. (If the screen doesn’t scroll enough to show the skulls due to the SNES screen size, just edge forward a bit – in the Game Boy Advance version the screen is slightly cropped, so you might need to position Link carefully until the pots come into view.) Now that you’re on the north ledge, use Key #5 to unlock the door in the center of the north wall. Step through into the next room.


Key #6
You enter a room that seems to mirror the one on the other side. The door slams shut behind you. To your immediate left is a pot hiding a pressure floor switch. When you lift the pot, you’ll see the switch – but it won’t stay down on its own. This puzzle is a familiar one: you need to hold that switch down to keep the nearby doors open. Luckily, a statue is conveniently nearby. Push or pull the statue onto the floor switch and it will weigh it down, causing two doors to open with a click: the one right next to you (on the left wall) and another across the room on the right side.


The door by the switch (on the left) simply leads back to the central hub (it’s effectively a shortcut or an exit). Ignore that. Instead, head to the right side of the room. The door on the east wall is now open (there are 2 doors here — use the one on the left) ; go through it to continue deeper into the palace.


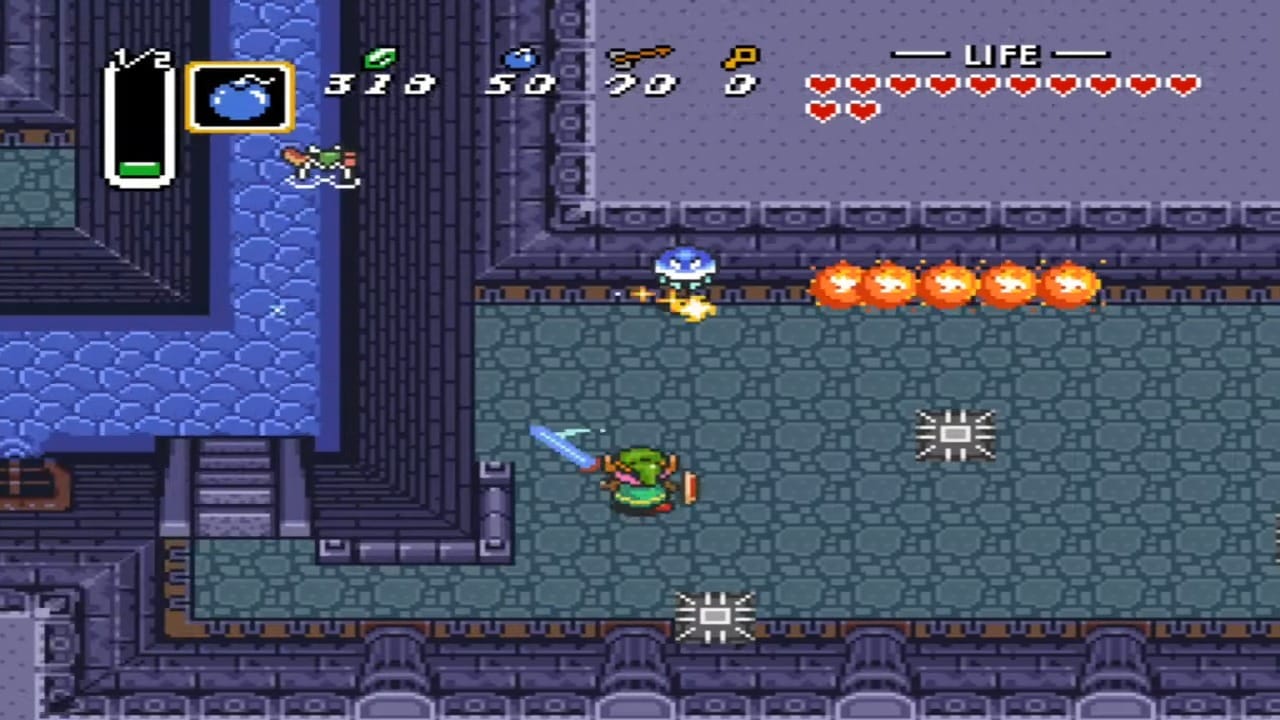
In the next area, walk straight ahead and descend the staircase leading down to B1. This basement room is actually the lower level of the area you just left, and it contains a drainage mechanism. At the center is another large floor lever like the ones you’ve seen. There’s also waist-deep water covering the floor here. Go to the right side of the lever and push it leftward. Link heaves the lever and it snaps into place, triggering a massive drainage. All the water in this room (and connected rooms) gushes out; you’ve effectively drained the water from the entire west half of the dungeon. A moment ago you were swimming here – now you stand on damp floor tiles with water receding through the grates.


Climb down the ladder into the newly drained basin and head left (west) to the next room. This large room was the area just south of the boss door, and draining it was crucial. Run all the way to the south end of the empty reservoir and go through the door on the south wall.


You’ve found a hidden treasure chamber. It’s an optional room, but it’s worth the quick detour for supplies. Inside, you’ll find a couple of skull pots and two chests. Open them to collect a pile of rupees (totaling 40 rupees) and perhaps some arrows or bombs from under the skulls. If you’re low on health, under one of the skulls you may also find a heart. Once you’ve looted the goodies, return north through the door to the previous big drained room.


Now traverse to the north end of this long room. You’ll see a line of six blocks across the floor. Push the third block from the left to the right; it moves and reveals a hidden chest. This chest holds some rupees (a small reward for the observant – you can grab them if you like). More importantly, along the north wall, water is trickling from several carved heads. Most of these are just wall decorations, but one of them hides a secret passage. Walk through the waterfall that is second from the right – it’s an illusionary wall. You will pass directly through the waterfall into a concealed door behind it.


Climb the ladder to your north and then up the stairs up to 1F again. This brings you to a hallway on an upper ledge. Head down (south) one screen along this hallway. You’re now overlooking the once-flooded reservoir room – except now it’s drained, showing the empty floor below. Walk forward and jump off the ledge into the area below. A deep pool of water remains here on the east side (this section didn’t drain), and you plunge in with a splash.


You’re now swimming in the final water-filled room before the boss. This wide room has strong currents and a few lurking foes. Immediately, a school of Water Tektites (also known as Pirogusu) might start converging on you. These creepy, bug-eyed blue critters swim rapidly and tend to cluster near ladders to attack you as you climb out. To avoid being overwhelmed, it’s smart to immediately swim to the right (east) side of the room upon landing in the water. There you’ll find a low ledge with a skull pot. Climb the ladder onto this small platform. Quickly lift the skull to reveal the sixth and final small key (Key #6) beneath it, and grab the key.

There’s also a cracked north wall on a ledge here. If you need recovery, you can bomb this wall to reveal a fairy room (contains a couple of fairies or hearts in pots, useful before the boss). Otherwise, no need to unless you’re hurting.

Once you have Key #6, jump back into the water and swim westward (against the gentle current) to the left side of the room. You’ll see a locked door on the west wall, up on a low platform. Climb out using the ladder there. Use Key #6 to unlock this door and go through. This leads directly to a short hallway connecting to the Boss’s chamber. If you have any last-second needs (like using a potion or catching a fairy), do so now. When you’re ready, head north through the ornate door to face the dungeon boss.


Boss: Arrghus – Battle Strategy
As you step into the boss chamber, the door seals shut and you stand knee-deep in a round pool. From the water rises Arrghus, a colossal one-eyed jellyfish-like creature. Its huge central eye glares at you from within a cluster of smaller orange blobs. These twenty or so miniature minions, called Arrgi, orbit Arrghus in a protective ring.

As long as Arrghus is surrounded by these Arrgi, direct attacks on its body won’t hurt it. The room itself has a shallow water floor, which will slow your movement slightly, but you’re still agile enough to dodge and maneuver.
Phase 1: Destroying the Arrgi
Immediately equip your new Hookshot – this is the key to breaking Arrghus’s defense. Keep a medium distance from the boss as it moves slowly around the room. One by one, target the orbiting Arrgi: fire the Hookshot at a nearby Arrgi to latch onto it and yank it off of Arrghus. The pulled Arrgi will be momentarily stunned (and turn blue) as it lands in front of you. Quickly slash it with your sword twice to destroy it.


Each Arrgi takes two hits with the Master Sword. Work methodically: Hookshot an Arrgi, slash it to bits, then move away from Arrghus if needed and repeat the process. Be mindful of your spacing; Arrghus will occasionally spin its remaining Arrgi in a wide circle outward like a spinning razor barrier. Back off when you see them start swirling to avoid getting hit. The Arrgi then retract back to the boss.

Also, Arrghus itself will drift around the room trying to bump into you, so don’t stay too close to its body. Keep using the Hookshot to peel off and kill all the little orbiting blobs. If you find yourself surrounded, move to an open spot in the pool – you can even run between the Arrgi when they spread out, just avoid touching them directly. With patience, the number of Arrgi will dwindle until you’ve plucked off every last one. Once all the minions are gone, Arrghus lets out an angry wail and shifts tactics.

Phase 2: Arrghus Unleashed
With its protective blobs gone, Arrghus itself turns a pinkish-red and begins a more aggressive assault. The giant eye will leap high into the air, disappearing off-screen for a second. It’s trying to crush you from above! Run (or swim) out of the way until Arrghus comes crashing down into the water. Upon landing, it will always bounce toward a corner of the room (often heading to the bottom-right first), then it starts skating rapidly around the pool, ricocheting off the walls in a diagonal pattern. Think of it like a giant pinball zipping around the room. Now is your chance to damage it – whenever Arrghus swoops near you, smack it with your sword. The Master Sword will hurt it, and you should be able to land a hit or two each pass if you position yourself well. After a few seconds of zooming around, Arrghus will pause and repeat the cycle: jumping up, slamming down, and then zipping about.


Stay alert and keep moving. If you’re directly under Arrghus when it comes down, it can be hard to dodge, so watch its shadow on the water to gauge where it will land. Also be aware that in this phase Arrghus might shoot out fast-moving needle-like projectiles or water droplets, but these are relatively rare and often missed if you’re circling the room. Focus on getting in sword strikes when it gets close. It takes roughly 8 hits with the Master Sword to bring Arrghus down for good. After enough punishment, Arrghus will flash and explode in a spectacular splash, finally defeated.

With the boss vanquished, the door to the room reopens and a Heart Container drops onto the shallow water where Arrghus perished. Pick it up to increase your life by one heart – this should be your sixth full Heart Container acquired in the adventure so far (if you’ve been following the standard dungeon order) not counting pieces. Alongside it descends a shining Crystal. Grab the crystal to free the second of the Seven Maidens. A grateful Maiden of Wisdom will speak to you: she thanks you for defeating the evil lurking here and reminds you that there are other maidens to rescue before you can challenge Ganon. After the dialogue, she warps you out of the Swamp Palace.


You emerge back outside in the Dark World swamp, victorious. The Swamp Palace is complete, and you now possess the mighty Hookshot, which will be invaluable in reaching new areas.

Heart Piece #19
With the Hookshot in hand, you can now gather several previously unreachable treasures in Hyrule. One optional prize now accessible is Piece of Heart #19 in our 100% collection sequence. This heart piece is located at the base of Death Mountain in the Dark World – specifically, on a high ledge south of the Dark World Item Shop (which in the Light World is the Magic Potion Shop east of the Lost Woods).
If you haven’t been in that area yet: use the Flute (if you have it) to warp to Kakariko (Light World), then enter the Dark World via the northwest portal, and head east to where the Witch’s Hut would be. Just to the south of the Dark World Item Shop (east of the Skeleton Forest region), you’ll see a Piece of Heart tantalizingly sitting on a high cliff ledge – but you can’t grab it from outside.


To claim it, enter the cave at ground level near that ledge. Inside, you’ll navigate a short gauntlet. It’s dark and cavernous, with a few enemies and obstacles: Immediately, you’ll encounter a couple of Hardhat Beetles on narrow platforms. Use your shield or sword to bump them into the pits, or carefully slip by them. They will try to charge at you, so face them head-on with shield raised if you need to block, then strike.

Climb the stairs to the second floor of the cave. Here you’ll find a wide gap separating you from the exit. On the far side of the gap lies a lone skull pot. This is a perfect job for the Hookshot: line up with the skull and Hookshot across the void by targeting the pot. You’ll be pulled over the gap to the other side.


Continue southward. You’ll see a large Bumper in a tight corridor, an obstacle that knocks you back if you touch it. Equip the Magic Cape, because you cannot squeeze by normally. Activate the Magic Cape to become invisible/intangible and walk straight through the Bumper safely (this uses magic energy, but only for a brief moment). At the end of the cave, take the exit door. You’ll emerge outside on the high ledge where the heart piece rests! Walk over and pick up Heart Piece #19.


With the Swamp Palace cleared, you have rescued another maiden and obtained the Hookshot, opening up new paths in both the Dark World and Light World. Your next destination is likely the eerie Skull Woods in the northwest Dark World, or you may choose to explore for more upgrades now that you can cross gaps with the Hookshot. Safe travels, hero of Hyrule, and good luck on the next leg of your adventure! (The journey continues in the Skull Woods dungeon, where even trickier puzzles and fearsome foes await.)