


The Wind Waker 100% Completion Walkthrough
- Prologue: Outset Island: Introduction to Link’s home, initial quests, and obtaining the Hero’s Sword and Shield.
- Forsaken Fortress (First Visit): Stealth mechanics and rescuing Aryll.
- Windfall Island: Acquiring the Sail, meeting key characters, and side quests.
- Dragon Roost Island & Cavern: Assisting the Rito tribe, dungeon exploration, and obtaining Din’s Pearl.
- Forest Haven & Forbidden Woods: Meeting the Great Deku Tree, aiding the Koroks, and securing Farore’s Pearl.
- Post-Forbidden Woods Exploration: Collect charts, heart pieces, and upgrades across the southern sea.
- Greatfish Isle & Nayru’s Pearl: Story progression and obtaining the final pearl.
- Great Sea Side Quest Adventure: Explore islands and complete Windfall quests for key upgrades and collectibles.
- Tower of the Gods: Dungeon challenges and gaining access to Hyrule.
- Hyrule Castle: Discovering the Master Sword and storyline developments.
- Post-Hyrule Castle Exploration: Complete trading quests for heart pieces, treasure charts, and the Magic Armor.
- The Forest Water Challenge: Locating and saving each withered tree for a heart piece.
- Forsaken Fortress (Second Visit): Confronting the Helmaroc King and rescuing Aryll.
- Reef Special Charts & Windfall Side Quests: Six-Eye Reefs, Treasure Charts, and Windfall Island side quests.
- Fire Mountain & Ice Ring Isle: Obtain the Power Bracelets and Iron Boots from these elemental islands to access the next temples.
- Earth Temple: Venture with Medli into the Earth Temple to cleanse evil and claim the Mirror Shield.
- Wind Temple: Enter Gale Isle, team up with Makar, and conquer the Wind Temple.
- Triforce Shard Quest: Locating Triforce Charts, deciphering them, and retrieving Triforce shards.
- Ganon’s Tower: Final challenges, boss rematches, and the ultimate confrontation with Ganondorf.
Table of Contents
Fire Mountain
You begin this segment by charting a course for Fire Mountain, which lies one square south of Dragon Roost Island. Sail up to the fiery volcano island, where an intense column of lava erupts from the peak and makes landing impossible. Equip your recently acquired Ice Arrows and take aim at the volcanic plume. Fire! The Ice Arrow pierces the lava stream, freezing the eruption in mid-air. The fiery rain halts as the volcano’s core cools over, giving you a brief window of safety. From the moment the lava is frozen, a five-minute timer appears on-screen – this is your time limit to get in and out of Fire Mountain before it heats up again.


Climb out of your boat and scale the rocky mountain as quickly (but carefully) as you can. The path winds upward; at one point, you’ll need to sidle across a narrow ledge around the mountain’s perimeter while wind rushes past. Make your way up to the summit where the lava was erupting. With the volcanic activity temporarily halted, you can safely drop down into the crater. Leap into the hole at the peak to enter the interior of Fire Mountain.


Inside the crater, you’ll land on a series of rocky platforms overlooking a pool of bubbling lava far below. Almost immediately you are swarmed by Fire Keese (flaming bats) darting through the air. Use your Boomerang or sword to swat them down before they knock you into the lava. As you hop across the platforms, watch out for Magtails – centipede-like lava creatures – emerging from the flames. Magtails will curl up after you strike them; take the opportunity to toss or finish them off. Defeat every enemy in the chamber while navigating the jumps between platforms. Once the last foe falls, a chest materializes on the central platform. Open it to claim the Power Bracelets.


Item: Power Bracelets
A pair of mighty gauntlets that grant you super-human strength. These bracelets equip automatically, allowing you to lift extremely heavy objects from now on.
With the Power Bracelets in hand, look nearby for a massive stone head inside the crater. Approach the huge stone and press A to lift it – thanks to your newfound strength, Link heaves the giant slab aside. This reveals a shaft of light shining down from the opening above. Step into the glowing light to warp out of the volcano and back to the mountain’s exterior. (This lifted headstone also acts as a shortcut, clearing the path in case you ever return.) You should now hurry off the island before the five-minute timer expires and Fire Mountain reactivates.


Make your way back to the King of Red Lions, and sail off as the volcano resumes its fiery eruption behind you.


Ice Ring Isle
Your next destination is Ice Ring Isle, located west of Forest Haven (one square west on your Sea Chart). Warp to the Forest Haven and sail west until you spot a small island encased in a spiral of frigid air and ice. As you approach, you’ll notice a frozen dragon-shaped structure on the isle – similar to Fire Mountain’s constant eruption, this island is completely frozen over, making landing impossible until you thaw it out.


Swap to your Fire Arrows, take aim at the large ice dragon’s head, and shoot a Fire Arrow straight into its gaping mouth. The magical flame melts the ice, shattering the frozen shell around the island. As the ice coating collapses, a five-minute countdown will begin, just like on Fire Mountain. You have limited time to explore Ice Ring Isle before it refreezes, so act fast.


Land the boat and hop onto the now-accessible icy shore. The ground is slick, causing Link to slide if you run too quickly, so tread with care. Before entering the cavern, take a detour to grab a valuable treasure nearby.

Treasure Chart #36 (Collectible #37 of 41)
Off to one side, you’ll see a treasure chest trapped in ice. Shoot the frozen chest with a Fire Arrow to melt the ice away. Open it to obtain Treasure Chart #36. (This chart will later lead you to sunken treasure, so it’s worth the few extra seconds to collect.)
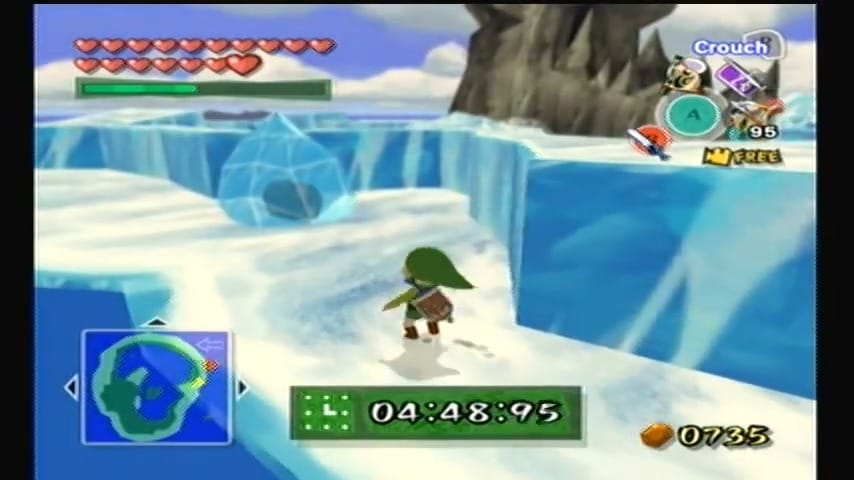


With the chart in hand, turn your attention to the dragon’s mouth entrance. Carefully make your way up the icy terrain toward the dragon’s mouth. Climb a short ledge and traverse a narrow, slick pathway around the perimeter of the isle. Move deliberately—if you dash, you may slip and tumble off the path. At the end of the winding route, jump across to a small moving ice platform when it comes near. Ride it and leap over to the dragon’s icy mouth. Enter the cavern through the mouth to delve into the heart of Ice Ring Isle.


Inside, you’ll immediately slide down a short ice chute into a freezing chamber. The floor is extremely slippery here, effectively pulling you along its path. Ascend a couple of ledges to get your bearings, then prepare for a longer ice slide. Step onto the slick incline and let it carry you downward, steering as best as you can. Partway down, you’ll see a ledge with a treasure chest – it zooms by quickly on your left. Don’t worry if you miss it; that chest is just a bundle of Rupees and not required. Focus on reaching the end of the slide in one piece. At the bottom, you’ll arrive on a platform with an ornate chest. Open it to claim the Iron Boots.


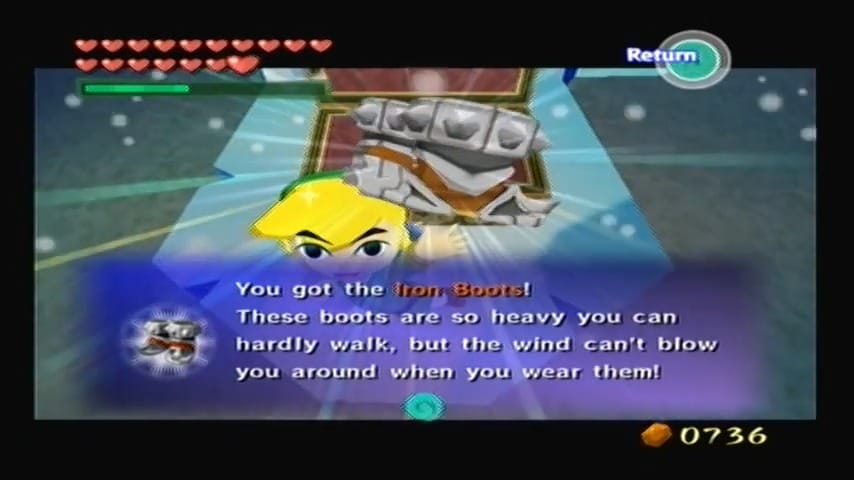

Item: Iron Boots
These heavy boots can be equipped to make you extremely heavy, anchoring you in place. Put them on and test them out: with the Iron Boots, even fierce gusts of wind won’t budge you.
Before leaving, you can use the Iron Boots to uncover a bonus area. In the same chamber, a powerful wind is blowing through a tunnel, blasting from a hidden cave. Equip the Iron Boots to march straight against the gust into that secret cave. Inside, you’ll find several enemies trapped in ice. (If you have time remaining on your five-minute timer, you can melt these frozen foes with Fire Arrows and defeat them for an optional orange Rupee reward.)


When you’re done, look for the glowing warp tile and step on it to exit the icy cavern. You’ll be transported back outside to Ice Ring Isle’s entrance. Quickly return to your boat before the isle refreezes. With the Power Bracelets and Iron Boots now secured, you’re ready to continue the quest for the next sage.


Outset Island Revisited (The Giant Pig – Optional Heart Piece)
It’s time to put those Power Bracelets to use back home. Play the Ballad of Gales to warp to Outset Island, and go visit Abe and Rose’s pigpen near your house. Remember the cute little piglets you helped gather at the start of your adventure? Those piglets have grown enormous in your absence – so large that previously you couldn’t even lift them. Thanks to the Power Bracelets, you can now pick up the giant pig (named after you, if you caught the black pig earlier) without breaking a sweat. Approach the hefty hog and press A to hoist it above your head. Be careful not to toss it from too high up – this porker packs a punch if it lands on you!


With the pig in your arms, carry it across the wooden bridge to the east half of Outset (where your house and Grandma’s house are). You’re looking for patches of dark, soft soil on the ground – those are the pig’s favorite digging spots. One good patch to try is right in front of Mesa’s grass-covered home (Mesa’s house is on the lower level of the eastern hill, identifiable by the lush patch of tall grass beside it). Stand on a patch of black soil and set the pig down on it. Now bring out some All-Purpose Bait from your bag and scatter it on the ground. The pig will excitedly start sniffing and then dig furiously at the soil, unearthing whatever is buried beneath.

Often your hog will dig up Rupees, but it has a chance to find something far more valuable.

Heart Piece #41 of 44
One of these soil patches hides a Piece of Heart (it’s Heart Piece #41 in this walkthrough’s tally). The buried heart piece can actually appear from any of the black soil spots on Outset. If you’re hunting for it, a likely location is the patch of soil facing Mesa’s house, just above the beach. Keep using bait on different patches until your trusty pig digs up the Piece of Heart. When it finally snorts out that precious heart-shaped treasure, pick it up to increase your life energy.


Once you’re done pig wrangling (and have washed off all the mud), it’s time to get back on the Great Sea.
Bird’s Peak Rock and Treasure Chart #36
Your next stop is a small island called Bird’s Peak Rock, located northeast of Forest Haven on your Sea Chart. Warp to Forest Haven once more, then sail to the northeast until you see a cluster of tall, thin spire-like rocks sticking out of the sea. The largest spire has multiple smaller peaks around it – this is Bird’s Peak Rock. As you approach, be mindful of the Kargarocs (giant birds) that nest on these peaks; they might swoop down at you. For now, you don’t need to climb the island itself (that challenge is for later in the quest), but there are two important things to do here.


Sea Chart Info #48: Bird’s Peak Rock
First, take out your Sea Chart and feed the Fishman some bait near Bird’s Peak Rock to mark this island on your map. Filling in your Sea Chart is always helpful, and the Fishman’s hints might come in handy for future tasks.


Treasure Chart #36 (Salvaged for 200 Rupees)
With Bird’s Peak Rock on your map, you can now put your new Treasure Chart #36 to use. Open your charts and find #36; it reveals a treasure location somewhere in this sector. Position the King of Red Lions over the spot marked by the X on the sea (it should be close by, in the waters around Bird’s Peak Rock) and watch for the telltale glow on the ocean surface.
When you’re above the treasure, stop the boat and use your Grappling Hook to salvage the sunken chest indicated by Chart #36. The winch will haul up a hefty treasure chest from the depths, which contains a Silver Rupee worth 200 Rupees. That’s a nice influx of cash after all your recent adventures.


With the island mapped and the treasure salvaged, you’re finished at Bird’s Peak Rock for now. (You’ll return here later with a certain item to solve the puzzle of the six hatchling rocks and the mother bird statue.) For the moment, set your sights on the next goal: finding the Earth Temple. The key lies on Headstone Island, so let’s head there.