
























| Region | Akkala, the north-east highlands around Akkala Tower and Tarrey Town |
|---|---|
| Korok Seeds | 61 (47 on the ground, 14 off the ground) |
| Areas | Tamul Plateau (32), Tamul Outback (19), Lanayru Water Sources (4), Tamul Sea (4), Eldin Canyon (2) |
| Start of the route | Akkala Tower |
| Route length | about 15,374 map units in 7 legs of up to 10 seeds |
| Walkthrough | Akkala and Tarrey Town chapter |
Show every Korok seed on the interactive map
There are 61 Korok Seeds in the Akkala region of Breath of the Wild, the north-east highlands around Akkala Tower and Tarrey Town. This page numbers them in a collection route that starts at Akkala Tower and always heads for the next closest seed, so you can work through them in order without crossing the map twice. Every seed has a link to its spot on the interactive map, the nearest landmark with a compass direction. If you do not know how to solve a Korok puzzle, the Korok puzzle guide lists every type and its solution.
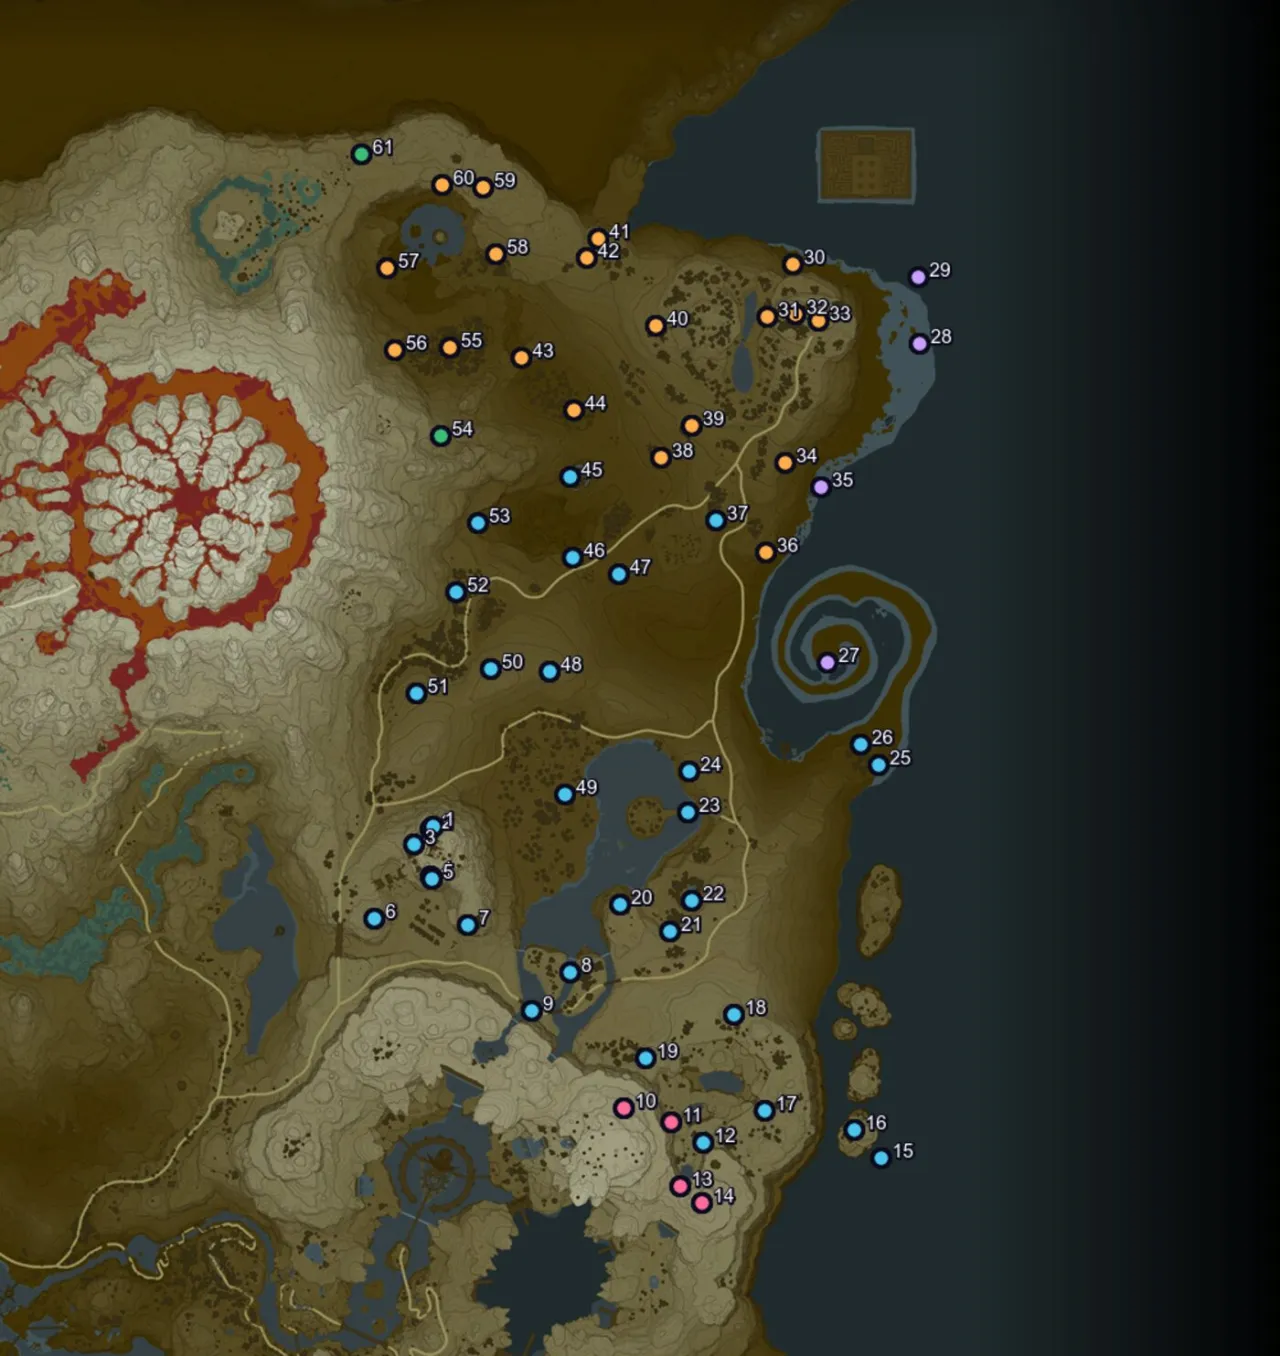
Table of Contents
Korok Seeds by area
The game divides the world into named areas. The seeds of Akkala fall into these:
| Area | Seeds | Seed numbers on this page |
|---|---|---|
| Tamul Plateau | 32 | 1, 2, 3, 4, 5, 6, 7, 8, 9, 12, 15, 16, 17, 18, 19, 20, 21, 22 and 14 more |
| Tamul Outback | 19 | 30, 31, 32, 33, 34, 36, 38, 39, 40, 41, 42, 43, 44, 55, 56, 57, 58, 59 and 1 more |
| Lanayru Water Sources | 4 | 10, 11, 13, 14 |
| Tamul Sea | 4 | 27, 28, 29, 35 |
| Eldin Canyon | 2 | 54, 61 |
Seeds near landmarks
Towers, shrines, stables and villages make the easiest starting points. These landmarks have the most seeds within 500 map units:
| Landmark | Type | Seeds within 500 units | Seed numbers |
|---|---|---|---|
 Dah Hesho Shrine | Shrine | 11 | 7, 8, 9, 18, 19, 20, 21, 22, 23, 24, 49 |
| Tutsuwa Nima Shrine | Shrine | 11 | 37, 38, 39, 40, 43, 44, 45, 46, 47, 53, 54 |
| Ke’nai Shakah Shrine | Shrine | 10 | 10, 11, 12, 13, 14, 16, 17, 18, 19, 21 |
| East Akkala Stable | Stable | 10 | 31, 32, 33, 34, 35, 36, 37, 38, 39, 40 |
| Zuna Kai Shrine | Shrine | 10 | 41, 42, 43, 55, 56, 57, 58, 59, 60, 61 |
| Katosa Aug Shrine | Shrine | 9 | 31, 32, 33, 34, 35, 36, 37, 38, 39 |
| Akkala Tower | Sheikah Tower | 8 | 1, 2, 3, 4, 5, 6, 7, 49 |
| South Akkala Stable | Stable | 8 | 1, 2, 3, 4, 5, 6, 7, 51 |
| Ze Kasho Shrine | Shrine | 7 | 1, 2, 3, 4, 5, 6, 51 |
| Tarrey Town | Village | 6 | 20, 21, 22, 23, 24, 49 |
| Ritaag Zumo Shrine | Shrine | 4 | 25, 26, 27, 36 |
| Tu Ka’loh Shrine | Shrine | 2 | 29, 30 |
Seed clusters
Seeds that sit close together are worth collecting in one trip. Each group below has four or more seeds within a short walk of each other.
| Group | Seeds | Map | Nearest landmark | Seed numbers |
|---|---|---|---|---|
| Group 1 | 7 | Show on map | Ke’nai Shakah Shrine (255 units south-west) | 10, 11, 12, 13, 14, 17, 19 |
| Group 2 | 6 | Show on map | Akkala Tower (31 units south) | 1, 2, 3, 4, 5, 7 |
| Group 3 | 4 | Show on map | Katosa Aug Shrine (503 units north) | 30, 31, 32, 33 |
Collection route: all 61 seeds in order
Placement is the game’s own flag: Ground seeds appear on the ground, Air seeds appear off the ground (on a ledge, in a tree or in mid-air), so look up for those. Distances are in map units; a square on the map is 1,000 units wide. The last column is the distance from the previous seed.
Leg 1: seeds 1 to 10
| # | Map | Area | Placement | Nearest landmark | From previous |
|---|---|---|---|---|---|
| 1 | Show on map | Tamul Plateau | Ground | Akkala Tower, 85 units north | 85 units from Akkala Tower |
| 2 | Show on map | Tamul Plateau | Ground | Akkala Tower, 77 units north | 13 units |
| 3 | Show on map | Tamul Plateau | Ground | Akkala Tower, 75 units west | 69 units |
| 4 | Show on map | Tamul Plateau | Ground | Akkala Tower, 73 units south | 113 units |
| 5 | Show on map | Tamul Plateau | Ground | Akkala Tower, 80 units south | 9 units |
| 6 | Show on map | Tamul Plateau | Ground | Akkala Tower, 283 units south-west | 222 units |
| 7 | Show on map | Tamul Plateau | Ground | Akkala Tower, 243 units south-east | 294 units |
| 8 | Show on map | Tamul Plateau | Air | Dah Hesho Shrine, 246 units south-west | 352 units |
| 9 | Show on map | Tamul Plateau | Ground | Dah Hesho Shrine, 417 units south-west | 171 units |
| 10 | Show on map | Lanayru Water Sources | Ground | Ke’nai Shakah Shrine, 337 units south-west | 420 units |
Leg 2: seeds 11 to 20
| # | Map | Area | Placement | Nearest landmark | From previous |
|---|---|---|---|---|---|
| 11 | Show on map | Lanayru Water Sources | Ground | Ke’nai Shakah Shrine, 247 units south-west | 154 units |
| 12 | Show on map | Tamul Plateau | Air | Ke’nai Shakah Shrine, 265 units south | 121 units |
| 13 | Show on map | Lanayru Water Sources | Air | Ke’nai Shakah Shrine, 415 units south | 155 units |
| 14 | Show on map | Lanayru Water Sources | Ground | Ke’nai Shakah Shrine, 451 units south | 82 units |
| 15 | Show on map | Tamul Plateau | Ground | Ke’nai Shakah Shrine, 591 units south-east | 578 units |
| 16 | Show on map | Tamul Plateau | Air | Ke’nai Shakah Shrine, 474 units south-east | 122 units |
| 17 | Show on map | Tamul Plateau | Ground | Ke’nai Shakah Shrine, 211 units south-east | 289 units |
| 18 | Show on map | Tamul Plateau | Ground | Ke’nai Shakah Shrine, 149 units north | 315 units |
| 19 | Show on map | Tamul Plateau | Air | Ke’nai Shakah Shrine, 234 units west | 311 units |
| 20 | Show on map | Tamul Plateau | Ground | Dah Hesho Shrine, 40 units north-west | 487 units |
Leg 3: seeds 21 to 30
| # | Map | Area | Placement | Nearest landmark | From previous |
|---|---|---|---|---|---|
| 21 | Show on map | Tamul Plateau | Ground | Dah Hesho Shrine, 147 units east | 177 units |
| 22 | Show on map | Tamul Plateau | Air | Dah Hesho Shrine, 211 units east | 117 units |
| 23 | Show on map | Tamul Plateau | Air | Tarrey Town, 132 units east | 276 units |
| 24 | Show on map | Tamul Plateau | Ground | Tarrey Town, 194 units north-east | 129 units |
| 25 | Show on map | Tamul Plateau | Ground | Ritaag Zumo Shrine, 389 units south-east | 594 units |
| 26 | Show on map | Tamul Plateau | Ground | Ritaag Zumo Shrine, 307 units south | 86 units |
| 27 | Show on map | Tamul Sea | Ground | Ritaag Zumo Shrine, 31 units south | 277 units |
| 28 | Show on map | Tamul Sea | Ground | Tu Ka’loh Shrine, 636 units south | 1,036 units |
| 29 | Show on map | Tamul Sea | Ground | Tu Ka’loh Shrine, 440 units south | 206 units |
| 30 | Show on map | Tamul Outback | Ground | Tu Ka’loh Shrine, 436 units south-west | 395 units |
Leg 4: seeds 31 to 40
| # | Map | Area | Placement | Nearest landmark | From previous |
|---|---|---|---|---|---|
| 31 | Show on map | Tamul Outback | Air | East Akkala Stable, 446 units north | 180 units |
| 32 | Show on map | Tamul Outback | Ground | Katosa Aug Shrine, 473 units north | 85 units |
| 33 | Show on map | Tamul Outback | Air | Katosa Aug Shrine, 482 units north-east | 77 units |
| 34 | Show on map | Tamul Outback | Ground | Katosa Aug Shrine, 102 units east | 455 units |
| 35 | Show on map | Tamul Sea | Ground | Katosa Aug Shrine, 231 units east | 136 units |
| 36 | Show on map | Tamul Outback | Air | Katosa Aug Shrine, 294 units south | 267 units |
| 37 | Show on map | Tamul Plateau | Air | East Akkala Stable, 213 units south | 187 units |
| 38 | Show on map | Tamul Outback | Ground | East Akkala Stable, 219 units west | 261 units |
| 39 | Show on map | Tamul Outback | Ground | East Akkala Stable, 152 units north-west | 139 units |
| 40 | Show on map | Tamul Outback | Ground | East Akkala Stable, 463 units north-west | 330 units |
Leg 5: seeds 41 to 50
| # | Map | Area | Placement | Nearest landmark | From previous |
|---|---|---|---|---|---|
| 41 | Show on map | Tamul Outback | Ground | Zuna Kai Shrine, 489 units east | 327 units |
| 42 | Show on map | Tamul Outback | Ground | Zuna Kai Shrine, 460 units east | 66 units |
| 43 | Show on map | Tamul Outback | Air | Tutsuwa Nima Shrine, 399 units north-west | 377 units |
| 44 | Show on map | Tamul Outback | Ground | Tutsuwa Nima Shrine, 185 units north | 231 units |
| 45 | Show on map | Tamul Plateau | Ground | Tutsuwa Nima Shrine, 57 units south-west | 208 units |
| 46 | Show on map | Tamul Plateau | Ground | Tutsuwa Nima Shrine, 285 units south | 254 units |
| 47 | Show on map | Tamul Plateau | Ground | Tutsuwa Nima Shrine, 347 units south | 154 units |
| 48 | Show on map | Tamul Plateau | Ground | Tarrey Town, 544 units north-west | 373 units |
| 49 | Show on map | Tamul Plateau | Ground | Tarrey Town, 265 units west | 387 units |
| 50 | Show on map | Tamul Plateau | Ground | South Akkala Stable, 507 units north-east | 456 units |
Leg 6: seeds 51 to 60
| # | Map | Area | Placement | Nearest landmark | From previous |
|---|---|---|---|---|---|
| 51 | Show on map | Tamul Plateau | Ground | South Akkala Stable, 322 units north | 247 units |
| 52 | Show on map | Tamul Plateau | Air | Tutsuwa Nima Shrine, 562 units south-west | 340 units |
| 53 | Show on map | Tamul Plateau | Ground | Tutsuwa Nima Shrine, 380 units south-west | 228 units |
| 54 | Show on map | Eldin Canyon | Ground | Tutsuwa Nima Shrine, 465 units west | 292 units |
| 55 | Show on map | Tamul Outback | Ground | Zuna Kai Shrine, 342 units south | 278 units |
| 56 | Show on map | Tamul Outback | Ground | Zuna Kai Shrine, 376 units south-west | 171 units |
| 57 | Show on map | Tamul Outback | Air | Zuna Kai Shrine, 195 units south-west | 255 units |
| 58 | Show on map | Tamul Outback | Ground | Zuna Kai Shrine, 178 units east | 346 units |
| 59 | Show on map | Tamul Outback | Ground | Zuna Kai Shrine, 208 units north-east | 212 units |
| 60 | Show on map | Tamul Outback | Ground | Zuna Kai Shrine, 168 units north | 129 units |
Leg 7: seeds 61 to 61
| # | Map | Area | Placement | Nearest landmark | From previous |
|---|---|---|---|---|---|
| 61 | Show on map | Eldin Canyon | Ground | Zuna Kai Shrine, 361 units north-west | 268 units |
More help
- All 900 Korok Seeds, Hestu‘s rewards and the full region list
- Korok puzzle types and how to solve each one
- The Akkala and Tarrey Town walkthrough chapter, which solves many of this region’s Koroks along the route
- Interactive map of every Korok Seed
