
























| Region | Eldin, Death Mountain and the volcanic land around Goron City |
|---|---|
| Korok Seeds | 44 (30 on the ground, 14 off the ground) |
| Areas | Eldin Canyon (41), Eldin Mountains (2), Tamul Plateau (1) |
| Start of the route | Eldin Tower |
| Route length | about 11,794 map units in 5 legs of up to 10 seeds |
| Walkthrough | Death Mountain and Goron City chapter |
Show every Korok seed on the interactive map
There are 44 Korok Seeds in the Eldin region of Breath of the Wild, Death Mountain and the volcanic land around Goron City. This page numbers them in a collection route that starts at Eldin Tower and always heads for the next closest seed, so you can work through them in order without crossing the map twice. Every seed has a link to its spot on the interactive map, the nearest landmark with a compass direction. If you do not know how to solve a Korok puzzle, the Korok puzzle guide lists every type and its solution.
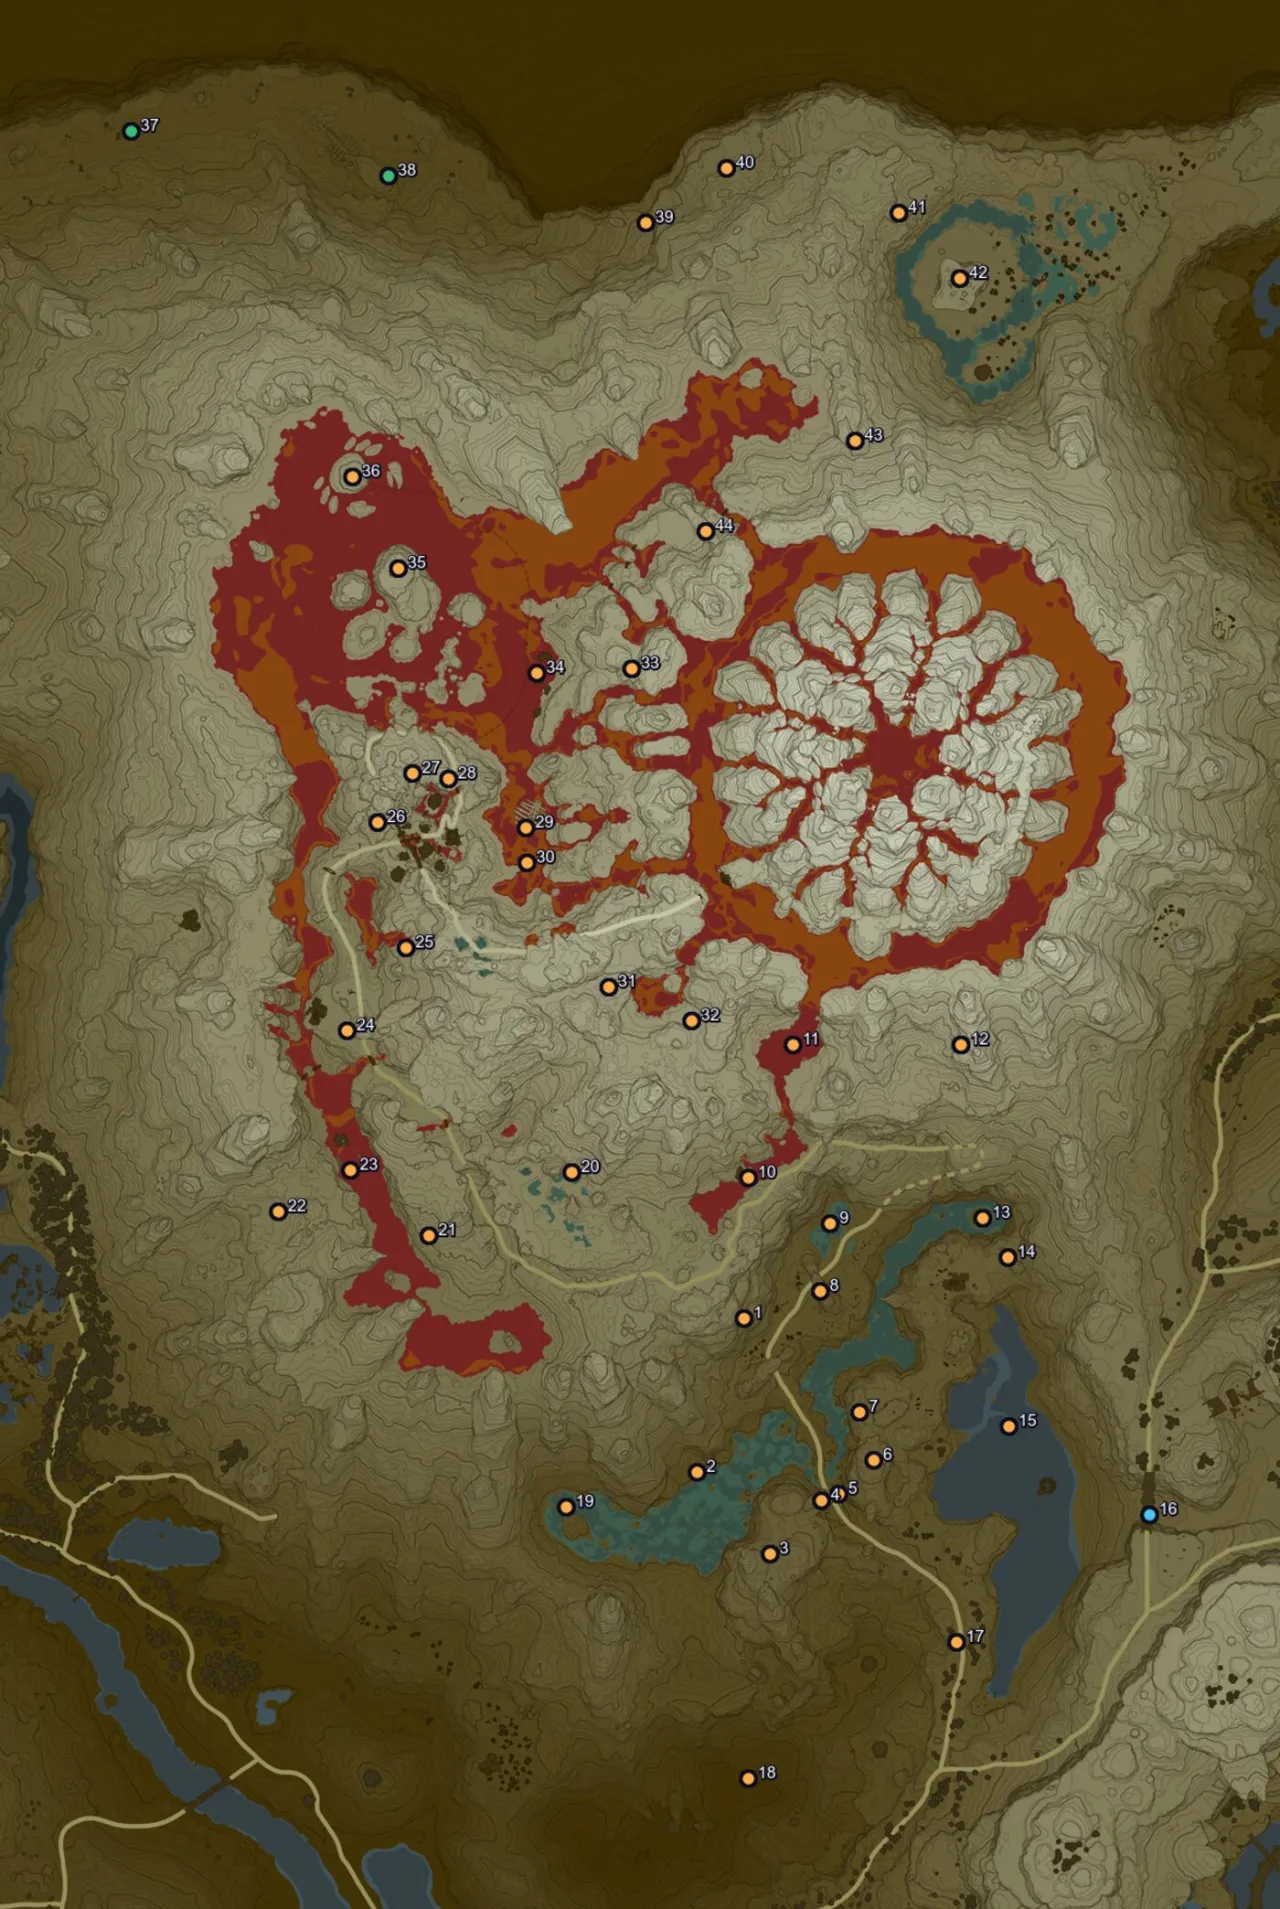
Table of Contents
Korok Seeds by area
The game divides the world into named areas. The seeds of Eldin fall into these:
| Area | Seeds | Seed numbers on this page |
|---|---|---|
| Eldin Canyon | 41 | 1, 2, 3, 4, 5, 6, 7, 8, 9, 10, 11, 12, 13, 14, 15, 17, 18, 19 and 23 more |
| Eldin Mountains | 2 | 37, 38 |
| Tamul Plateau | 1 | 16 |
Seeds near landmarks
Towers, shrines, stables and villages make the easiest starting points. These landmarks have the most seeds within 500 map units:
| Landmark | Type | Seeds within 500 units | Seed numbers |
|---|---|---|---|
 Sah Dahaj Shrine | Shrine | 12 | 1, 4, 5, 6, 7, 8, 9, 10, 12, 13, 14, 15 |
| Eldin Tower | Sheikah Tower | 12 | 1, 2, 3, 4, 5, 6, 7, 8, 9, 10, 19, 20 |
| Daqa Koh Shrine | Shrine | 11 | 11, 25, 26, 27, 28, 29, 30, 31, 32, 33, 34 |
| Goron City | Village | 11 | 24, 25, 26, 27, 28, 29, 30, 31, 33, 34, 35 |
| Shae Mo’sah Shrine | Shrine | 10 | 25, 26, 27, 28, 29, 30, 31, 33, 34, 35 |
| Tah Muhl Shrine | Shrine | 9 | 2, 3, 4, 5, 6, 7, 17, 18, 19 |
| Foothill Stable | Stable | 9 | 2, 3, 4, 5, 6, 7, 15, 16, 17 |
| Kayra Mah Shrine | Shrine | 9 | 9, 10, 11, 20, 25, 29, 30, 31, 32 |
| Mo’a Keet Shrine | Shrine | 8 | 3, 4, 5, 6, 7, 15, 16, 17 |
| Qua Raym Shrine | Shrine | 7 | 1, 2, 19, 20, 21, 22, 23 |
| Ze Kasho Shrine | Shrine | 4 | 13, 14, 15, 16 |
| Gorae Torr Shrine | Shrine | 4 | 40, 41, 42, 43 |
| South Akkala Stable | Stable | 2 | 13, 14 |
| Shora Hah Shrine | Shrine | 2 | 35, 36 |
Seed clusters
Seeds that sit close together are worth collecting in one trip. Each group below has four or more seeds within a short walk of each other.
| Group | Seeds | Map | Nearest landmark | Seed numbers |
|---|---|---|---|---|
| Group 1 | 6 | Show on map | Foothill Stable (256 units north-west) | 2, 3, 4, 5, 6, 7 |
| Group 2 | 5 | Show on map | Goron City (62 units north-east) | 26, 27, 28, 29, 30 |
| Group 3 | 4 | Show on map | Eldin Tower (212 units north-east) | 1, 8, 9, 10 |
Collection route: all 44 seeds in order
Placement is the game’s own flag: Ground seeds appear on the ground, Air seeds appear off the ground (on a ledge, in a tree or in mid-air), so look up for those. Distances are in map units; a square on the map is 1,000 units wide. The last column is the distance from the previous seed.
Leg 1: seeds 1 to 10
| # | Map | Area | Placement | Nearest landmark | From previous |
|---|---|---|---|---|---|
| 1 | Show on map | Eldin Canyon | Ground | Eldin Tower, 93 units east | 93 units from Eldin Tower |
| 2 | Show on map | Eldin Canyon | Ground | Eldin Tower, 275 units south | 296 units |
| 3 | Show on map | Eldin Canyon | Ground | Tah Muhl Shrine, 193 units north | 201 units |
| 4 | Show on map | Eldin Canyon | Air | Foothill Stable, 223 units north-west | 134 units |
| 5 | Show on map | Eldin Canyon | Ground | Foothill Stable, 198 units north-west | 35 units |
| 6 | Show on map | Eldin Canyon | Ground | Foothill Stable, 194 units north-west | 88 units |
| 7 | Show on map | Eldin Canyon | Ground | Sah Dahaj Shrine, 265 units south-west | 91 units |
| 8 | Show on map | Eldin Canyon | Air | Eldin Tower, 240 units east | 233 units |
| 9 | Show on map | Eldin Canyon | Air | Sah Dahaj Shrine, 289 units north-west | 126 units |
| 10 | Show on map | Eldin Canyon | Air | Eldin Tower, 284 units north | 172 units |
Leg 2: seeds 11 to 20
| # | Map | Area | Placement | Nearest landmark | From previous |
|---|---|---|---|---|---|
| 11 | Show on map | Eldin Canyon | Ground | Kayra Mah Shrine, 281 units east | 257 units |
| 12 | Show on map | Eldin Canyon | Ground | Sah Dahaj Shrine, 487 units north | 308 units |
| 13 | Show on map | Eldin Canyon | Ground | Sah Dahaj Shrine, 173 units north | 321 units |
| 14 | Show on map | Eldin Canyon | Ground | Sah Dahaj Shrine, 128 units north-east | 87 units |
| 15 | Show on map | Eldin Canyon | Air | Mo’a Keet Shrine, 203 units north | 310 units |
| 16 | Show on map | Tamul Plateau | Ground | Mo’a Keet Shrine, 290 units east | 305 units |
| 17 | Show on map | Eldin Canyon | Ground | Foothill Stable, 178 units south | 424 units |
| 18 | Show on map | Eldin Canyon | Air | Tah Muhl Shrine, 222 units south | 456 units |
| 19 | Show on map | Eldin Canyon | Air | Qua Raym Shrine, 323 units south | 600 units |
| 20 | Show on map | Eldin Canyon | Ground | Kayra Mah Shrine, 242 units south-west | 615 units |
Leg 3: seeds 21 to 30
| # | Map | Area | Placement | Nearest landmark | From previous |
|---|---|---|---|---|---|
| 21 | Show on map | Eldin Canyon | Ground | Qua Raym Shrine, 239 units north-west | 287 units |
| 22 | Show on map | Eldin Canyon | Air | Qua Raym Shrine, 475 units north-west | 279 units |
| 23 | Show on map | Eldin Canyon | Air | Qua Raym Shrine, 422 units north-west | 153 units |
| 24 | Show on map | Eldin Canyon | Air | Goron City, 403 units south | 255 units |
| 25 | Show on map | Eldin Canyon | Ground | Goron City, 227 units south | 187 units |
| 26 | Show on map | Eldin Canyon | Air | Goron City, 91 units west | 237 units |
| 27 | Show on map | Eldin Canyon | Ground | Shae Mo’sah Shrine, 99 units west | 110 units |
| 28 | Show on map | Eldin Canyon | Air | Shae Mo’sah Shrine, 32 units west | 68 units |
| 29 | Show on map | Eldin Canyon | Ground | Shae Mo’sah Shrine, 146 units south-east | 167 units |
| 30 | Show on map | Eldin Canyon | Air | Goron City, 195 units east | 64 units |
Leg 4: seeds 31 to 40
| # | Map | Area | Placement | Nearest landmark | From previous |
|---|---|---|---|---|---|
| 31 | Show on map | Eldin Canyon | Ground | Kayra Mah Shrine, 145 units north-west | 273 units |
| 32 | Show on map | Eldin Canyon | Ground | Kayra Mah Shrine, 118 units north-east | 165 units |
| 33 | Show on map | Eldin Canyon | Ground | Shae Mo’sah Shrine, 362 units north-east | 656 units |
| 34 | Show on map | Eldin Canyon | Air | Shae Mo’sah Shrine, 228 units north-east | 175 units |
| 35 | Show on map | Eldin Canyon | Ground | Shora Hah Shrine, 202 units south-east | 318 units |
| 36 | Show on map | Eldin Canyon | Ground | Shora Hah Shrine, 15 units south-east | 188 units |
| 37 | Show on map | Eldin Mountains | Ground | Shora Hah Shrine, 739 units north-west | 753 units |
| 38 | Show on map | Eldin Mountains | Ground | Shora Hah Shrine, 549 units north | 479 units |
| 39 | Show on map | Eldin Canyon | Ground | Gorae Torr Shrine, 587 units west | 480 units |
| 40 | Show on map | Eldin Canyon | Ground | Gorae Torr Shrine, 480 units north-west | 178 units |
Leg 5: seeds 41 to 44
| # | Map | Area | Placement | Nearest landmark | From previous |
|---|---|---|---|---|---|
| 41 | Show on map | Eldin Canyon | Ground | Gorae Torr Shrine, 176 units north-west | 327 units |
| 42 | Show on map | Eldin Canyon | Ground | Gorae Torr Shrine, 15 units north | 165 units |
| 43 | Show on map | Eldin Canyon | Ground | Gorae Torr Shrine, 342 units south-west | 354 units |
| 44 | Show on map | Eldin Canyon | Ground | Shae Mo’sah Shrine, 626 units north-east | 321 units |
More help
- All 900 Korok Seeds, Hestu‘s rewards and the full region list
- Korok puzzle types and how to solve each one
- The Death Mountain and Goron City walkthrough chapter, which solves many of this region’s Koroks along the route
- Interactive map of every Korok Seed
