





















| Region | Dueling Peaks, the area around Kakariko Village and the twin Dueling Peaks |
|---|---|
| Korok Seeds | 68 (38 on the ground, 30 off the ground) |
| Areas | West Hateru (50), East Hateru (8), Central Hyrule (5), Lanayru Water Sources (4), Lanayru Wetlands (1) |
| Start of the route | Dueling Peaks Tower |
| Route length | about 12,434 map units in 7 legs of up to 10 seeds |
| Walkthrough | Kakariko Village chapter |
| Position | x increases east, z increases south, height is up |
Show every Korok seed on the interactive map
There are 68 Korok Seeds in the Dueling Peaks region of Breath of the Wild, the area around Kakariko Village and the twin Dueling Peaks. This page numbers them in a collection route that starts at Dueling Peaks Tower and always heads for the next closest seed, so you can work through them in order without crossing the map twice. Every seed has its map position (click it to see the spot on the interactive map), its map square, the nearest landmark with a compass direction. If you do not know how to solve a Korok puzzle, the Korok puzzle guide lists every type and its solution.
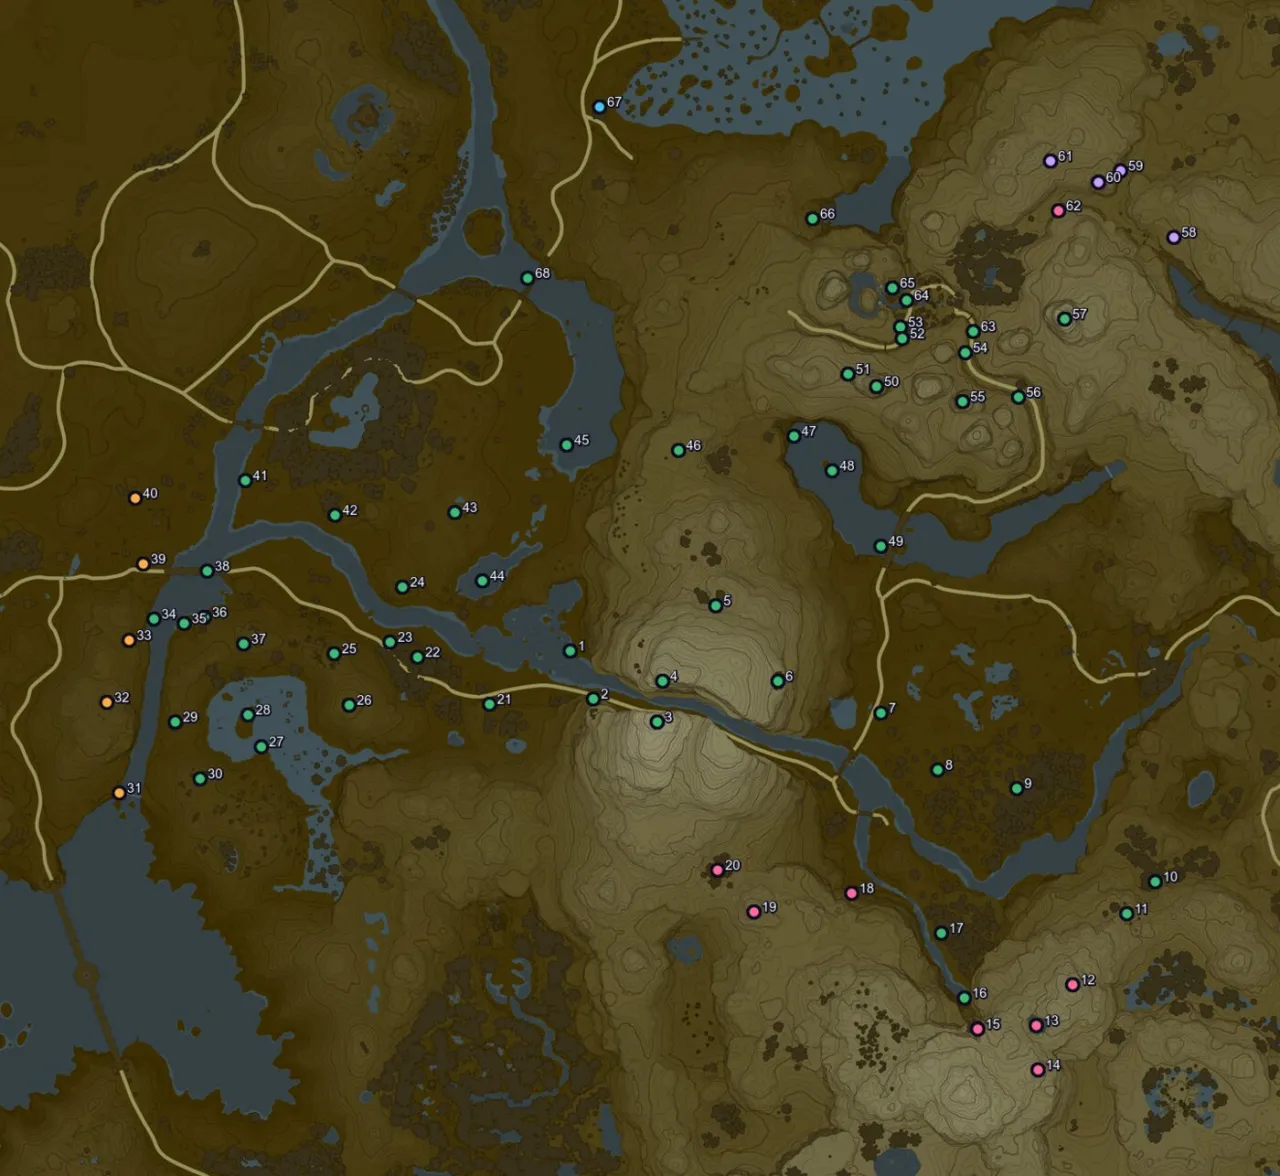
Korok Seeds by area
The game divides the world into named areas. The seeds of Dueling Peaks fall into these:
| Area | Seeds | Seed numbers on this page |
|---|---|---|
| West Hateru | 50 | 1, 2, 3, 4, 5, 6, 7, 8, 9, 10, 11, 16, 17, 21, 22, 23, 24, 25 and 32 more |
| East Hateru | 8 | 12, 13, 14, 15, 18, 19, 20, 62 |
| Central Hyrule | 5 | 31, 32, 33, 39, 40 |
| Lanayru Water Sources | 4 | 58, 59, 60, 61 |
| Lanayru Wetlands | 1 | 67 |
Seeds near landmarks
Towers, shrines, stables and villages make the easiest starting points. These landmarks have the most seeds within 500 map units:
| Landmark | Type | Seeds within 500 units | Seed numbers |
|---|---|---|---|
 Lakna Rokee Shrine Lakna Rokee Shrine | Shrine | 17 | 50, 51, 52, 53, 54, 55, 56, 57, 58, 59, 60, 61, 62, 63, 64, 65, 66 |
| Ta’loh Naeg Shrine | Shrine | 17 | 47, 50, 51, 52, 53, 54, 55, 56, 57, 59, 60, 61, 62, 63, 64, 65, 66 |
| Bosh Kala Shrine | Shrine | 17 | 25, 27, 28, 29, 30, 31, 32, 33, 34, 35, 36, 37, 38, 39, 40, 41, 42 |
| Kakariko Village | Village | 16 | 47, 48, 50, 51, 52, 53, 54, 55, 56, 57, 61, 62, 63, 64, 65, 66 |
| Dueling Peaks Tower | Sheikah Tower | 13 | 1, 2, 3, 4, 5, 21, 22, 23, 24, 43, 44, 45, 46 |
| Toto Sah Shrine | Shrine | 11 | 8, 9, 11, 12, 13, 14, 15, 16, 17, 18, 19 |
| Ha Dahamar Shrine | Shrine | 11 | 3, 4, 5, 6, 7, 8, 9, 18, 19, 20, 49 |
| Ree Dahee Shrine | Shrine | 10 | 1, 2, 3, 4, 5, 6, 7, 20, 21, 44 |
| Shee Vaneer Shrine | Shrine | 10 | 1, 2, 3, 4, 5, 6, 7, 19, 20, 21 |
| Shee Venath Shrine | Shrine | 9 | 1, 2, 3, 4, 5, 6, 20, 21, 44 |
| Dueling Peaks Stable | Stable | 7 | 5, 6, 7, 8, 9, 18, 49 |
| Shoda Sah Shrine | Shrine | 4 | 13, 14, 15, 16 |
| Riverside Stable | Stable | 3 | 40, 41, 42 |
| Hateno Tower | Sheikah Tower | 2 | 10, 11 |
Seed clusters
Seeds that sit close together are worth collecting in one trip. Each group below has four or more seeds within a short walk of each other.
| Group | Seeds | Centre (x, z) | Nearest landmark | Seed numbers |
|---|---|---|---|---|
| Group 1 | 27 | 518, 1,787 | Bosh Kala Shrine (450 units east) | 1, 2, 3, 4, 5, 21, 22, 23, 24, 25, 26, 27, 28, 29, 30, 31, 32, 33, 34, 35, 36, 37, 38, 39, 40, 43, 44 |
| Group 2 | 14 | 1,828, 1,163 | Kakariko Village (180 units south) | 47, 48, 49, 50, 51, 52, 53, 54, 55, 56, 57, 63, 64, 65 |
| Group 3 | 8 | 2,106, 2,523 | Toto Sah Shrine (264 units east) | 10, 11, 12, 13, 14, 15, 16, 17 |
| Group 4 | 5 | 2,244, 749 | Lakna Rokee Shrine (302 units north-east) | 58, 59, 60, 61, 62 |
Collection route: all 68 seeds in order
Placement is the game’s own flag: Ground seeds appear on the ground, Air seeds appear off the ground (on a ledge, in a tree or in mid-air), so look up for those. Distances are in map units; a square on the map is 1,000 units wide. The last column is the distance from the previous seed.
Leg 1: seeds 1 to 10
| # | Map position (x, z, height) | Square | Area | Placement | Nearest landmark | From previous |
|---|---|---|---|---|---|---|
| 1 | 1049, 1783, 116 | G-6 | West Hateru | Ground | Dueling Peaks Tower, 76 units south-east | 76 units from Dueling Peaks Tower |
| 2 | 1102, 1890, 224 | G-6 | West Hateru | Ground | Shee Venath Shrine, 148 units west | 119 units |
| 3 | 1245, 1942, 541 | G-6 | West Hateru | Ground | Shee Vaneer Shrine, 21 units west | 152 units |
| 4 | 1258, 1851, 492 | G-6 | West Hateru | Ground | Shee Venath Shrine, 13 units east | 92 units |
| 5 | 1377, 1680, 328 | G-6 | West Hateru | Air | Ree Dahee Shrine, 194 units north-east | 208 units |
| 6 | 1517, 1850, 400 | G-6 | West Hateru | Air | Ha Dahamar Shrine, 163 units north-west | 220 units |
| 7 | 1749, 1922, 141 | G-6 | West Hateru | Air | Dueling Peaks Stable, 13 units west | 243 units |
| 8 | 1877, 2051, 133 | G-7 | West Hateru | Ground | Dueling Peaks Stable, 170 units south-east | 182 units |
| 9 | 2055, 2093, 153 | H-7 | West Hateru | Air | Dueling Peaks Stable, 338 units south-east | 183 units |
| 10 | 2367, 2303, 222 | H-7 | West Hateru | Air | Hateno Tower, 406 units south-west | 376 units |
Leg 2: seeds 11 to 20
| # | Map position (x, z, height) | Square | Area | Placement | Nearest landmark | From previous |
|---|---|---|---|---|---|---|
| 11 | 2304, 2375, 281 | H-7 | West Hateru | Air | Toto Sah Shrine, 468 units east | 96 units |
| 12 | 2182, 2535, 415 | H-7 | East Hateru | Ground | Toto Sah Shrine, 341 units east | 201 units |
| 13 | 2100, 2626, 364 | H-7 | East Hateru | Air | Toto Sah Shrine, 296 units south-east | 122 units |
| 14 | 2104, 2726, 423 | H-7 | East Hateru | Ground | Toto Sah Shrine, 360 units south-east | 100 units |
| 15 | 1967, 2634, 366 | G-7 | East Hateru | Ground | Toto Sah Shrine, 200 units south-east | 165 units |
| 16 | 1937, 2565, 134 | G-7 | West Hateru | Ground | Toto Sah Shrine, 128 units south-east | 75 units |
| 17 | 1886, 2419, 147 | G-7 | West Hateru | Air | Toto Sah Shrine, 67 units north-east | 155 units |
| 18 | 1683, 2328, 201 | G-7 | East Hateru | Ground | Toto Sah Shrine, 219 units north-west | 222 units |
| 19 | 1463, 2371, 337 | G-7 | East Hateru | Air | Toto Sah Shrine, 397 units west | 224 units |
| 20 | 1382, 2277, 288 | G-7 | East Hateru | Air | Shee Vaneer Shrine, 358 units south | 124 units |
Leg 3: seeds 21 to 30
| # | Map position (x, z, height) | Square | Area | Placement | Nearest landmark | From previous |
|---|---|---|---|---|---|---|
| 21 | 868, 1902, 143 | F-6 | West Hateru | Air | Dueling Peaks Tower, 240 units south-west | 636 units |
| 22 | 705, 1797, 117 | F-6 | West Hateru | Ground | Dueling Peaks Tower, 323 units west | 194 units |
| 23 | 644, 1763, 117 | F-6 | West Hateru | Air | Dueling Peaks Tower, 376 units west | 70 units |
| 24 | 671, 1638, 181 | F-6 | West Hateru | Air | Dueling Peaks Tower, 354 units west | 128 units |
| 25 | 517, 1788, 167 | F-6 | West Hateru | Ground | Bosh Kala Shrine, 449 units east | 215 units |
| 26 | 552, 1904, 183 | F-6 | West Hateru | Ground | Dueling Peaks Tower, 502 units west | 121 units |
| 27 | 354, 1998, 115 | F-6 | West Hateru | Ground | Bosh Kala Shrine, 432 units south-east | 219 units |
| 28 | 323, 1927, 118 | F-6 | West Hateru | Air | Bosh Kala Shrine, 358 units south-east | 77 units |
| 29 | 160, 1942, 150 | F-6 | West Hateru | Ground | Bosh Kala Shrine, 293 units south | 164 units |
| 30 | 215, 2070, 170 | F-7 | West Hateru | Air | Bosh Kala Shrine, 432 units south | 139 units |
Leg 4: seeds 31 to 40
| # | Map position (x, z, height) | Square | Area | Placement | Nearest landmark | From previous |
|---|---|---|---|---|---|---|
| 31 | 34, 2103, 116 | F-7 | Central Hyrule | Ground | Bosh Kala Shrine, 448 units south | 184 units |
| 32 | 5, 1898, 208 | F-6 | Central Hyrule | Ground | Bosh Kala Shrine, 254 units south | 207 units |
| 33 | 55, 1759, 147 | F-6 | Central Hyrule | Air | Bosh Kala Shrine, 106 units south | 148 units |
| 34 | 112, 1710, 117 | F-6 | West Hateru | Air | Bosh Kala Shrine, 58 units south-east | 75 units |
| 35 | 179, 1720, 117 | F-6 | West Hateru | Ground | Bosh Kala Shrine, 111 units south-east | 68 units |
| 36 | 225, 1706, 122 | F-6 | West Hateru | Ground | Bosh Kala Shrine, 146 units east | 48 units |
| 37 | 313, 1767, 180 | F-6 | West Hateru | Air | Bosh Kala Shrine, 251 units south-east | 107 units |
| 38 | 232, 1601, 115 | F-6 | West Hateru | Ground | Bosh Kala Shrine, 156 units east | 185 units |
| 39 | 87, 1585, 165 | F-6 | Central Hyrule | Air | Bosh Kala Shrine, 73 units north | 146 units |
| 40 | 69, 1438, 121 | F-6 | Central Hyrule | Air | Bosh Kala Shrine, 220 units north | 148 units |
Leg 5: seeds 41 to 50
| # | Map position (x, z, height) | Square | Area | Placement | Nearest landmark | From previous |
|---|---|---|---|---|---|---|
| 41 | 318, 1398, 115 | F-6 | West Hateru | Ground | Riverside Stable, 303 units south | 252 units |
| 42 | 519, 1476, 131 | F-6 | West Hateru | Air | Riverside Stable, 421 units south-east | 216 units |
| 43 | 789, 1471, 146 | F-6 | West Hateru | Ground | Dueling Peaks Tower, 333 units north-west | 270 units |
| 44 | 851, 1624, 115 | F-6 | West Hateru | Ground | Dueling Peaks Tower, 189 units north-west | 165 units |
| 45 | 1041, 1318, 121 | F-6 | West Hateru | Ground | Dueling Peaks Tower, 397 units north | 360 units |
| 46 | 1293, 1331, 274 | G-6 | West Hateru | Ground | Dueling Peaks Tower, 472 units north-east | 252 units |
| 47 | 1554, 1297, 119 | G-6 | West Hateru | Air | Kakariko Village, 401 units south-west | 263 units |
| 48 | 1639, 1376, 116 | G-6 | West Hateru | Air | Kakariko Village, 425 units south-west | 116 units |
| 49 | 1750, 1545, 116 | G-6 | West Hateru | Air | Dueling Peaks Stable, 381 units north | 202 units |
| 50 | 1739, 1187, 413 | G-6 | West Hateru | Ground | Kakariko Village, 213 units south | 358 units |
Leg 6: seeds 51 to 60
| # | Map position (x, z, height) | Square | Area | Placement | Nearest landmark | From previous |
|---|---|---|---|---|---|---|
| 51 | 1676, 1158, 325 | G-6 | West Hateru | Ground | Kakariko Village, 217 units south-west | 69 units |
| 52 | 1798, 1078, 231 | G-6 | West Hateru | Air | Kakariko Village, 94 units south | 146 units |
| 53 | 1794, 1053, 259 | G-6 | West Hateru | Ground | Kakariko Village, 69 units south | 25 units |
| 54 | 1940, 1111, 269 | G-6 | West Hateru | Ground | Lakna Rokee Shrine, 171 units south-west | 157 units |
| 55 | 1933, 1221, 377 | G-6 | West Hateru | Ground | Kakariko Village, 268 units south-east | 110 units |
| 56 | 2059, 1209, 245 | H-6 | West Hateru | Ground | Lakna Rokee Shrine, 238 units south | 127 units |
| 57 | 2164, 1035, 461 | H-6 | West Hateru | Ground | Lakna Rokee Shrine, 140 units south-east | 203 units |
| 58 | 2410, 849, 270 | H-5 | Lanayru Water Sources | Air | Lakna Rokee Shrine, 390 units east | 308 units |
| 59 | 2289, 700, 251 | H-5 | Lanayru Water Sources | Ground | Lakna Rokee Shrine, 369 units north-east | 192 units |
| 60 | 2240, 726, 338 | H-5 | Lanayru Water Sources | Air | Lakna Rokee Shrine, 317 units north-east | 55 units |
Leg 7: seeds 61 to 68
| # | Map position (x, z, height) | Square | Area | Placement | Nearest landmark | From previous |
|---|---|---|---|---|---|---|
| 61 | 2132, 679, 321 | H-5 | Lanayru Water Sources | Ground | Lakna Rokee Shrine, 307 units north | 118 units |
| 62 | 2149, 790, 263 | H-5 | East Hateru | Ground | Lakna Rokee Shrine, 212 units north-east | 112 units |
| 63 | 1957, 1062, 248 | G-6 | West Hateru | Air | Lakna Rokee Shrine, 122 units south-west | 333 units |
| 64 | 1807, 992, 220 | G-6 | West Hateru | Air | Kakariko Village, 7 units south | 166 units |
| 65 | 1776, 964, 219 | G-6 | West Hateru | Air | Kakariko Village, 37 units north-west | 42 units |
| 66 | 1596, 808, 117 | G-5 | West Hateru | Ground | Ta’loh Naeg Shrine, 259 units west | 238 units |
| 67 | 1116, 556, 120 | G-5 | Lanayru Wetlands | Ground | Hila Rao Shrine, 385 units north-east | 542 units |
| 68 | 954, 942, 116 | F-5 | West Hateru | Ground | Hila Rao Shrine, 144 units south-east | 419 units |
More help
- All 900 Korok Seeds, Hestu‘s rewards and the full region list
- Korok puzzle types and how to solve each one
- The Kakariko Village walkthrough chapter, which solves many of this region’s Koroks along the route
- Interactive map of every Korok Seed
