
























| Region | Lanayru, the rivers, wetlands and coast around Zora’s Domain |
|---|---|
| Korok Seeds | 60 (45 on the ground, 15 off the ground) |
| Areas | Lanayru Water Sources (29), Central Hyrule (11), Lanayru Wetlands (8), Lanayru Sea (5), Tamul Plateau (4), Eldin Canyon (3) |
| Start of the route | Lanayru Tower |
| Route length | about 18,462 map units in 6 legs of up to 10 seeds |
| Walkthrough | Zora’s Domain chapter |
Show every Korok seed on the interactive map
There are 60 Korok Seeds in the Lanayru region of Breath of the Wild, the rivers, wetlands and coast around Zora’s Domain. This page numbers them in a collection route that starts at Lanayru Tower and always heads for the next closest seed, so you can work through them in order without crossing the map twice. Every seed has a link to its spot on the interactive map, the nearest landmark with a compass direction. If you do not know how to solve a Korok puzzle, the Korok puzzle guide lists every type and its solution.
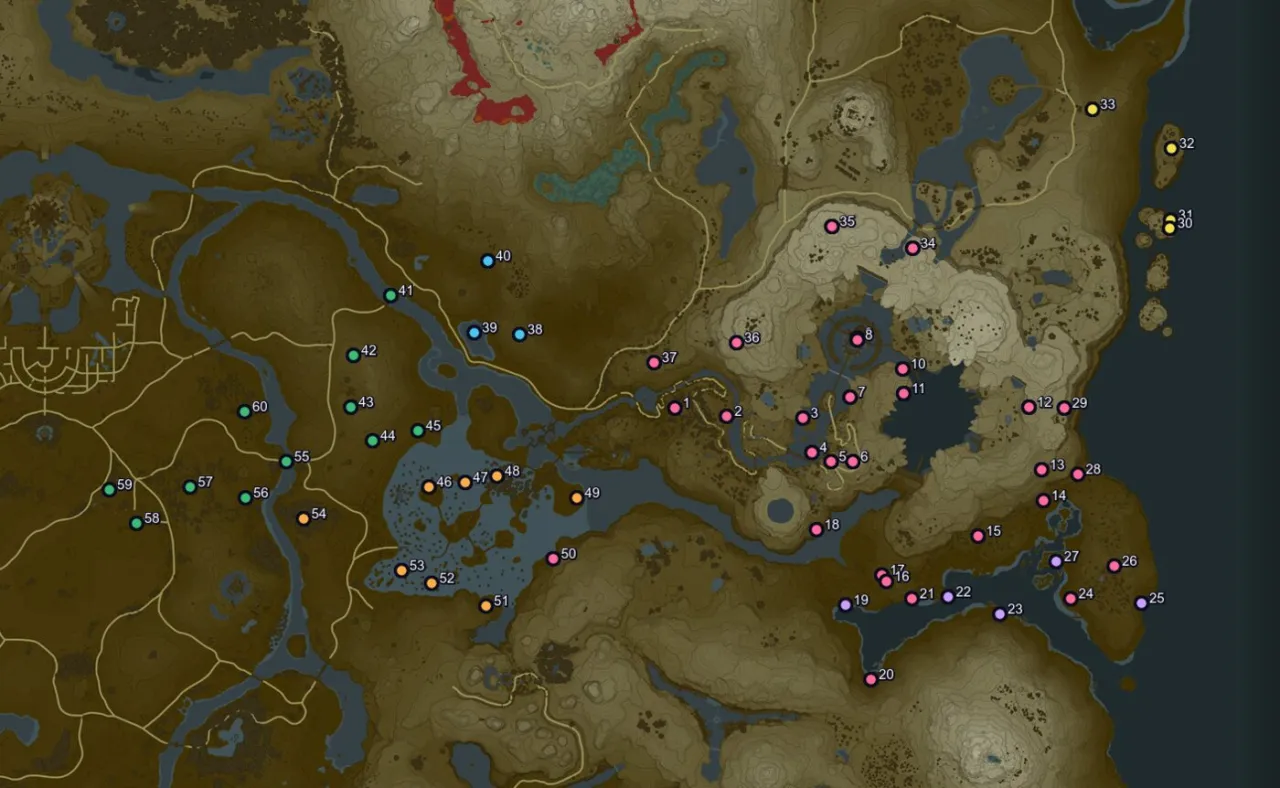
Table of Contents
Korok Seeds by area
The game divides the world into named areas. The seeds of Lanayru fall into these:
| Area | Seeds | Seed numbers on this page |
|---|---|---|
| Lanayru Water Sources | 29 | 1, 2, 3, 4, 5, 6, 7, 8, 9, 10, 11, 12, 13, 14, 15, 16, 17, 18 and 11 more |
| Central Hyrule | 11 | 41, 42, 43, 44, 45, 55, 56, 57, 58, 59, 60 |
| Lanayru Wetlands | 8 | 46, 47, 48, 49, 51, 52, 53, 54 |
| Lanayru Sea | 5 | 19, 22, 23, 25, 27 |
| Tamul Plateau | 4 | 30, 31, 32, 33 |
| Eldin Canyon | 3 | 38, 39, 40 |
Seeds near landmarks
Towers, shrines, stables and villages make the easiest starting points. These landmarks have the most seeds within 500 map units:
| Landmark | Type | Seeds within 500 units | Seed numbers |
|---|---|---|---|
 Dagah Keek Shrine | Shrine | 11 | 2, 3, 4, 5, 6, 7, 8, 9, 10, 11, 36 |
| Zora’s Domain | Village | 10 | 3, 4, 5, 6, 7, 8, 9, 10, 11, 36 |
| Shai Yota Shrine | Shrine | 9 | 12, 13, 14, 15, 24, 26, 27, 28, 29 |
| Rucco Maag Shrine | Shrine | 9 | 4, 5, 6, 16, 17, 18, 19, 21, 22 |
| Sheh Rata Shrine | Shrine | 8 | 38, 39, 41, 42, 43, 44, 45, 47 |
| Ne’ez Yohma Shrine | Shrine | 7 | 3, 7, 8, 9, 10, 11, 34 |
| Daka Tuss Shrine | Shrine | 7 | 46, 47, 48, 50, 51, 52, 53 |
| Kaya Wan Shrine | Shrine | 7 | 43, 44, 54, 55, 56, 57, 60 |
| Wetland Stable | Stable | 6 | 43, 44, 54, 55, 56, 60 |
| Kah Mael Shrine | Shrine | 4 | 30, 31, 32, 33 |
| Lanayru Tower | Sheikah Tower | 4 | 1, 2, 37, 49 |
| Soh Kofi Shrine | Shrine | 4 | 1, 37, 38, 49 |
| Ta’loh Naeg Shrine | Shrine | 2 | 50, 51 |
Seed clusters
Seeds that sit close together are worth collecting in one trip. Each group below has four or more seeds within a short walk of each other.
| Group | Seeds | Map | Nearest landmark | Seed numbers |
|---|---|---|---|---|
| Group 1 | 5 | Show on map | Rucco Maag Shrine (247 units south-east) | 16, 17, 19, 21, 22 |
| Group 2 | 4 | Show on map | Zora’s Domain (378 units south) | 3, 4, 5, 6 |
Collection route: all 60 seeds in order
Placement is the game’s own flag: Ground seeds appear on the ground, Air seeds appear off the ground (on a ledge, in a tree or in mid-air), so look up for those. Distances are in map units; a square on the map is 1,000 units wide. The last column is the distance from the previous seed.
Leg 1: seeds 1 to 10
| # | Map | Area | Placement | Nearest landmark | From previous |
|---|---|---|---|---|---|
| 1 | Show on map | Lanayru Water Sources | Ground | Lanayru Tower, 280 units east | 280 units from Lanayru Tower |
| 2 | Show on map | Lanayru Water Sources | Air | Dagah Keek Shrine, 470 units south-west | 231 units |
| 3 | Show on map | Lanayru Water Sources | Ground | Dagah Keek Shrine, 258 units south | 337 units |
| 4 | Show on map | Lanayru Water Sources | Ground | Dagah Keek Shrine, 401 units south | 156 units |
| 5 | Show on map | Lanayru Water Sources | Ground | Rucco Maag Shrine, 399 units north | 93 units |
| 6 | Show on map | Lanayru Water Sources | Ground | Rucco Maag Shrine, 381 units north | 97 units |
| 7 | Show on map | Lanayru Water Sources | Ground | Zora’s Domain, 142 units south | 284 units |
| 8 | Show on map | Lanayru Water Sources | Air | Ne’ez Yohma Shrine, 4 units south-west | 255 units |
| 9 | Show on map | Lanayru Water Sources | Air | Ne’ez Yohma Shrine, 2 units north | 7 units |
| 10 | Show on map | Lanayru Water Sources | Ground | Ne’ez Yohma Shrine, 239 units south-east | 239 units |
Leg 2: seeds 11 to 20
| # | Map | Area | Placement | Nearest landmark | From previous |
|---|---|---|---|---|---|
| 11 | Show on map | Lanayru Water Sources | Ground | Divine Beast Vah Ruta, 159 units north-west | 107 units |
| 12 | Show on map | Lanayru Water Sources | Ground | Divine Beast Vah Ruta, 434 units east | 556 units |
| 13 | Show on map | Lanayru Water Sources | Ground | Shai Yota Shrine, 223 units north-west | 282 units |
| 14 | Show on map | Lanayru Water Sources | Ground | Shai Yota Shrine, 117 units north-west | 136 units |
| 15 | Show on map | Lanayru Water Sources | Ground | Shai Yota Shrine, 403 units west | 329 units |
| 16 | Show on map | Lanayru Water Sources | Ground | Rucco Maag Shrine, 190 units south-east | 449 units |
| 17 | Show on map | Lanayru Water Sources | Ground | Rucco Maag Shrine, 156 units south-east | 34 units |
| 18 | Show on map | Lanayru Water Sources | Ground | Rucco Maag Shrine, 208 units west | 352 units |
| 19 | Show on map | Lanayru Sea | Ground | Rucco Maag Shrine, 262 units south | 357 units |
| 20 | Show on map | Lanayru Water Sources | Ground | Rucco Maag Shrine, 583 units south | 345 units |
Leg 3: seeds 21 to 30
| # | Map | Area | Placement | Nearest landmark | From previous |
|---|---|---|---|---|---|
| 21 | Show on map | Lanayru Water Sources | Ground | Rucco Maag Shrine, 320 units south-east | 399 units |
| 22 | Show on map | Lanayru Sea | Ground | Rucco Maag Shrine, 443 units south-east | 159 units |
| 23 | Show on map | Lanayru Sea | Ground | Shai Yota Shrine, 531 units south-west | 244 units |
| 24 | Show on map | Lanayru Water Sources | Ground | Shai Yota Shrine, 375 units south | 319 units |
| 25 | Show on map | Lanayru Sea | Ground | Shai Yota Shrine, 513 units south-east | 310 units |
| 26 | Show on map | Lanayru Water Sources | Air | Shai Yota Shrine, 310 units south-east | 203 units |
| 27 | Show on map | Lanayru Sea | Air | Shai Yota Shrine, 215 units south | 255 units |
| 28 | Show on map | Lanayru Water Sources | Ground | Shai Yota Shrine, 182 units north | 397 units |
| 29 | Show on map | Lanayru Water Sources | Ground | Shai Yota Shrine, 466 units north | 298 units |
| 30 | Show on map | Tamul Plateau | Ground | Kah Mael Shrine, 307 units south | 918 units |
Leg 4: seeds 31 to 40
| # | Map | Area | Placement | Nearest landmark | From previous |
|---|---|---|---|---|---|
| 31 | Show on map | Tamul Plateau | Ground | Kah Mael Shrine, 271 units south | 36 units |
| 32 | Show on map | Tamul Plateau | Ground | Kah Mael Shrine, 46 units north | 316 units |
| 33 | Show on map | Tamul Plateau | Air | Tarrey Town, 402 units east | 390 units |
| 34 | Show on map | Lanayru Water Sources | Ground | Ne’ez Yohma Shrine, 466 units north-east | 1,000 units |
| 35 | Show on map | Lanayru Water Sources | Ground | Akkala Tower, 499 units south | 369 units |
| 36 | Show on map | Lanayru Water Sources | Air | Dagah Keek Shrine, 368 units west | 659 units |
| 37 | Show on map | Lanayru Water Sources | Air | Soh Kofi Shrine, 223 units north-east | 374 units |
| 38 | Show on map | Eldin Canyon | Air | Sheh Rata Shrine, 360 units north-east | 608 units |
| 39 | Show on map | Eldin Canyon | Air | Sheh Rata Shrine, 208 units north-east | 200 units |
| 40 | Show on map | Eldin Canyon | Ground | Sheh Rata Shrine, 519 units north | 323 units |
Leg 5: seeds 41 to 50
| # | Map | Area | Placement | Nearest landmark | From previous |
|---|---|---|---|---|---|
| 41 | Show on map | Central Hyrule | Air | Sheh Rata Shrine, 411 units north-west | 457 units |
| 42 | Show on map | Central Hyrule | Air | Sheh Rata Shrine, 411 units west | 308 units |
| 43 | Show on map | Central Hyrule | Ground | Wetland Stable, 438 units north-east | 228 units |
| 44 | Show on map | Central Hyrule | Ground | Wetland Stable, 383 units north-east | 178 units |
| 45 | Show on map | Central Hyrule | Ground | Sheh Rata Shrine, 291 units south-west | 206 units |
| 46 | Show on map | Lanayru Wetlands | Air | Daka Tuss Shrine, 368 units north-west | 253 units |
| 47 | Show on map | Lanayru Wetlands | Ground | Daka Tuss Shrine, 349 units north | 159 units |
| 48 | Show on map | Lanayru Wetlands | Air | Daka Tuss Shrine, 400 units north | 146 units |
| 49 | Show on map | Lanayru Wetlands | Ground | Lanayru Tower, 338 units south-west | 363 units |
| 50 | Show on map | Lanayru Water Sources | Ground | Daka Tuss Shrine, 379 units east | 290 units |
Leg 6: seeds 51 to 60
| # | Map | Area | Placement | Nearest landmark | From previous |
|---|---|---|---|---|---|
| 51 | Show on map | Lanayru Wetlands | Ground | Daka Tuss Shrine, 215 units south-east | 362 units |
| 52 | Show on map | Lanayru Wetlands | Ground | Daka Tuss Shrine, 183 units south-west | 261 units |
| 53 | Show on map | Lanayru Wetlands | Ground | Daka Tuss Shrine, 291 units west | 143 units |
| 54 | Show on map | Lanayru Wetlands | Ground | Wetland Stable, 101 units south | 488 units |
| 55 | Show on map | Central Hyrule | Ground | Kaya Wan Shrine, 165 units north | 262 units |
| 56 | Show on map | Central Hyrule | Air | Kaya Wan Shrine, 198 units west | 240 units |
| 57 | Show on map | Central Hyrule | Ground | Kaya Wan Shrine, 444 units west | 248 units |
| 58 | Show on map | Central Hyrule | Ground | Kaya Wan Shrine, 687 units west | 287 units |
| 59 | Show on map | Central Hyrule | Ground | Kaya Wan Shrine, 800 units west | 192 units |
| 60 | Show on map | Central Hyrule | Ground | Kaya Wan Shrine, 433 units north-west | 688 units |
More help
- All 900 Korok Seeds, Hestu‘s rewards and the full region list
- Korok puzzle types and how to solve each one
- The Zora’s Domain walkthrough chapter, which solves many of this region’s Koroks along the route
- Interactive map of every Korok Seed
