
























| Unlock | Enter from the Collection screen in your menu once Faron Province is freed from the Twilight |
|---|---|
| Floors | 40, in three sections of 5, 15 and 20 floors |
| Form | Wolf Link with Midna the whole way; you cannot turn human |
| Reward | 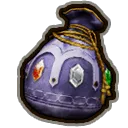 Colossal Wallet (9,999 Rupees) on floor 40; Red Rupee and Purple Rupee chests on the way; a Silver Rupee and an Orange Rupee in the exit room |
| Requirements | First section after Faron Province is freed from the Twilight; second after Arbiter’s Grounds; third after the Palace of Twilight |
The Cave of Shadows is a Twilight Princess HD addition, a 40-floor wolf-only combat challenge that you enter from the Collection screen in your menu. You fight waves of enemies as Wolf Link with Midna on your back, and you do it in three runs, since you leave and re-enter after each section. Clearing the last floor while carrying the Giant Wallet hands you the Colossal Wallet, which holds 9,999 Rupees. It is the HD game’s most generous Rupee reward and is the reason the cave counts toward a full 100%.
Table of Contents
Unlocking and structure
Getting in
Open the Collection screen in your menu. Once you have restored light to Faron Province in the Faron Woods chapter the first section becomes available. You are carried straight into the cave.
Three sections
The cave is split into three sections you must play in order: floors 1 to 5 (five fights, then a rest floor with a chest at floor 6), then up to floor 20 (a 15-floor section ending at another rest floor), then up to floor 40 (twenty floors). After each section you leave and come back in to start the next. The second section opens after the execution cutscene that follows the Arbiter’s Grounds (Arbiter’s Grounds walkthrough) and the third after the Master Sword is strengthened in the Palace of Twilight (Palace of Twilight walkthrough). You do not need to finish the game first, but you need to reach those points.
Score
After a section the game rates you on hearts left, best combo and time.
The Colossal Wallet
If you reach floor 40 while you hold the Giant Wallet (2,000 Rupees), you are rewarded with the Colossal Wallet. If you do not yet own the Giant Wallet, you are given the next wallet upgrade instead, and the Colossal Wallet becomes Agitha‘s final golden bug reward (see golden bugs and equipment upgrades).
Floors 1 to 20
| Floor | Enemies | Notes |
|---|---|---|
| 1 | 3 Shadow Beasts | First section |
| 2 | 4 Shadow Beasts | |
| 3 | 3 Shadow Deku Babas, 4 Shadow Vermin | |
| 4 | 4 Shadow Keese, 4 Shadow Vermin | |
| 5 | 4 Shadow Beasts, 4 Shadow Vermin | Last fight of section one |
| 6 | Rest floor | Chest with a Red Rupee; exit |
| 7 | 4 Bokoblins | Second section begins |
| 8 | 8 Keese | |
| 9 | 6 Baba Serpents | |
| 10 | 4 Helmasaurs | |
| 11 | 9 Torch Slugs | |
| 12 | 6 Tektites | |
| 13 | 3 Bulblins | |
| 14 | 3 Dodongos | |
| 15 | 20 Chus | |
| 16 | 15 Ghoul Rats | |
| 17 | 15 Bubbles | |
| 18 | 26 Stalchildren | |
| 19 | 2 Gibdos, 55 Poison Mites | |
| 20 | Rest floor | Chest with a Purple Rupee; exit |
Section 1 (floors 1 to 5)
Every floor is a closed room of Twilight creatures. Clear it with Wolf Link’s bite and attacks; chaining kills builds the combo that is rated at the end of the section.
Section 2 (floors 6 to 20)
From floor 7 you meet ordinary enemies from the main game, but as Wolf Link you have no sword or items, so fight with your bite and moves and keep an eye on your hearts. Floor 6 and floor 20 are rest floors; each ends the section and you must leave and re-enter to continue.
Floors 21 to 40
| Floor | Enemies | Notes |
|---|---|---|
| 21 | 3 Skulltulas, 5 Deku Babas | Third section begins |
| 22 | 3 Helmasaurs, 12 Ghoul Rats | |
| 23 | 2 Lizalfos, 6 Bokoblins, 4 Armos | |
| 24 | 4 Gibdos, 8 Deku Babas | |
| 25 | 2 Dodongos, 14 Torch Slugs, 6 Fire Keese | |
| 26 | 5 Keese, 5 Blue Bokoblins, 10 Ghoul Rats | |
| 27 | 2 Bulblins, 3 Gibdos | |
| 28 | 6 Ice Keese, 8 White Wolfos | |
| 29 | 12 Chus, 12 Ghoul Rats | |
| 30 | 1 Chilfos, 5 Mini-Freezards, 7 Ice Keese | |
| 31 | 4 Armos, 10 Baby Gohmas, 6 Keese, 7 Rats | |
| 32 | 1 Dynalfos, 1 Lizalfos, 2 Bokoblins | |
| 33 | 2 Chilfos, 4 Mini-Freezards, 7 Ice Keese | |
| 34 | 11 Chus, 3 Lizalfos, 1 Dynalfos | |
| 35 | 2 Helmasaurs, 5 Deku Babas, 10 Keese | |
| 36 | 2 Shadow Bulblin Archers, 6 Shadow Bulblins | |
| 37 | 4 Zant Masks, 4 Shadow Keese | |
| 38 | 3 Bulblin Archers, 4 Bokoblins | |
| 39 | Four-phase fight (see below) | Last battle before the reward |
| 40 | Reward room | Wallet; Silver Rupee chest; Orange Rupee on the Wolf Link statue |
Section 3 (floors 21 to 39)
Expect a mixed bag of earlier dungeon enemies, with ice enemies on floors 28, 30 and 33 and shadow creatures and Zant Masks again on floors 36 and 37. The third section opens once the Master Sword holds the light of the Sol in the Palace of Twilight.
Floor 39: the final battle
Floor 39 comes in four phases. First 2 Dodongos and 4 Baba Serpents, then 2 Fire Bubbles, 2 Ice Bubbles and 6 Stalchildren, then 3 Zant Masks. In the final phase the room has four switches, and the one you step on decides the last group: southeast sends 1 Dynalfos, 2 Helmasaurs and 4 Keese; southwest, 1 Lizalfos and 2 Dynalfos; northeast, 2 Bulblins and 3 Bokoblins; northwest, 2 Skulltulas and 6 Baby Gohmas. Defeat that group to open floor 40.
Floor 40: the reward and the exit room
The final reward is the Colossal Wallet, and the exit door opens. In the exit room there is a warp portal and a chest with a Silver Rupee (200 Rupees). A large Wolf Link and Midna statue stands there: climb the stairs, step on the lower-left tile for a Midna icon, press L so she moves to the top of the statue, jump up with her, and use your senses to dig up an Orange Rupee (100 Rupees).
Extra
Enemies drop no Hearts here, but you can dig one up from the centre of the room on floors 6, 9, 13, 20, 27, 32 and 38. Fairies in Bottles do not revive you in the cave.
