Hebra Korok Seeds
Region Hebra, the snowy Hebra Mountains in the far north-west Korok Seeds 79 (48 on the ground, 29 off the ground) Areas Hebra Mountains (50), Tabantha Frontier (27), Hyrule Hills (1), Eldin Mountains (1) Start of the route Hebra Tower Route length about 21,782 map units in 8 legs of up to 10 seeds Walkthrough Hebra Mountains chapter Position x increases east, z increases south, height is up
Show every Korok seed on the interactive map
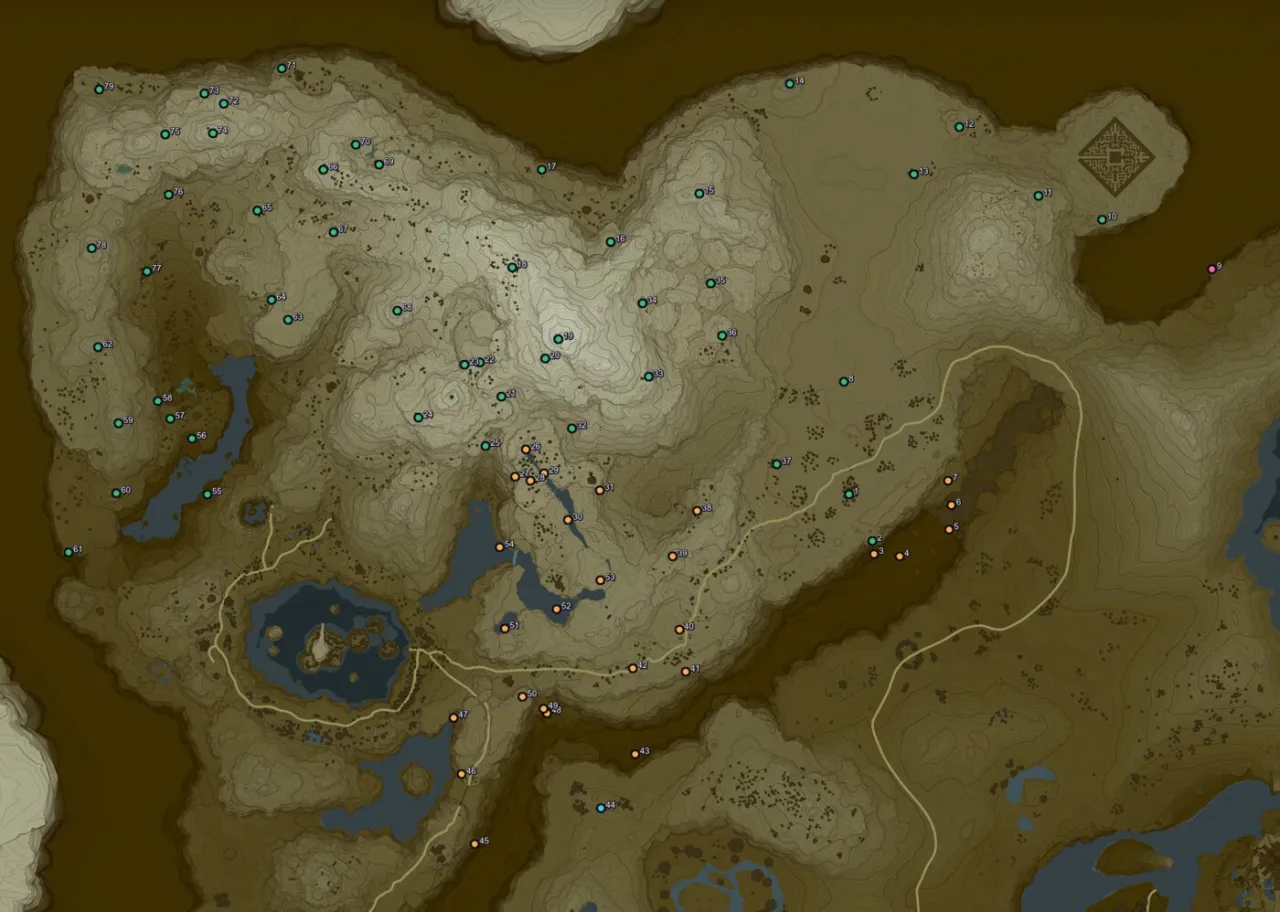
There are 79 Korok Seeds in the Hebra region of Breath of the Wild, the snowy Hebra Mountains in the far north-west. This page numbers them in a collection route that starts at Hebra Tower and always heads for the next closest seed, so you can work through them in order without crossing the map twice. Every seed has its map position (click it to see the spot on the interactive map), its map square, the nearest landmark with a compass direction. If you do not know how to solve a Korok puzzle, the Korok puzzle guide lists every type and its solution.
This interactive map needs JavaScript.
Korok Seeds by area
The game divides the world into named areas. The seeds of Hebra fall into these:
Area Seeds Seed numbers on this page Hebra Mountains 50 1, 2, 8, 10, 11, 12, 13, 14, 15, 16, 17, 18, 19, 20, 21, 22, 23, 24 and 32 more Tabantha Frontier 27 3, 4, 5, 6, 7, 26, 27, 28, 29, 30, 31, 38, 39, 40, 41, 42, 43, 45 and 9 more Hyrule Hills 1 44 Eldin Mountains 1 9
Seeds near landmarks
Towers, shrines, stables and villages make the easiest starting points. These landmarks have the most seeds within 500 map units:
Landmark Type Seeds within 500 units Seed numbers Goma Asaagh Shrine Shrine 15 16, 18, 19, 20, 21, 22, 23, 25, 26, 27, 28, 29, 32, 33, 34 Lanno Kooh Shrine Shrine 14 27, 28, 29, 30, 31, 38, 39, 40, 41, 42, 51, 52, 53, 54 Dunba Taag Shrine Shrine 10 42, 43, 44, 46, 47, 48, 49, 50, 51, 52 Rin Oyaa Shrine Shrine 9 1, 2, 3, 4, 5, 6, 7, 8, 37 Snowfield Stable Stable 9 1, 2, 3, 4, 5, 6, 7, 8, 37 Gee Ha’rah Shrine Shrine 9 29, 30, 31, 32, 37, 38, 39, 40, 53 To Quomo Shrine Shrine 9 65, 66, 71, 72, 73, 74, 75, 76, 79 Shada Naw Shrine Shrine 8 16, 17, 18, 19, 20, 22, 23, 68 Hebra Tower Sheikah Tower 7 37, 38, 39, 40, 41, 42, 53 Rito Stable Stable 7 46, 47, 48, 49, 50, 51, 54 Maka Rah Shrine Shrine 7 55, 56, 57, 58, 59, 60, 62 Rok Uwog Shrine Shrine 6 15, 16, 33, 34, 35, 36 Mozo Shenno Shrine Shrine 6 63, 64, 65, 66, 67, 68 Hia Miu Shrine Shrine 6 72, 73, 74, 75, 76, 79
Seed clusters
Seeds that sit close together are worth collecting in one trip. Each group below has four or more seeds within a short walk of each other.
Group Seeds Centre (x, z) Nearest landmark Seed numbers Group 1 13 -2,885, -2,577 Goma Asaagh Shrine (318 units south)19, 20, 21, 22, 23, 25, 26, 27, 28, 29, 30, 31, 32 Group 2 7 -1,562, -2,249 Snowfield Stable (336 units south)1, 2, 3, 4, 5, 6, 7 Group 3 5 -4,153, -2,558 Maka Rah Shrine (107 units north-west)55, 56, 57, 58, 59 Group 4 5 -4,062, -3,625 To Quomo Shrine (96 units south-west)72, 73, 74, 75, 76
Collection route: all 79 seeds in order
Placement is the game’s own flag: Ground seeds appear on the ground, Air seeds appear off the ground (on a ledge, in a tree or in mid-air), so look up for those. Distances are in map units; a square on the map is 1,000 units wide. The last column is the distance from the previous seed.
Leg 1: seeds 1 to 10
# Map position (x, z, height) Square Area Placement Nearest landmark From previous 1 -1764, -2351, 344 D-2 Hebra Mountains Ground Rin Oyaa Shrine , 208 units south517 units from Hebra Tower 2 -1682, -2185, 353 D-2 Hebra Mountains Air Rin Oyaa Shrine , 372 units south185 units 3 -1676, -2139, 97 D-2 Tabantha Frontier Ground Serenne Stable , 359 units north46 units 4 -1586, -2133, 68 D-2 Tabantha Frontier Ground Serenne Stable , 335 units north90 units 5 -1411, -2225, 1 D-2 Tabantha Frontier Ground Snowfield Stable , 424 units south-east198 units 6 -1403, -2312, 101 D-2 Tabantha Frontier Ground Snowfield Stable , 362 units south-east87 units 7 -1415, -2399, 229 D-2 Tabantha Frontier Air Snowfield Stable , 296 units south-east88 units 8 -1781, -2745, 347 D-2 Hebra Mountains Ground Rin Oyaa Shrine , 200 units north504 units 9 -487, -3143, 232 E-1 Eldin Mountains Air Qaza Tokki Shrine , 515 units south-east1,354 units 10 -873, -3316, 336 E-1 Hebra Mountains Air Qaza Tokki Shrine , 225 units south423 units
Leg 2: seeds 11 to 20
# Map position (x, z, height) Square Area Placement Nearest landmark From previous 11 -1096, -3400, 414 D-1 Hebra Mountains Ground Qaza Tokki Shrine , 306 units south-west238 units 12 -1375, -3641, 362 D-1 Hebra Mountains Ground Sha Gehma Shrine , 320 units east369 units 13 -1535, -3476, 347 D-1 Hebra Mountains Ground Sha Gehma Shrine , 315 units south-east230 units 14 -1971, -3793, 421 D-1 Hebra Mountains Air Sha Gehma Shrine , 301 units west539 units 15 -2290, -3408, 564 C-1 Hebra Mountains Ground Rok Uwog Shrine , 203 units north-east500 units 16 -2602, -3239, 508 C-1 Hebra Mountains Air Rok Uwog Shrine , 225 units west355 units 17 -2843, -3493, 334 C-1 Hebra Mountains Ground Shada Naw Shrine , 314 units north-east350 units 18 -2947, -3147, 687 C-1 Hebra Mountains Air Shada Naw Shrine , 90 units south-east361 units 19 -2784, -2896, 839 C-2 Hebra Mountains Ground Goma Asaagh Shrine , 17 units north-east299 units 20 -2831, -2828, 670 C-2 Hebra Mountains Ground Goma Asaagh Shrine , 66 units south-west83 units
Leg 3: seeds 21 to 30
# Map position (x, z, height) Square Area Placement Nearest landmark From previous 21 -2985, -2694, 559 C-2 Hebra Mountains Air Goma Asaagh Shrine , 269 units south-west204 units 22 -3061, -2814, 535 B-2 Hebra Mountains Ground Goma Asaagh Shrine , 276 units west142 units 23 -3116, -2806, 496 B-2 Hebra Mountains Ground Goma Asaagh Shrine , 332 units west56 units 24 -3277, -2619, 585 B-2 Hebra Mountains Ground Mozo Shenno Shrine , 546 units south-east247 units 25 -3041, -2520, 430 B-2 Hebra Mountains Ground Goma Asaagh Shrine , 439 units south-west256 units 26 -2900, -2509, 499 C-2 Tabantha Frontier Air Goma Asaagh Shrine , 388 units south141 units 27 -2937, -2412, 471 C-2 Tabantha Frontier Ground Lanno Kooh Shrine , 462 units north-west104 units 28 -2884, -2398, 521 C-2 Tabantha Frontier Air Lanno Kooh Shrine , 418 units north-west55 units 29 -2836, -2424, 502 C-2 Tabantha Frontier Air Lanno Kooh Shrine , 414 units north-west55 units 30 -2751, -2259, 459 C-2 Tabantha Frontier Ground Lanno Kooh Shrine , 228 units north-west186 units
Leg 4: seeds 31 to 40
# Map position (x, z, height) Square Area Placement Nearest landmark From previous 31 -2639, -2364, 410 C-2 Tabantha Frontier Ground Gee Ha’rah Shrine , 280 units north-west154 units 32 -2736, -2583, 457 C-2 Hebra Mountains Air Goma Asaagh Shrine , 304 units south240 units 33 -2468, -2765, 621 C-2 Hebra Mountains Ground Goma Asaagh Shrine , 346 units east324 units 34 -2488, -3022, 514 C-1 Hebra Mountains Ground Rok Uwog Shrine , 231 units south-west258 units 35 -2250, -3092, 447 C-1 Hebra Mountains Air Rok Uwog Shrine , 184 units south-east248 units 36 -2210, -2909, 499 C-2 Hebra Mountains Ground Rok Uwog Shrine , 357 units south-east187 units 37 -2016, -2456, 348 C-2 Hebra Mountains Ground Rin Oyaa Shrine , 312 units west493 units 38 -2297, -2293, 425 C-2 Tabantha Frontier Ground Gee Ha’rah Shrine , 91 units north-east325 units 39 -2383, -2133, 499 C-2 Tabantha Frontier Ground Gee Ha’rah Shrine , 122 units south182 units 40 -2359, -1873, 385 C-3 Tabantha Frontier Air Hebra Tower , 246 units south-west261 units
Leg 5: seeds 41 to 50
# Map position (x, z, height) Square Area Placement Nearest landmark From previous 41 -2338, -1727, 369 C-3 Tabantha Frontier Ground Hebra Tower , 349 units south-west148 units 42 -2523, -1737, 365 C-3 Tabantha Frontier Ground Lanno Kooh Shrine , 344 units south185 units 43 -2516, -1436, 62 C-3 Tabantha Frontier Air Dunba Taag Shrine , 346 units south-east301 units 44 -2636, -1247, 301 C-3 Hyrule Hills Air Dunba Taag Shrine , 384 units south-east224 units 45 -3078, -1120, 208 B-3 Tabantha Frontier Ground Dunba Taag Shrine , 519 units south-west460 units 46 -3125, -1367, 263 B-3 Tabantha Frontier Ground Dunba Taag Shrine , 361 units south-west251 units 47 -3152, -1563, 186 B-3 Tabantha Frontier Air Rito Stable , 220 units south-east198 units 48 -2826, -1580, 193 C-3 Tabantha Frontier Air Dunba Taag Shrine , 7 units north-east326 units 49 -2837, -1595, 349 C-3 Tabantha Frontier Air Dunba Taag Shrine , 19 units north19 units 50 -2910, -1639, 382 C-3 Tabantha Frontier Air Dunba Taag Shrine , 99 units north-west85 units
Leg 6: seeds 51 to 60
# Map position (x, z, height) Square Area Placement Nearest landmark From previous 51 -2973, -1878, 377 C-3 Tabantha Frontier Air Rito Stable , 307 units north-east247 units 52 -2791, -1946, 398 C-3 Tabantha Frontier Air Lanno Kooh Shrine , 193 units south-west194 units 53 -2637, -2048, 445 C-2 Tabantha Frontier Ground Lanno Kooh Shrine , 13 units south185 units 54 -2990, -2165, 223 C-2 Tabantha Frontier Air Lanno Kooh Shrine , 368 units west372 units 55 -4020, -2350, 131 A-2 Hebra Mountains Ground Maka Rah Shrine , 163 units south1,046 units 56 -4072, -2546, 131 A-2 Hebra Mountains Ground Maka Rah Shrine , 40 units north203 units 57 -4149, -2616, 216 A-2 Hebra Mountains Ground Maka Rah Shrine , 140 units north-west104 units 58 -4193, -2679, 288 A-2 Hebra Mountains Ground Maka Rah Shrine , 217 units north-west77 units 59 -4331, -2600, 442 A-2 Hebra Mountains Ground Maka Rah Shrine , 287 units west159 units 60 -4340, -2354, 302 A-2 Hebra Mountains Ground Maka Rah Shrine , 321 units south-west246 units
Leg 7: seeds 61 to 70
# Map position (x, z, height) Square Area Placement Nearest landmark From previous 61 -4507, -2146, 226 A-2 Hebra Mountains Air Maka Rah Shrine , 576 units south-west267 units 62 -4403, -2867, 415 A-2 Hebra Mountains Ground Maka Rah Shrine , 497 units north-west728 units 63 -3735, -2964, 447 B-2 Hebra Mountains Ground Mozo Shenno Shrine , 131 units south-west675 units 64 -3794, -3033, 353 B-1 Hebra Mountains Ground Mozo Shenno Shrine , 167 units west91 units 65 -3843, -3348, 435 B-1 Hebra Mountains Air Mozo Shenno Shrine , 378 units north-west319 units 66 -3611, -3492, 562 B-1 Hebra Mountains Ground Mozo Shenno Shrine , 454 units north273 units 67 -3575, -3272, 494 B-1 Hebra Mountains Air Mozo Shenno Shrine , 239 units north223 units 68 -3351, -2995, 622 B-2 Hebra Mountains Air Mozo Shenno Shrine , 279 units east356 units 69 -3415, -3510, 542 B-1 Hebra Mountains Air Shada Naw Shrine , 507 units north-west519 units 70 -3496, -3581, 474 B-1 Hebra Mountains Ground To Quomo Shrine , 542 units east108 units
Leg 8: seeds 71 to 79
# Map position (x, z, height) Square Area Placement Nearest landmark From previous 71 -3757, -3848, 375 B-1 Hebra Mountains Ground To Quomo Shrine , 298 units north-east373 units 72 -3960, -3723, 351 A-1 Hebra Mountains Ground To Quomo Shrine , 63 units east238 units 73 -4029, -3760, 465 A-1 Hebra Mountains Ground To Quomo Shrine , 49 units north78 units 74 -3999, -3620, 633 A-1 Hebra Mountains — To Quomo Shrine , 95 units south143 units 75 -4167, -3616, 517 A-1 Hebra Mountains Air To Quomo Shrine , 174 units south-west168 units 76 -4156, -3404, 350 A-1 Hebra Mountains Ground To Quomo Shrine , 336 units south-west212 units 77 -4231, -3135, 285 A-1 Hebra Mountains Ground Mozo Shenno Shrine , 612 units west279 units 78 -4424, -3216, 497 A-1 Hebra Mountains Ground Hia Miu Shrine , 587 units south209 units 79 -4398, -3774, 332 A-1 Hebra Mountains — Hia Miu Shrine , 56 units south-east559 units
More help






















 Goma Asaagh Shrine