
























| Region | Gerudo Wasteland, the Gerudo Desert and the land around Gerudo Town |
|---|---|
| Korok Seeds | 64 (46 on the ground, 18 off the ground) |
| Areas | Gerudo Highlands (36), Gerudo Desert (28) |
| Start of the route | Wasteland Tower |
| Route length | about 18,539 map units in 7 legs of up to 10 seeds |
| Walkthrough | Vah Naboris and the Gerudo Desert chapter, Gerudo Town chapter |
Show every Korok seed on the interactive map
There are 64 Korok Seeds in the Gerudo Wasteland region of Breath of the Wild, the Gerudo Desert and the land around Gerudo Town. This page numbers them in a collection route that starts at Wasteland Tower and always heads for the next closest seed, so you can work through them in order without crossing the map twice. Every seed has a link to its spot on the interactive map, the nearest landmark with a compass direction. If you do not know how to solve a Korok puzzle, the Korok puzzle guide lists every type and its solution.
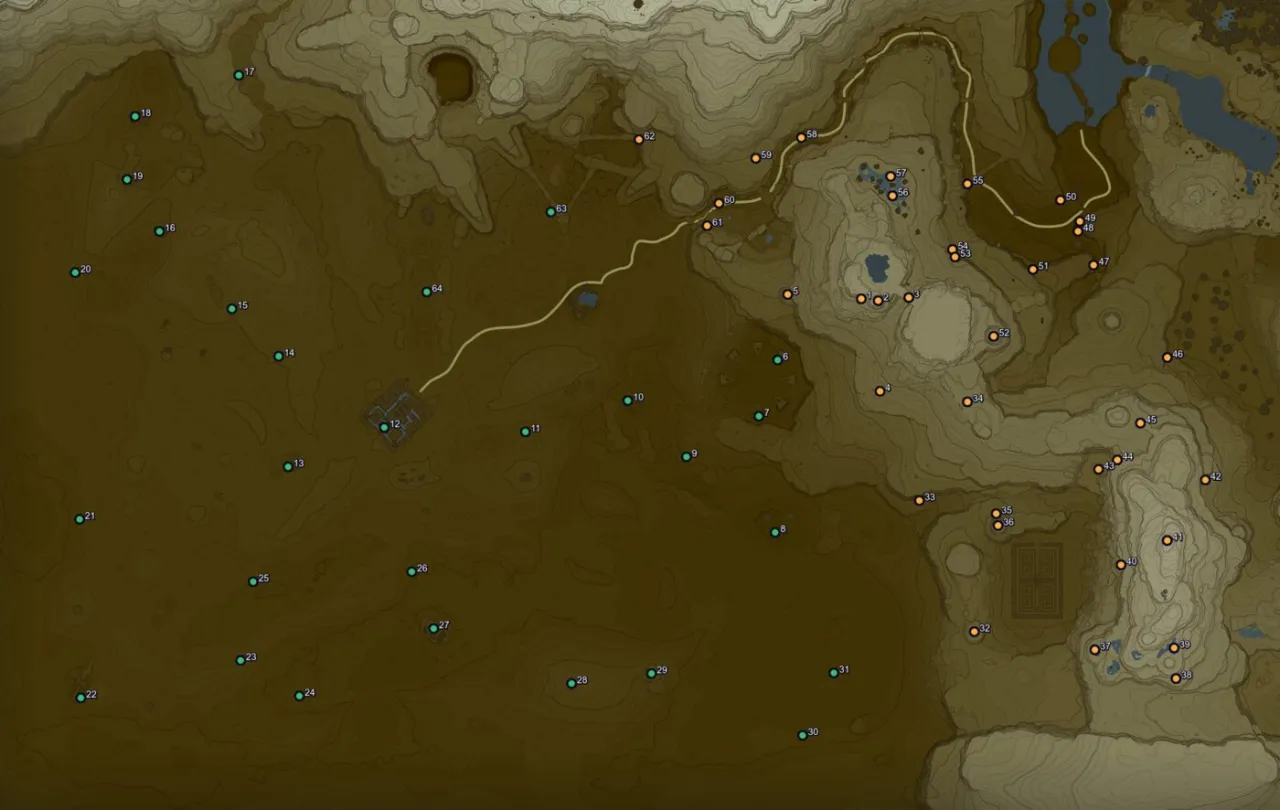
Table of Contents
Korok Seeds by area
The game divides the world into named areas. The seeds of Gerudo Wasteland fall into these:
| Area | Seeds | Seed numbers on this page |
|---|---|---|
| Gerudo Highlands | 36 | 1, 2, 3, 4, 5, 32, 33, 34, 35, 36, 37, 38, 39, 40, 41, 42, 43, 44 and 18 more |
| Gerudo Desert | 28 | 6, 7, 8, 9, 10, 11, 12, 13, 14, 15, 16, 17, 18, 19, 20, 21, 22, 23 and 10 more |
Seeds near landmarks
Towers, shrines, stables and villages make the easiest starting points. These landmarks have the most seeds within 500 map units:
| Landmark | Type | Seeds within 500 units | Seed numbers |
|---|---|---|---|
| Wasteland Tower | Sheikah Tower | 14 | 1, 2, 3, 4, 5, 6, 51, 52, 53, 54, 55, 56, 57, 58 |
 Dila Maag Shrine | Shrine | 10 | 32, 33, 35, 36, 37, 39, 40, 41, 43, 44 |
| Jee Noh Shrine | Shrine | 10 | 3, 47, 48, 49, 50, 51, 52, 53, 54, 55 |
| Suma Sahma Shrine | Shrine | 9 | 37, 38, 39, 40, 41, 42, 43, 44, 45 |
| Korsh O’hu Shrine | Shrine | 9 | 1, 2, 4, 5, 6, 7, 8, 9, 10 |
| Kay Noh Shrine | Shrine | 7 | 5, 6, 58, 59, 60, 61, 62 |
| Gerudo Canyon Stable | Stable | 6 | 5, 58, 59, 60, 61, 62 |
| Raqa Zunzo Shrine | Shrine | 5 | 11, 12, 13, 26, 27 |
| Daqo Chisay Shrine | Shrine | 5 | 11, 12, 13, 14, 64 |
| Gerudo Town | Village | 5 | 11, 12, 13, 14, 64 |
| Keh Namut Shrine | Shrine | 4 | 47, 48, 49, 50 |
| Tho Kayu Shrine | Shrine | 4 | 15, 16, 20, 21 |
| Kema Zoos Shrine | Shrine | 4 | 16, 17, 18, 19 |
| Ishto Soh Shrine | Shrine | 3 | 38, 39, 41 |
Seed clusters
Seeds that sit close together are worth collecting in one trip. Each group below has four or more seeds within a short walk of each other.
| Group | Seeds | Map | Nearest landmark | Seed numbers |
|---|---|---|---|---|
| Group 1 | 6 | Show on map | Wasteland Tower (137 units east) | 1, 2, 3, 53, 54, 55 |
| Group 2 | 5 | Show on map | Jee Noh Shrine (118 units north-east) | 47, 48, 49, 50, 51 |
| Group 3 | 4 | Show on map | Gerudo Canyon Stable (89 units north-east) | 58, 59, 60, 61 |
Collection route: all 64 seeds in order
Placement is the game’s own flag: Ground seeds appear on the ground, Air seeds appear off the ground (on a ledge, in a tree or in mid-air), so look up for those. Distances are in map units; a square on the map is 1,000 units wide. The last column is the distance from the previous seed.
Leg 1: seeds 1 to 10
| # | Map | Area | Placement | Nearest landmark | From previous |
|---|---|---|---|---|---|
| 1 | Show on map | Gerudo Highlands | Ground | Wasteland Tower, 129 units south-west | 129 units from Wasteland Tower |
| 2 | Show on map | Gerudo Highlands | Ground | Wasteland Tower, 124 units south | 54 units |
| 3 | Show on map | Gerudo Highlands | Air | Wasteland Tower, 151 units south-east | 98 units |
| 4 | Show on map | Gerudo Highlands | Ground | Korsh O’hu Shrine, 392 units east | 313 units |
| 5 | Show on map | Gerudo Highlands | Ground | Korsh O’hu Shrine, 288 units north | 429 units |
| 6 | Show on map | Gerudo Desert | Air | Korsh O’hu Shrine, 86 units north-east | 214 units |
| 7 | Show on map | Gerudo Desert | Ground | Korsh O’hu Shrine, 118 units south | 188 units |
| 8 | Show on map | Gerudo Desert | Ground | Korsh O’hu Shrine, 494 units south | 376 units |
| 9 | Show on map | Gerudo Desert | Ground | Korsh O’hu Shrine, 339 units south-west | 372 units |
| 10 | Show on map | Gerudo Desert | Ground | Korsh O’hu Shrine, 423 units west | 260 units |
Leg 2: seeds 11 to 20
| # | Map | Area | Placement | Nearest landmark | From previous |
|---|---|---|---|---|---|
| 11 | Show on map | Gerudo Desert | Ground | Raqa Zunzo Shrine, 402 units east | 343 units |
| 12 | Show on map | Gerudo Desert | Air | Gerudo Town, 72 units south-west | 451 units |
| 13 | Show on map | Gerudo Desert | Ground | Raqa Zunzo Shrine, 388 units west | 335 units |
| 14 | Show on map | Gerudo Desert | Ground | Daqo Chisay Shrine, 417 units west | 355 units |
| 15 | Show on map | Gerudo Desert | Air | Tho Kayu Shrine, 475 units north-east | 212 units |
| 16 | Show on map | Gerudo Desert | Air | Kema Zoos Shrine, 376 units south | 341 units |
| 17 | Show on map | Gerudo Desert | Ground | Kema Zoos Shrine, 346 units east | 561 units |
| 18 | Show on map | Gerudo Desert | Ground | Kema Zoos Shrine, 12 units west | 357 units |
| 19 | Show on map | Gerudo Desert | Air | Kema Zoos Shrine, 206 units south | 204 units |
| 20 | Show on map | Gerudo Desert | Ground | Tho Kayu Shrine, 339 units north | 342 units |
Leg 3: seeds 21 to 30
| # | Map | Area | Placement | Nearest landmark | From previous |
|---|---|---|---|---|---|
| 21 | Show on map | Gerudo Desert | Ground | Tho Kayu Shrine, 465 units south | 791 units |
| 22 | Show on map | Gerudo Desert | Air | Hawa Koth Shrine, 61 units south | 572 units |
| 23 | Show on map | Gerudo Desert | Ground | Hawa Koth Shrine, 503 units east | 525 units |
| 24 | Show on map | Gerudo Desert | Ground | Hawa Koth Shrine, 689 units east | 219 units |
| 25 | Show on map | Gerudo Desert | Ground | Raqa Zunzo Shrine, 600 units south-west | 395 units |
| 26 | Show on map | Gerudo Desert | Ground | Raqa Zunzo Shrine, 302 units south | 509 units |
| 27 | Show on map | Gerudo Desert | Air | Raqa Zunzo Shrine, 490 units south | 194 units |
| 28 | Show on map | Gerudo Desert | Ground | Misae Suma Shrine, 316 units west | 477 units |
| 29 | Show on map | Gerudo Desert | Ground | Misae Suma Shrine, 67 units west | 256 units |
| 30 | Show on map | Gerudo Desert | Ground | Misae Suma Shrine, 456 units east | 523 units |
Leg 4: seeds 31 to 40
| # | Map | Area | Placement | Nearest landmark | From previous |
|---|---|---|---|---|---|
| 31 | Show on map | Gerudo Desert | Air | Misae Suma Shrine, 523 units east | 223 units |
| 32 | Show on map | Gerudo Highlands | Air | Dila Maag Shrine, 255 units south-west | 470 units |
| 33 | Show on map | Gerudo Highlands | Ground | Dila Maag Shrine, 461 units north-west | 455 units |
| 34 | Show on map | Gerudo Highlands | Ground | Jee Noh Shrine, 514 units south-west | 351 units |
| 35 | Show on map | Gerudo Highlands | Ground | Dila Maag Shrine, 258 units north-west | 370 units |
| 36 | Show on map | Gerudo Highlands | Ground | Dila Maag Shrine, 224 units north-west | 38 units |
| 37 | Show on map | Gerudo Highlands | Ground | Dila Maag Shrine, 281 units south-east | 504 units |
| 38 | Show on map | Gerudo Highlands | Ground | Suma Sahma Shrine, 329 units south | 277 units |
| 39 | Show on map | Gerudo Highlands | Ground | Suma Sahma Shrine, 231 units south | 99 units |
| 40 | Show on map | Gerudo Highlands | Ground | Suma Sahma Shrine, 117 units west | 316 units |
Leg 5: seeds 41 to 50
| # | Map | Area | Placement | Nearest landmark | From previous |
|---|---|---|---|---|---|
| 41 | Show on map | Gerudo Highlands | Ground | Suma Sahma Shrine, 127 units north | 167 units |
| 42 | Show on map | Gerudo Highlands | Ground | Suma Sahma Shrine, 354 units north-east | 229 units |
| 43 | Show on map | Gerudo Highlands | Ground | Suma Sahma Shrine, 393 units north-west | 344 units |
| 44 | Show on map | Gerudo Highlands | Ground | Suma Sahma Shrine, 398 units north | 67 units |
| 45 | Show on map | Gerudo Highlands | Ground | Suma Sahma Shrine, 499 units north | 138 units |
| 46 | Show on map | Gerudo Highlands | Ground | Jee Noh Shrine, 523 units south-east | 227 units |
| 47 | Show on map | Gerudo Highlands | Air | Jee Noh Shrine, 179 units east | 379 units |
| 48 | Show on map | Gerudo Highlands | Air | Jee Noh Shrine, 153 units north-east | 120 units |
| 49 | Show on map | Gerudo Highlands | Air | Jee Noh Shrine, 177 units north-east | 32 units |
| 50 | Show on map | Gerudo Highlands | Air | Jee Noh Shrine, 198 units north | 93 units |
Leg 6: seeds 51 to 60
| # | Map | Area | Placement | Nearest landmark | From previous |
|---|---|---|---|---|---|
| 51 | Show on map | Gerudo Highlands | Ground | Jee Noh Shrine, 41 units south-west | 239 units |
| 52 | Show on map | Gerudo Highlands | Ground | Jee Noh Shrine, 289 units south-west | 248 units |
| 53 | Show on map | Gerudo Highlands | Ground | Wasteland Tower, 247 units east | 283 units |
| 54 | Show on map | Gerudo Highlands | Air | Wasteland Tower, 243 units east | 24 units |
| 55 | Show on map | Gerudo Highlands | Ground | Jee Noh Shrine, 326 units north-west | 215 units |
| 56 | Show on map | Gerudo Highlands | Ground | Wasteland Tower, 217 units north | 244 units |
| 57 | Show on map | Gerudo Highlands | Ground | Wasteland Tower, 277 units north | 62 units |
| 58 | Show on map | Gerudo Highlands | Air | Gerudo Canyon Stable, 316 units north-east | 311 units |
| 59 | Show on map | Gerudo Highlands | Air | Gerudo Canyon Stable, 161 units north-east | 162 units |
| 60 | Show on map | Gerudo Highlands | Ground | Gerudo Canyon Stable, 25 units south-west | 185 units |
Leg 7: seeds 61 to 64
| # | Map | Area | Placement | Nearest landmark | From previous |
|---|---|---|---|---|---|
| 61 | Show on map | Gerudo Highlands | Ground | Kay Noh Shrine, 47 units south-west | 81 units |
| 62 | Show on map | Gerudo Highlands | Ground | Dako Tah Shrine, 273 units north-east | 351 units |
| 63 | Show on map | Gerudo Desert | Ground | Dako Tah Shrine, 119 units south | 365 units |
| 64 | Show on map | Gerudo Desert | Air | Daqo Chisay Shrine, 294 units north | 474 units |
More help
- All 900 Korok Seeds, Hestu‘s rewards and the full region list
- Korok puzzle types and how to solve each one
- The Vah Naboris and the Gerudo Desert walkthrough chapter, which solves many of this region’s Koroks along the route
- The Gerudo Town walkthrough chapter, which solves many of this region’s Koroks along the route
- Interactive map of every Korok Seed
